Tooth Proportion Aesthetic Ratio

January 28, 2019 Lee Ann Brady DMD

One of the challenges of aesthetic dentistry is setting clear expectations for patients. The more we can use visual tools over words the easier this becomes.

Over the years I have found that looking at photos with patients, both of their teeth and of the teeth of other people whose smiles demonstrate the principles I am explaining has made patient understanding much more successful. I always ask permission to show a patient the photos of their teeth as I find sometimes they are shocked by what they see. The photos can also be used to show them the changes being proposed. Drawing shapes and lines on the images communicates the information without the risk of setting unattainable expectations, which I fear using photoshop might.

The Third Aesthetic Zone Ration

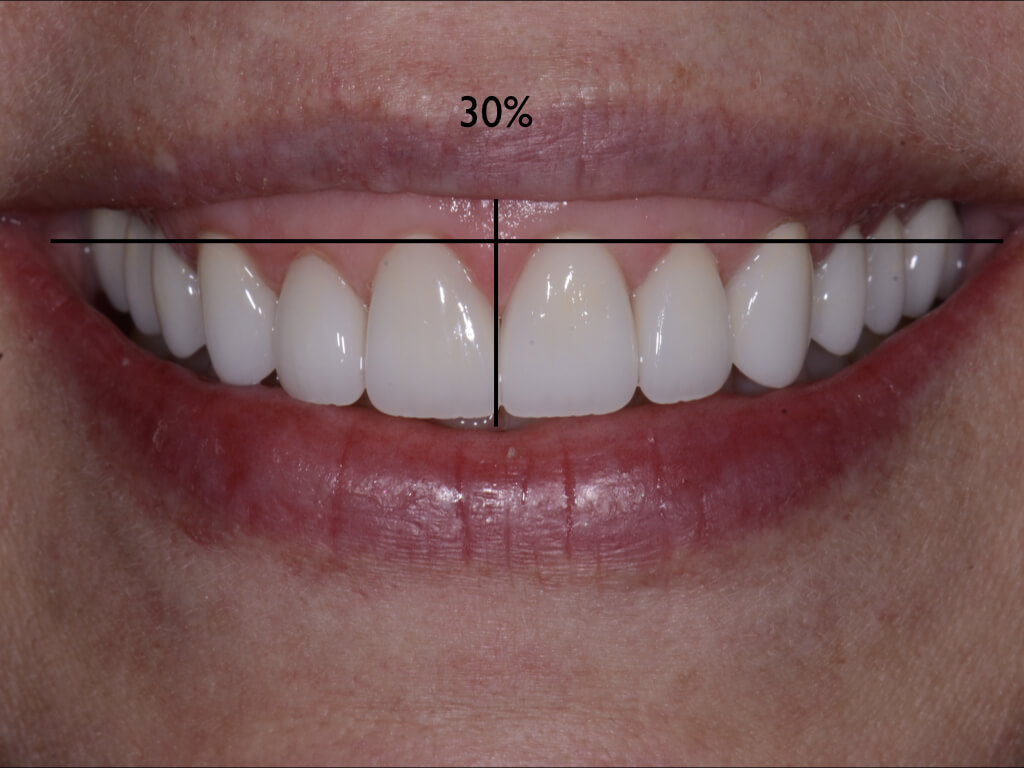
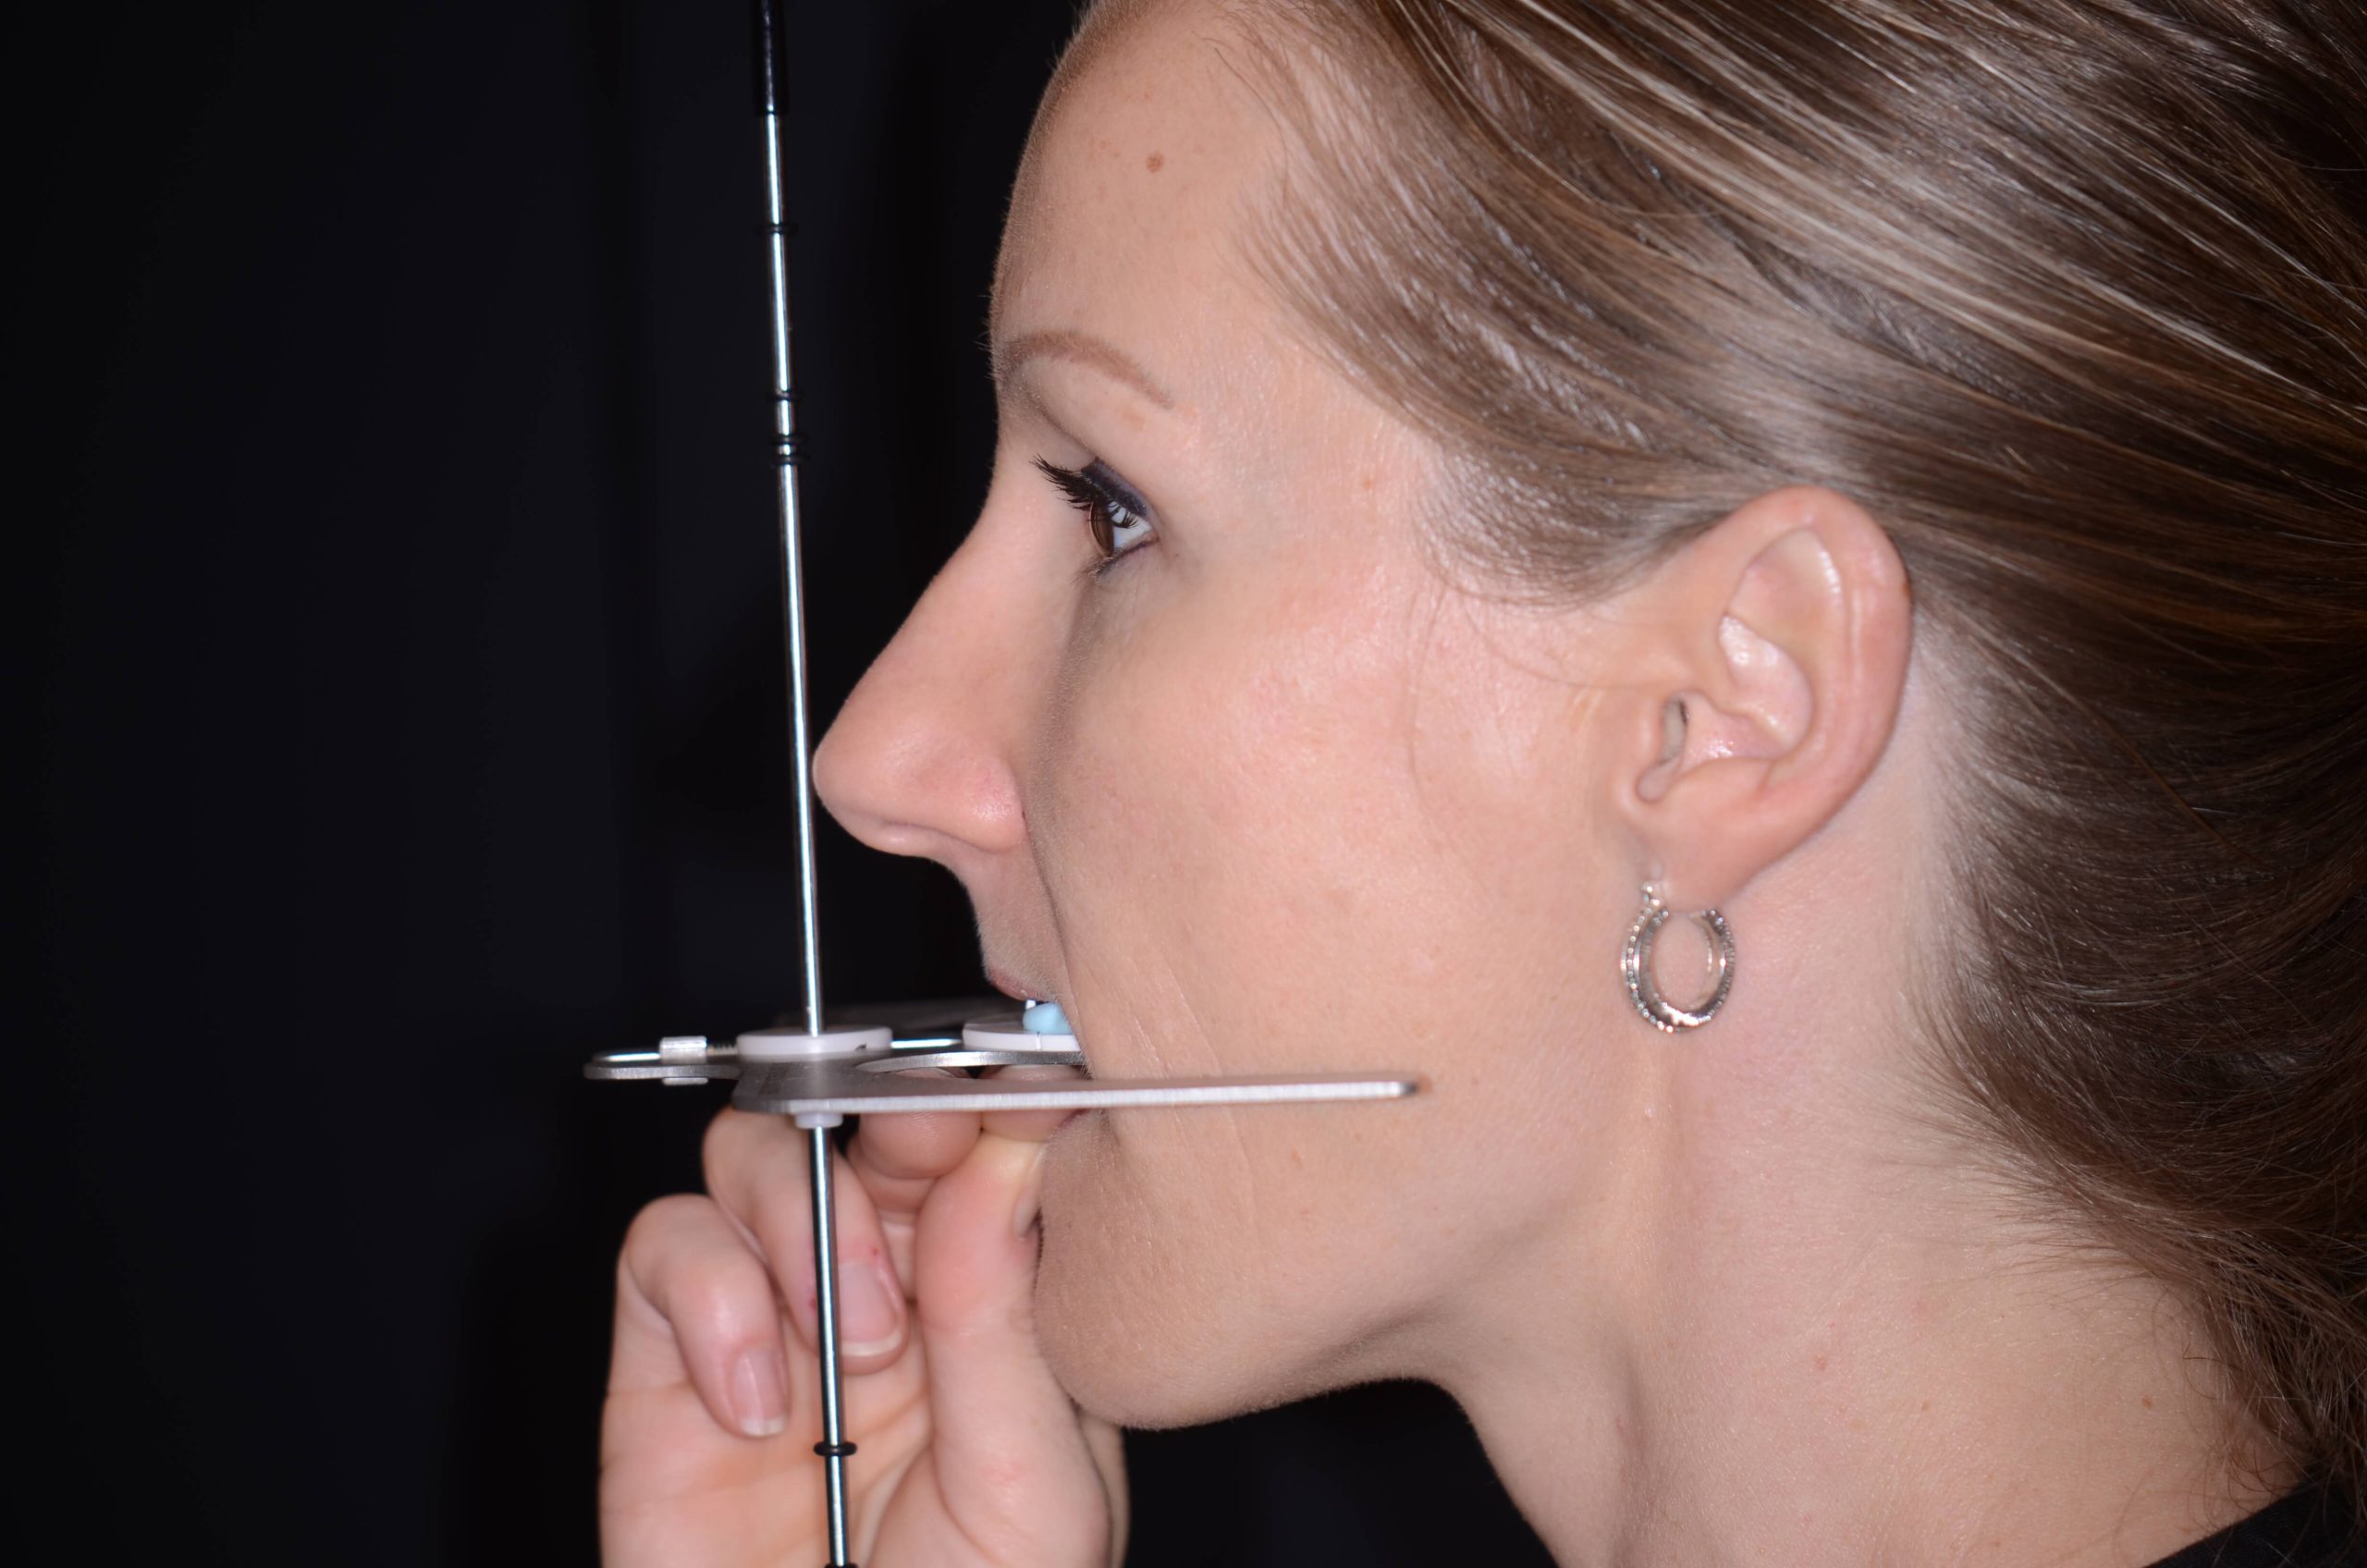
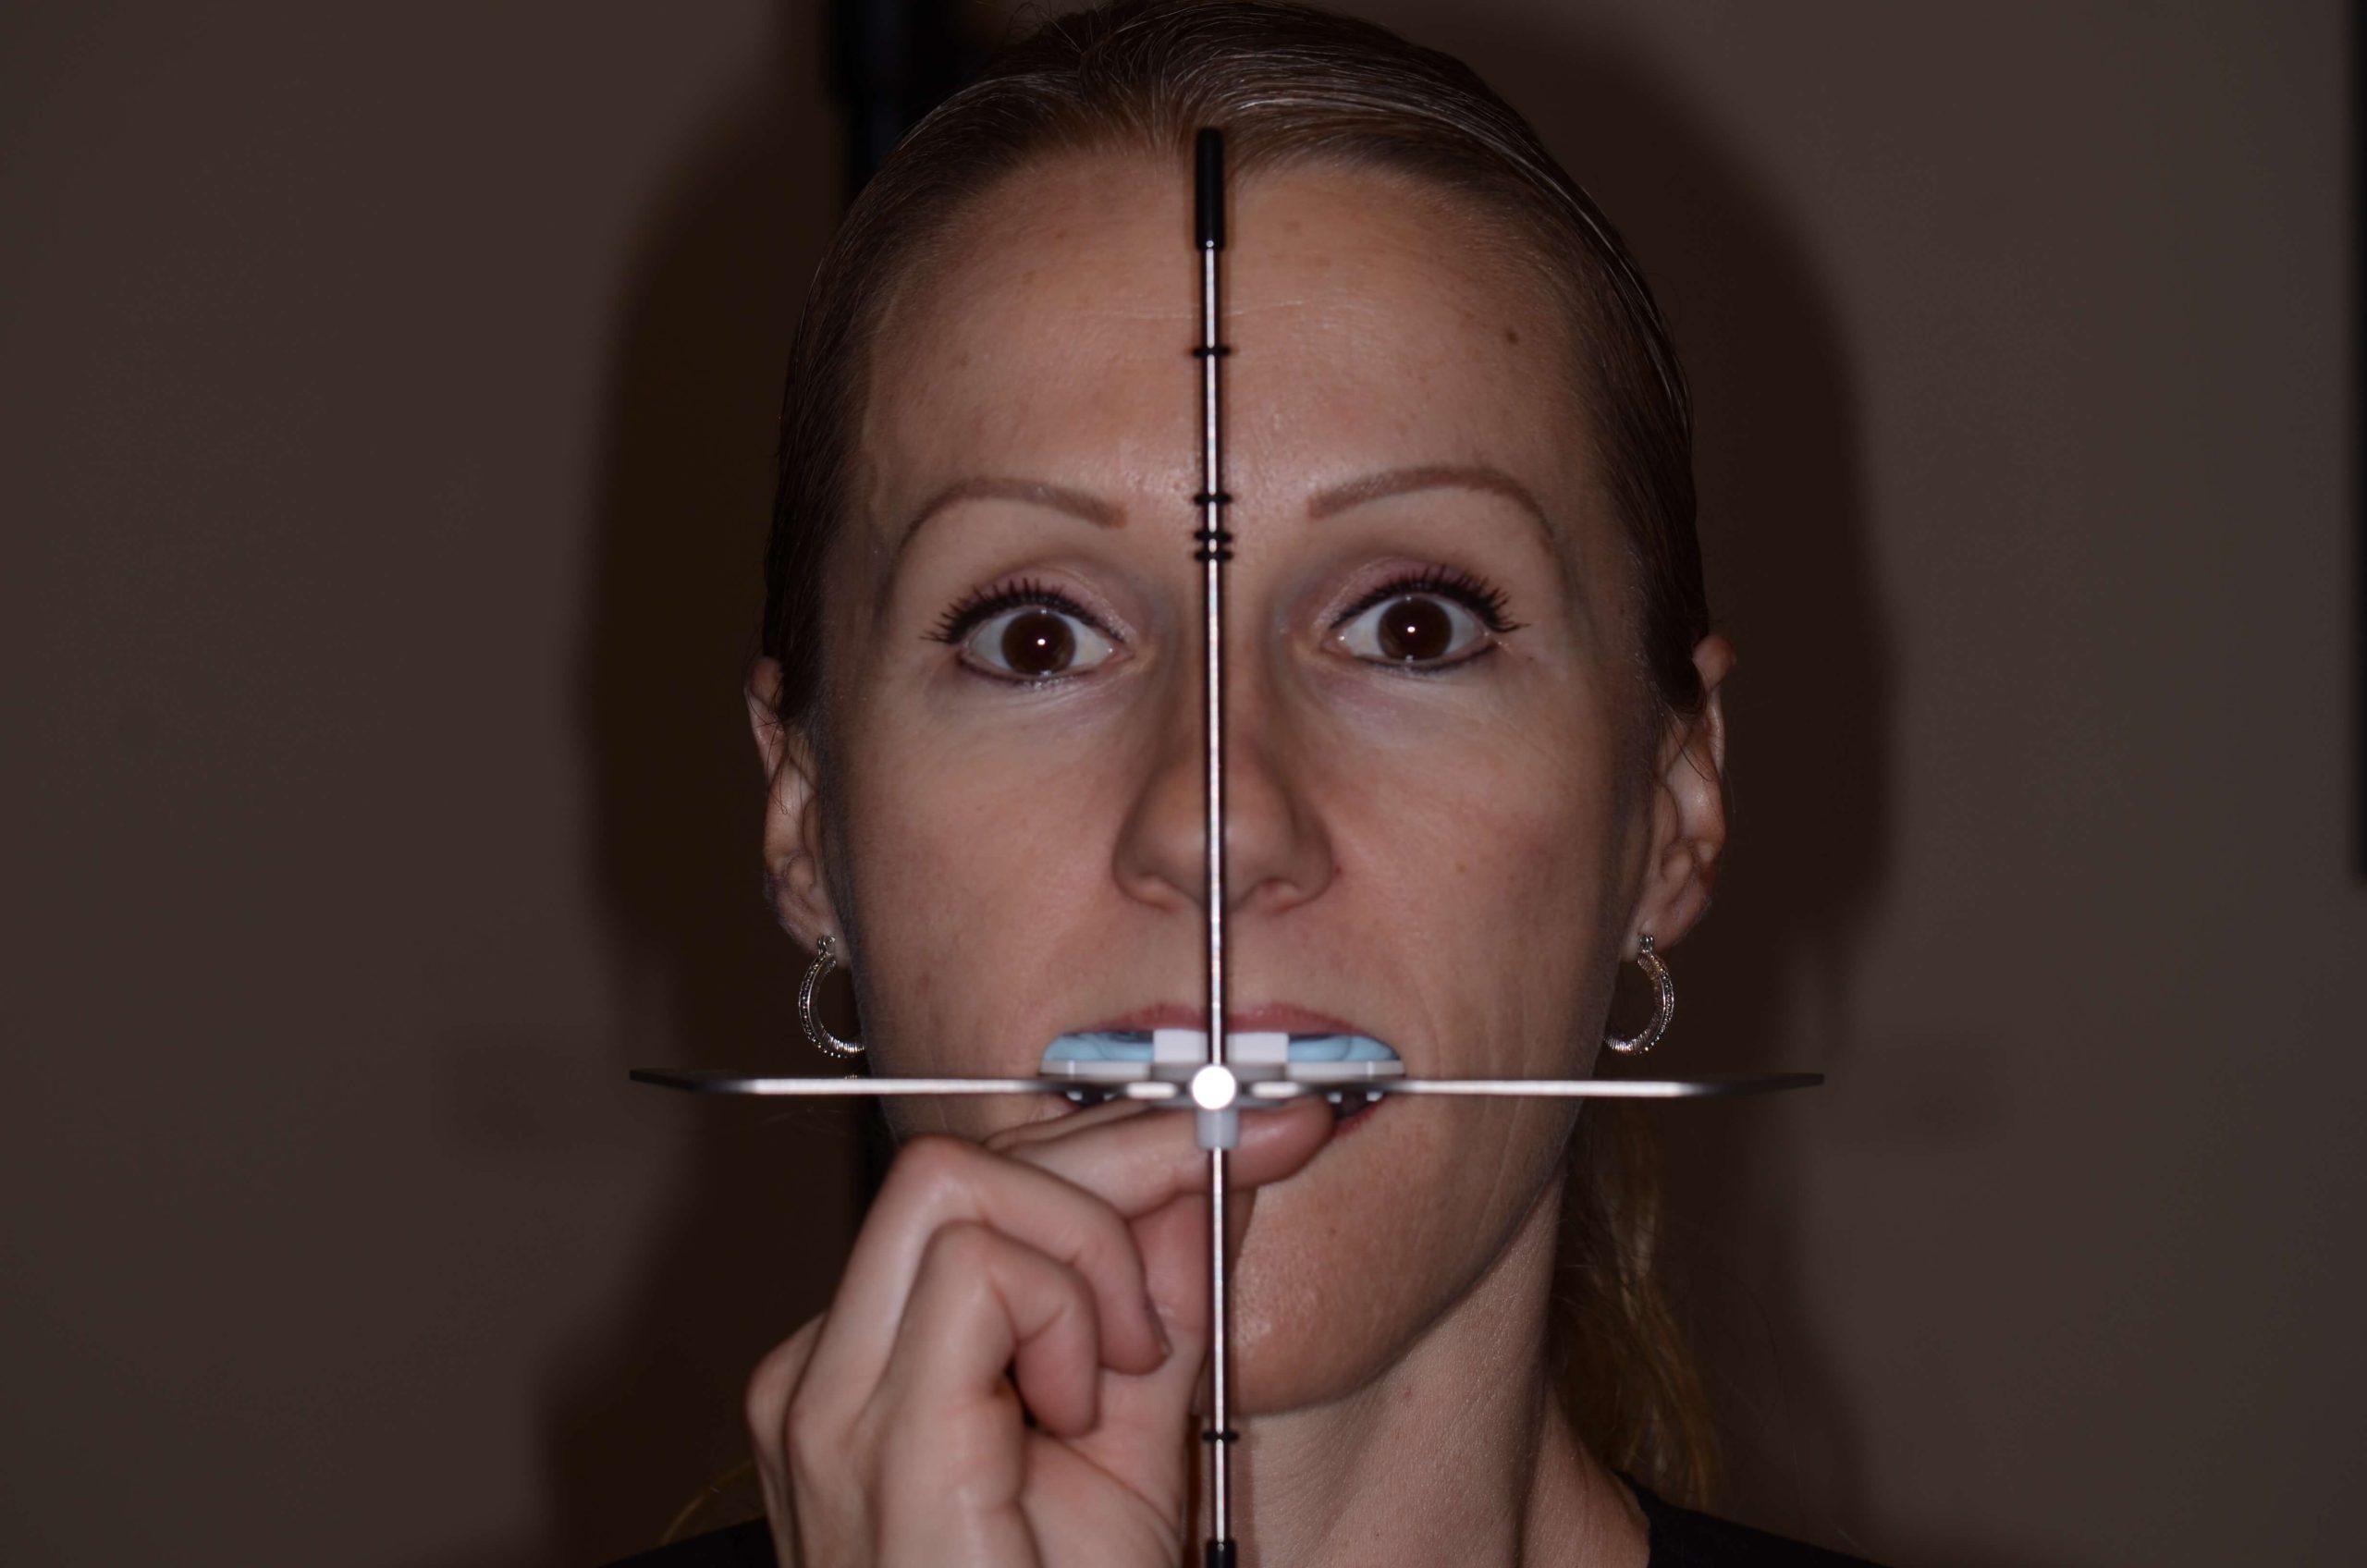
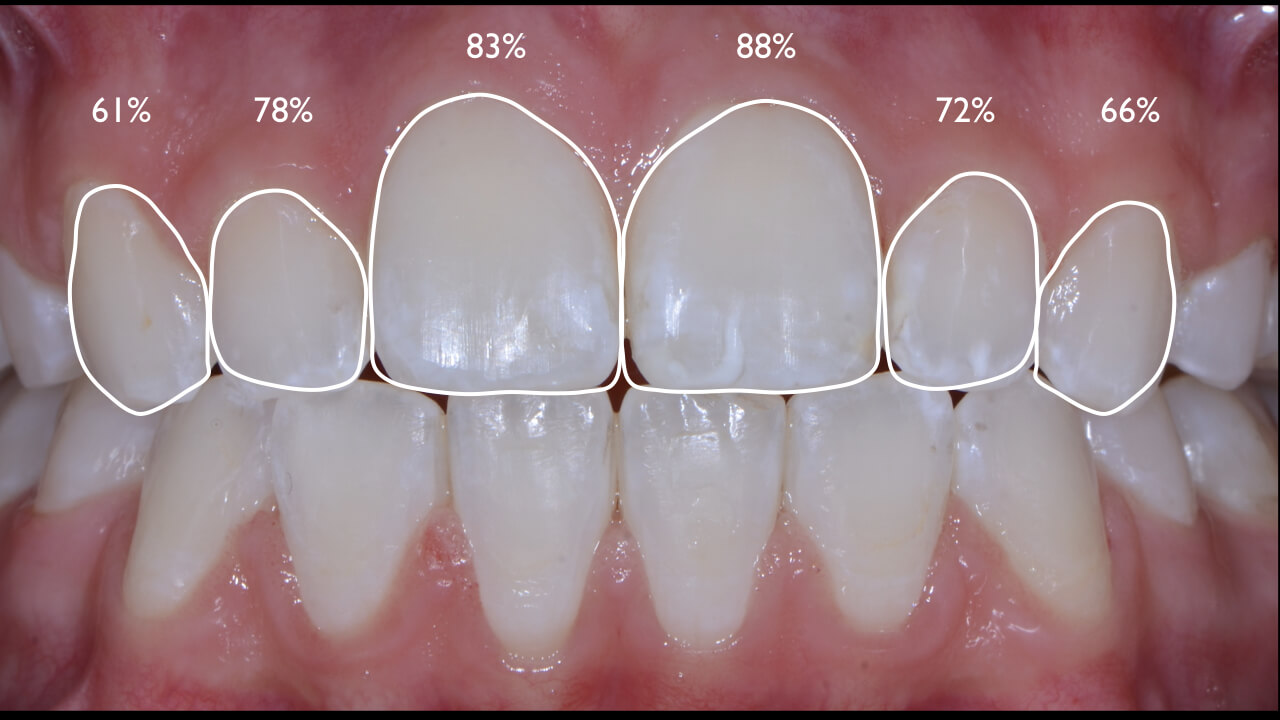
The next of the esthetic zone ratios looks at tooth proportion. Upper anterior teeth look their most esthetic when the ratio comparing width to length is between 70-80%. This proportion can be measured on a computer screen in pixels using programs like Keynote or Powerpoint.  Insert the image into a slide and trace the outline of the tooth with the freehand shape tool. Once the shape is complete click on it and hold your mouse curser over the corner. The pixels for width and length will apear and you can calculate the ratio. It is also easy to figure out this ratio by measuring on a stone model with digital calipers, or from a printed image using a ruler.

(Width/Length) * 100= Tooth Proportion Ratio

What the Ratio Means

Teeth with a ratio of less than 70% appear too tall and narrow. If it is greater then 80% the tooth appears too short and wide. If the tooth has a width to length ratio that is less than 70% or greater than 80% and we are going to treatment plan changing it we have to determine where we make the length adjustments at the incisal edge or the free gingival margin. The fist step is to determine the correct position of the incisal edge in the face using a lips at repose or rest photo. From the proposed incisal edge position we can then determine the proper position of the free gingival margin using this ration.

Some simple math can be very helpful when determining the appropriate length to correct this ratio.

  • 70%= width times 1.43
  • 75%=width times 1.33
  • 80%=width times 1.25

Related Course

Today’s Top Clinical Tips: 2024

DATE: October 18 2024 @ 12:00 pm - October 18 2024 @ 4:00 pm

Location: Online

CE HOURS: 4

Today’s Top Clinical Tips: 2024 Dentistry is changing at a rapid pace. Being successful and efficient is about staying on top of the newest trends and clinical tips. In this…

Learn More>

About Author

User Image
Lee Ann Brady DMD

Dr. Lee Ann Brady is passionate about dentistry, her family and making a difference. She is a general dentist and owns a practice in Glendale, AZ limited to restorative dentistry. Lee’s passion for dental education began as a CE junkie herself, pursuing lots of advanced continuing education focused on Restorative and Occlusion. In 2005, she became a full time resident faculty member for The Pankey Institute, and was promoted to Clinical Director in 2006. Lee joined Spear Education as Executive VP of Education in the fall of 2008 to teach and coordinate the educational curriculum. In June of 2011, she left Spear Education, founded leeannbrady.com and joined the dental practice she now owns as an associate. Today, she teaches at dental meetings and study clubs both nationally and internationally, continues to write for dental journals and her website, sits on the editorial board of the Journal of Cosmetic Dentistry, Inside Dentistry and DentalTown Magazines and is the Director of Education for The Pankey Institute.

FIND A PANKEY DENTIST OR TECHNICIAN

I AM A
I AM INTERESTED IN

VIEW COURSE CALENDAR

Anterior Segment Aesthetic Ratio

January 21, 2019 Lee Ann Brady DMD

Aesthetic Zone ratios is one of many ways to evaluate the appearance of a patients smile, and also to plan for changes that will improve overall aesthetics.

In the last article on using aesthetic zone ratios we looked at comparing the width to the height. This ratio allows us to gather data and diagnose issues like vertical maxillary excess and hypermobile lip that cause this ratio to be larger than normal.

Anterior Segment Ratio

The next of the four ratios compares the width of the total esthetic zone, all of the teeth visible between the commissures at a full smile, and the width of just the anterior segment, between the distal of the canines. The first thing to do is measure the two distances. This can be done in pixels by inserting a line over a full smile photo, or measured with a mm ruler on a printed photograph. Make sure your line is placed at the inside of the soft tissue near the commissures. The relationship to real width is irrelevant as we are going to use a ratio. We then divide the width of the anterior segment by the width of the esthetic zone and multiply by 100.

Arch Width Ratio= (Anterior Segment Width/ Esthetic Zone width) x 100

Smiles that are rated as attractive have an anterior segment width ratio between 59-75%, and the average ratio is 66%. The percentages do not have a gender or age bias which makes relying on these numbers easy. If the ration is too small or too large I start to wonder about arch space issues. Often with patients with a large midline diastema you will see this ratio be larger than 75%. In these cases or cases with inadequate space I want to make sure we use wax-ups and mock-ups to ascertain that we can meet the patients aesthetic demands without the addition of ortho to the treatment plan.

Related Course

Pankey Scholar 14B

DATE: August 15 2024 @ 6:00 pm - August 17 2024 @ 3:00 pm

Location: The Pankey Institute

CE HOURS: 0

Dentist Tuition: $ 3905

Single Occupancy with Ensuite Private Bath (per night): $ 290

“A Pankey Scholar is one who has demonstrated a commitment to apply the principles, practices and philosophy they learned through their journey at The Pankey Institute.”   At its core,…

Learn More>

About Author

User Image
Lee Ann Brady DMD

Dr. Lee Ann Brady is passionate about dentistry, her family and making a difference. She is a general dentist and owns a practice in Glendale, AZ limited to restorative dentistry. Lee’s passion for dental education began as a CE junkie herself, pursuing lots of advanced continuing education focused on Restorative and Occlusion. In 2005, she became a full time resident faculty member for The Pankey Institute, and was promoted to Clinical Director in 2006. Lee joined Spear Education as Executive VP of Education in the fall of 2008 to teach and coordinate the educational curriculum. In June of 2011, she left Spear Education, founded leeannbrady.com and joined the dental practice she now owns as an associate. Today, she teaches at dental meetings and study clubs both nationally and internationally, continues to write for dental journals and her website, sits on the editorial board of the Journal of Cosmetic Dentistry, Inside Dentistry and DentalTown Magazines and is the Director of Education for The Pankey Institute.

FIND A PANKEY DENTIST OR TECHNICIAN

I AM A
I AM INTERESTED IN

VIEW COURSE CALENDAR

Anterior Aesthetic Zone Ratio

January 15, 2019 Lee Ann Brady DMD

There are many different ways to assess and diagnose the aesthetics of a smile. I love learning a different approach, not so I can change to it, but so I can incorporate it into what I am already doing.

I had the pleasure of attending a full day lecture by Dr. Corky Willhite on transitional Bonding. Corky is one of the dentists I respect the most when it comes to composite education, and I had not heard him teach for many years so I was really looking forward to it. With all of the great new tricks I learned about composite, what I came away with that has me most excited is the four Esthetic Zone Ratios, to analyze and improve the attractiveness of a smile.

What Are Aesthetic Zone Ratios?

Esthetic Zone Ratios is an approach to smile design, and can be used in conjunction with or as a replacement for other smile design systems. There are four aesthetic zone ratios:

  • Anterior Aesthetic Zone Ratio
  • Tooth Proportion Ratio
  • Anterior Segment Ratio
  • Central Dominance Ratio

Aesthetic Zone Ratio

The first of the four ratios compares the width and height of the esthetic zone at a full smile. The first thing you will need is a full smile photograph of the patient. I typically ask the patient to say “E” to capture this photo so I do not get their posed smile with less display. I utilize presentation software to do the analysis since the program will do the math for me. I insert the full smile photograph into a slide. I then insert two lines one from for the width from inside the upper to inside the lower lip. I then do the same thing for width taking my line from the commissures, just inside the tissue of the cheek or face. You can then get the pixels length of the two lines by placing your cursor over the end of the line and holding.

Now you are going to divide the two numbers into each other, height divided by width, then take that result times 100 and you now have a percentage. The ideal ratio is between 15-30%. If this ratio is great then 30% we can then focus on a diagnostic cause of the smile being too tall or high. This might be things like Vertical Maxillary Excess or a short upper lip. The ratio triggers me to go back and look through other photos and evaluate the face and sift tissue for diagnostic challenges. If the number is smaller then 15% we may have a long upper lip, reduced lip mobility or a short lower face.

Facial and Soft Tissue anomalies are rarely treated when we fix the teeth, but can have a significant impact on the aesthetic outcomes, and when undiagnosed can often negatively impact our dental treatment plan.

Are you routinely taking diagnostic photos with patients?

Related Course

Integrative Dental Medicine: Creating Healthier Patients & Practices

DATE: July 26 2024 @ 8:00 am - July 27 2024 @ 2:00 pm

Location: The Pankey Institute

CE HOURS: 14

Dentist Tuition: $ 2895

Single Occupancy with Ensuite Private Bath (per night): $ 290

We face a severe health crisis, that is a much larger pandemic than Covid19! Our western lifestyle affects periodontal & periapical oral disease, vascular disease, breathing disordered sleep, GERD, dental…

Learn More>

About Author

User Image
Lee Ann Brady DMD

Dr. Lee Ann Brady is passionate about dentistry, her family and making a difference. She is a general dentist and owns a practice in Glendale, AZ limited to restorative dentistry. Lee’s passion for dental education began as a CE junkie herself, pursuing lots of advanced continuing education focused on Restorative and Occlusion. In 2005, she became a full time resident faculty member for The Pankey Institute, and was promoted to Clinical Director in 2006. Lee joined Spear Education as Executive VP of Education in the fall of 2008 to teach and coordinate the educational curriculum. In June of 2011, she left Spear Education, founded leeannbrady.com and joined the dental practice she now owns as an associate. Today, she teaches at dental meetings and study clubs both nationally and internationally, continues to write for dental journals and her website, sits on the editorial board of the Journal of Cosmetic Dentistry, Inside Dentistry and DentalTown Magazines and is the Director of Education for The Pankey Institute.

FIND A PANKEY DENTIST OR TECHNICIAN

I AM A
I AM INTERESTED IN

VIEW COURSE CALENDAR

Perio Screening vs Assessment

November 7, 2018 Pankey Gram

Time is a major priority in the thriving dental practice. Balancing the need for comprehensive care with the efficiency necessary to get everything done in a day is a serious challenge. When it comes to periodontal assessments, the numbers today shockingly still show that a majority of offices are not routinely completing a perio exam.

It doesn’t have to be that way!

Implement a Quick Perio Screening

Consider making your life a lot easier while still improving patient care by offering periodontal screenings. An efficient screening that divides the mouth into scored sextants shouldn’t take more than a minute or two.

Your hygienists will appreciate the opportunity to show off their probing skills. They will be able to help patients recognize the signs of gingivitis and periodontal inflammation that may have gone unnoticed otherwise. If the patient scores high enough, then that will necessitate a full-mouth periodontal exam that includes full mouth probing furcation scoring and measuring muco-gingival attachment loss and recession.

This simple addition can lead to more dentistry in your practice and therefore higher production. That’s a boon for both patients and dentists, as the former improves their health and the latter is able to offer more complex treatment.

Periodontal disease is a sneaky, pervasive issue that can be detrimental to a patient’s entire health. Systemic diseases like atherosclerosis and diabetes have been associated with periodontitis. Gingivitis, while reversible, can still be exceedingly unpleasant and eventually lead to worsening periodontal health.

The way your hygienist educates patients about periodontal disease contributes to how patients understand the screening’s purpose. The hygienist must make it clear that you are checking for gingivitis and periodontitis because they can lead to pain and tooth loss. This would require much more invasive care in the long run.

Get our take on dental esthetics by reading this awesome Pankey blog here. Do you carry out perio screenings in your practice? We’re dying to know more, don’t be a stranger!

Related Course

E1: Aesthetic & Functional Treatment Planning

DATE: May 16 2024 @ 8:00 am - May 19 2024 @ 2:30 pm

Location: The Pankey Institute

CE HOURS: 39

Dentist Tuition: $ 6500

Single Occupancy Room with Ensuite Bath (Per Night): $ 290

This Course Is Sold Out! Transform your experience of practicing dentistry, increase predictability, profitability and fulfillment. The Essentials Series is the Key, and Aesthetic and Functional Treatment Planning is where your journey…

Learn More>

About Author

User Image
Pankey Gram

FIND A PANKEY DENTIST OR TECHNICIAN

I AM A
I AM INTERESTED IN

VIEW COURSE CALENDAR

The Patient’s Journey

October 24, 2018 Mark Murphy DDS

Providing healthier mouths to patients and doing more fulfilling dentistry (and making more money as a result) are admirable goals most practices have. I have written a couple of times about techniques that help us improve case acceptance: creating curiosity and co-discovery, listening, the learning ladder, and more.

This brief overview is an attempt to see the process as a journey for the patient and to consider their perspective:

Patient’s Journey: Eighteen Inches at a Time

It Starts in the Head

Patients first listen to the facts about dental care, their need and wants, issues or diseases that they have, and potential treatment solutions. Sadly, facts are not enough.

Developing great listening skills, caring, and trust help patients come to see you as their health advisor. This requires an eighteen-inch ‘Journey to the Heart’! It is there that caring and trust live. The emotional connection is very important in case acceptance. To ignore it is to minimize your success. But that too is not enough.

The patient must schedule, keep appointments, and pay for recommended treatment. This ‘Journey to the Wallet’ is the next eighteen-inch trip the patient must take. It is the execution of the plan from their perspective.

Valuing dental care and oral health is demonstrated by their checkbook and what they spend time and money on. Still not done?

The next eighteen-inches take us to a knee. Appreciation helps fulfill us as caregivers. Most rewards are best when they are balanced, financial, and behavioral: money and warm fuzzies, you get the idea. Money alone does not buy happiness (but it does help you enjoy your misery in some mighty fine places!).

The final journey takes us eighteen inches to the patient’s feet. When patients tell others about your practice and refer their friends, you have come full circle. This trust display is the ultimate compliment to you and your team.

Keep the Patient’s Perspective in Mind

Ask yourself the following and seek answers with your team to enhance patient health, your fulfillment, and mutual rewards:

·       Have you helped nurture movement toward the heart?

·       Did the patient accept and schedule treatment? If not, why not?

·       Were they able to pay with gratitude and appreciation? (borrowed from Dr. Pankey)

·       Did you ask for and receive referrals of their friends and family?

Remember, it’s a journey, not a destination. Enjoy the trip and check the map along the way. You, your team, and your patients will all be the better for it.

A journey is best measured in friends, rather than miles. -Tim Cahill

Related Course

E1: Aesthetic & Functional Treatment Planning

DATE: May 1 2025 @ 8:00 am - May 4 2025 @ 2:30 pm

Location: The Pankey Institute

CE HOURS: 39

Dentist Tuition: $ 6800

Single Occupancy with Ensuite Private Bath (Per Night): $ 345

Transform your experience of practicing dentistry, increase predictability, profitability and fulfillment. The Essentials Series is the Key, and Aesthetic and Functional Treatment Planning is where your journey begins.  Following a system of…

Learn More>

About Author

User Image
Mark Murphy DDS

Mark is the Lead Faculty for Clinical Education at ProSomnus Sleep Technologies, Principal of Funktional Consulting, serves on the Guest Faculty at the University of Detroit Mercy School of Dentistry and is a Regular Presenter on Business Development, Practice Management and Leadership at The Pankey Institute. He has served on the Boards of Directors of The Pankey Institute, National Association of Dental Laboratories, the Identalloy Council, the Foundation for Dental Laboratory Technology, St. Vincent DePaul's Dental Center and the Dental Advisor. He lectures internationally on Leadership, Practice Management, Communication, Case Acceptance, Planning, Occlusion, Sleep and TMD. He has a knack for presenting pertinent information in an entertaining manner. mtmurphydds@gmail.com

FIND A PANKEY DENTIST OR TECHNICIAN

I AM A
I AM INTERESTED IN

VIEW COURSE CALENDAR

Master Wax Centric Relation Bite Record 2

October 15, 2018 Pankey Gram

Now that you have fabricated the platform, the next step is to capture the record with the patient. You will need a heat source and a blue Delar wax Pencil.

The first step is to heat the sides of the Master Wax Platform so they are tempered. Take the wax to the patient’s mouth and place it over the maxillary teeth. The anterior edge of the wax should be at the embrasure between the canine and the lateral. Bend the corners over the canines to help with retention. Press the wax against the teeth and ask the patient to close gently into the wax. Cool the wax with your air water syringe, have the patient open, and continue to cool the platform before removing from the mouth.

Using blue delar wax created a small bead where the lower canines have left an impression. Reseat the platform over the maxillary teeth and using bimanual guidance bring the lower canine cusp tips up until they just touch the blue wax. Have your assistant cool the wax with air. After removing the platform from the mouth add Delar wax where the second molars have left a cusp imprint. Then return the platform to the mouth and using bimanual guidance arc the patient into the wax so the lower molar cusp touches, then cool with air.

Your record should now be dropped into cool water. A disposable plastic container from the grocery works great. Write the patients name on it with sharpie marker and add it to their lab pan.


Related Course

E2: Occlusal Appliances & Equilibration

DATE: April 6 2025 @ 8:00 am - April 10 2025 @ 2:30 pm

Location: The Pankey Institute

CE HOURS: 44

Dentist Tuition: $ 7400

Single Occupancy with Ensuite Private Bath (per night): $ 345

What if you had one tool that increased comprehensive case acceptance, managed patients with moderate to high functional risk, verified centric relation and treated signs and symptoms of TMD? Appliance…

Learn More>

About Author

User Image
Pankey Gram

FIND A PANKEY DENTIST OR TECHNICIAN

I AM A
I AM INTERESTED IN

VIEW COURSE CALENDAR

Master Wax Centric Relation Bite Record 1

October 12, 2018 Pankey Gram

Analyzing a patient’s occlusion is key to providing optimal care. There are multiple ways to take a centric relation bite record, but one of the classics at Pankey has to be utilizing master wax. Easily mounting models in the laboratory is one of the main advantages of this method.

Although a slightly more challenging technique from a chairside perspective, it can still be accomplished with ease. Here is where to start:

Intro to the Master Wax Centric Relation Bite Record

Begin by gathering your necessary tools and materials. Start with a red master wax that looks just like baseplate wax from a standpoint of the size of the wax sheets, although it is different because it’s both softer and tackier. You will also need a blue wax pencil, scissors to cut the wax, a heat source such as an alcohol torch, and a way to light the heat source.

Take a single sheet of wax and temper it in the middle with the intention of being able to bend it in half. Once it is thoroughly tempered, bend it in half without cracking or breaking the wax. Make sure the bend is fairly crisp. After the wax has cooled a little bit, open it back up and cut it in half. Out of every sheet of wax, you should be able to generate two platforms for wax records.

Once again temper the wax halfway in the middle with the heat source. Tempering refers to heating to flexibility but not dripping. Again, fold the wax in half so you have a double thickness sheet. Then, cut the wax into the shape of the platform …

Look for the second part in this series about our master wax technique coming soon. And did you get a chance to read this Pankey Gram blog on enjoying Miami while you visit Pankey? Let us know what you think!

Related Course

Worn Dentition: Direct & Indirect Adhesive Management Through a Non-Invasive Approach

DATE: October 24 2025 @ 8:00 am - October 25 2025 @ 2:30 pm

Location: The Pankey Institute

CE HOURS: 15

Dentist Tuition : $ 2595

Single Occupancy with Ensuite Private Bath (per night): $ 345

Enhance Restorative Outcomes The main goal of this course is to provide, indications and protocols to diagnose and treat severe worn dentition through a new no prep approach increasing the…

Learn More>

About Author

User Image
Pankey Gram

FIND A PANKEY DENTIST OR TECHNICIAN

I AM A
I AM INTERESTED IN

VIEW COURSE CALENDAR

Panadent Dento-Facial Analyzer Technique: Level Planes

October 7, 2018 Lee Ann Brady DMD

Function and esthetics are the two primary goals of excellent treatment. Achieving them both simultaneously requires the right tools used with the best skill possible. The  Dento-Facial Analyzer is my go-to for gathering information I can use to improve the outcome of mounting a maxillary model.

In parts 1 and 2 of this series, I introduced the Dento-Facial Analyzer and began the discussion of how to capture records with it. Here, I’ll complete my overview of a solid technique:

Completing the Dento-Facial Analyzer Technique

… Ensure the Dento-Facial Analyzer is positioned level to the horizon both when looking straight on at the patient’s face from the anterior section and looking at them from the side. It should be level in both planes of space. Then, allow the bite silicone to set and have the patient hold to verify.

Remember that the main use of the Dento-Facial Analyzer is transferring three significant pieces of information. This is either intended for the laboratory or for when we mount our own models.

The first piece of information is the maxillary relationship – the distance to hinge access – which means it’s very important that the central incisors on the maxilla are seated against the plastic bite plate.

Second, we are transferring information about the occlusal plane and the incisal plane. From an incisal plane perspective, it’s crucial that the plate is level to the horizon as we look straight on at the patient once we have the analyzer in. The vertical rod on the analyzer indicates the center of the face – the facial midline – which can be given by the central philtrum of the upper lip or the center of glabella.

You should also look at how you’ve captured the record from a lateral view. This ensures the occlusal plane – the relationship of the cant from anterior to posterior teeth that exists in the patient’s face – is transferred accurately to the lab or onto the articulator. The side bar of the Dento-Facial Analyzer should be level to the horizon.

Do you use this simple and accurate tool?

For a hands-on demonstration of the Dento-Facial Analyzer from Pankey educators, learn more about our Essentials 1 course.

Related Course

E2: Occlusal Appliances & Equilibration

DATE: April 6 2025 @ 8:00 am - April 10 2025 @ 2:30 pm

Location: The Pankey Institute

CE HOURS: 44

Dentist Tuition: $ 7400

Single Occupancy with Ensuite Private Bath (per night): $ 345

What if you had one tool that increased comprehensive case acceptance, managed patients with moderate to high functional risk, verified centric relation and treated signs and symptoms of TMD? Appliance…

Learn More>

About Author

User Image
Lee Ann Brady DMD

Dr. Lee Ann Brady is passionate about dentistry, her family and making a difference. She is a general dentist and owns a practice in Glendale, AZ limited to restorative dentistry. Lee’s passion for dental education began as a CE junkie herself, pursuing lots of advanced continuing education focused on Restorative and Occlusion. In 2005, she became a full time resident faculty member for The Pankey Institute, and was promoted to Clinical Director in 2006. Lee joined Spear Education as Executive VP of Education in the fall of 2008 to teach and coordinate the educational curriculum. In June of 2011, she left Spear Education, founded leeannbrady.com and joined the dental practice she now owns as an associate. Today, she teaches at dental meetings and study clubs both nationally and internationally, continues to write for dental journals and her website, sits on the editorial board of the Journal of Cosmetic Dentistry, Inside Dentistry and DentalTown Magazines and is the Director of Education for The Pankey Institute.

FIND A PANKEY DENTIST OR TECHNICIAN

I AM A
I AM INTERESTED IN

VIEW COURSE CALENDAR

Dento-Facial Analyzer Technique: Capturing Records

October 1, 2018 Lee Ann Brady DMD

You can gather accurate functional and esthetic information using the Panadent Dento-Facial Analyzer for restorative cases. I’ve found this tool particularly effective compared to alternatives such as the Facebow or stick bite.

If you haven’t done so yet, make sure to check out the introduction to this series on the Dento-Facial Analyzer. It includes background information, armamentarium, and key reasons why the device can elevate patient care.

Without further ado, the Dento-Facial Analyzer technique:

Essentials of Dento-Facial Analyzer Technique

Once you have the white disposable plate – which is actually the piece you will send to the lab once the record is captured – snapped onto the Dento-Facial Analyzer, use VPS tray adhesive to lightly coat the plastic tray. You are only going to do this from about the canine position posteriorly because you aren’t going to put silicone on the anterior portion of that bite plate.

Next, attach the vertical reference bar to the Dento-Facial Analyzer. Without bite registration on it, take it to the patient’s mouth and seat the central incisors exactly against the white plastic in the front labially.

Verify that you can hold this level to the horizon in two planes of space and that you can touch the patient’s teeth. If not, you might need to build up the posterior.

If you’ve verified this, put bite silicone on the plate from the canine position back, then seat it again, making sure the central incisors are seated labially against the white plastic …

I’ll round up this fun technique with Part 3 in the series coming soon.

For a hands-on lesson in the Dento-Facial Analyzer from our talented educators, check out our Essentials 1 Pankey course. Also, watch this video for a quick refresher or pre-course overview.  

Related Course

TMD & Orofacial Pain: Managing Complex Patients

DATE: January 29 2025 @ 8:00 am - February 2 2025 @ 1:00 pm

Location: The Pankey Institute

CE HOURS: 37

Dentist Tuition: $ 7200

Single Occupancy with Ensuite Private Bath (per night): $ 345

TMD patients present with a wide range of concerns and symptoms from tension headaches and muscle challenges to significant joint inflammation and breakdown. Accurate thorough diagnosis is the first step…

Learn More>

About Author

User Image
Lee Ann Brady DMD

Dr. Lee Ann Brady is passionate about dentistry, her family and making a difference. She is a general dentist and owns a practice in Glendale, AZ limited to restorative dentistry. Lee’s passion for dental education began as a CE junkie herself, pursuing lots of advanced continuing education focused on Restorative and Occlusion. In 2005, she became a full time resident faculty member for The Pankey Institute, and was promoted to Clinical Director in 2006. Lee joined Spear Education as Executive VP of Education in the fall of 2008 to teach and coordinate the educational curriculum. In June of 2011, she left Spear Education, founded leeannbrady.com and joined the dental practice she now owns as an associate. Today, she teaches at dental meetings and study clubs both nationally and internationally, continues to write for dental journals and her website, sits on the editorial board of the Journal of Cosmetic Dentistry, Inside Dentistry and DentalTown Magazines and is the Director of Education for The Pankey Institute.

FIND A PANKEY DENTIST OR TECHNICIAN

I AM A
I AM INTERESTED IN

VIEW COURSE CALENDAR

Panadent Dento-Facial Analyzer Technique: Introduction

September 21, 2018 Lee Ann Brady DMD

The Dento-Facial Analyzer is a marvelous tool I use in the practice to mount maxillary models. It has made a huge difference in my practice of dentistry and is one of my favorite tools to teach.

Introduction to the Dento-Facial Analyzer

For the critical aspects of diagnostics and sending info to the lab for the completion of a restorative case, mounting models appropriately is so important. They must be mounted in three planes of space referenced to hinge access to capture esthetic information including incisal plane and occlusal plane relative to the horizon.

Traditionally, this has been accomplished by utilizing a Facebow, Earbow, or by actually capturing hinge access position. Now, we have the option of using the Kois Dento-Facial Analyzer to capture both functional information and esthetic information that we would normally get with a Fox’s bite plane or stick bite. All of this functionality is managed with one simple device.

The Kois Dento-Facial Analyzer was designed based on scientific information gathered by Dr. John Kois, which shows that the distance from the incisal edge position of the maxillary central incisors to hinge access on average is 100 mm. Most people fall within a range of 5 mm to the average, therefore this is the assumption made when the device takes a record.

The armamentarium for record capturing with the Panadent instrument includes the analyzer, bite registration silicone in a gun with a tip, VPS adhesive used in an impression tray, and disposable bite plates that snap onto the analyzer (from the device manufacturer Panadent).

You can use bite registration silicone, Panadent bite tabs, wax, or VPS heavy body impression material to capture the record …

I’ll continue this review of the Dento-Facial Analyzer technique in Part 2, coming soon! And don’t miss one of my recent Pankey Gram favorites from Dr. Bill Gregg on an occlusion-focused hygiene exam. Read it here for his insightful tips.

For an in-person, hands-on lesson in the Dento-Facial Analyzer, check out our Essentials 1 Pankey course. You can also watch this video for a quick refresher.  

Related Course

Compromise to Co-Discovery: A Treatment Planning Journey

DATE: December 5 2024 @ 8:00 am - December 7 2024 @ 1:00 pm

Location: The Pankey Institute

CE HOURS: 21

Regular Tuition: $ 2895

Single Occupancy with Ensuite Private Bath (per night): $ 290

The Balance of Communication, Case Planning & Occlusion Dr. Melkers always brings a unique perspective to his workshops and challenges us to the way we think. At Compromise to Co-Discovery,…

Learn More>

About Author

User Image
Lee Ann Brady DMD

Dr. Lee Ann Brady is passionate about dentistry, her family and making a difference. She is a general dentist and owns a practice in Glendale, AZ limited to restorative dentistry. Lee’s passion for dental education began as a CE junkie herself, pursuing lots of advanced continuing education focused on Restorative and Occlusion. In 2005, she became a full time resident faculty member for The Pankey Institute, and was promoted to Clinical Director in 2006. Lee joined Spear Education as Executive VP of Education in the fall of 2008 to teach and coordinate the educational curriculum. In June of 2011, she left Spear Education, founded leeannbrady.com and joined the dental practice she now owns as an associate. Today, she teaches at dental meetings and study clubs both nationally and internationally, continues to write for dental journals and her website, sits on the editorial board of the Journal of Cosmetic Dentistry, Inside Dentistry and DentalTown Magazines and is the Director of Education for The Pankey Institute.

FIND A PANKEY DENTIST OR TECHNICIAN

I AM A
I AM INTERESTED IN

VIEW COURSE CALENDAR