Anterior Segment Aesthetic Ratio

January 21, 2019 Lee Ann Brady DMD

Aesthetic Zone ratios is one of many ways to evaluate the appearance of a patients smile, and also to plan for changes that will improve overall aesthetics.

In the last article on using aesthetic zone ratios we looked at comparing the width to the height. This ratio allows us to gather data and diagnose issues like vertical maxillary excess and hypermobile lip that cause this ratio to be larger than normal.

Anterior Segment Ratio

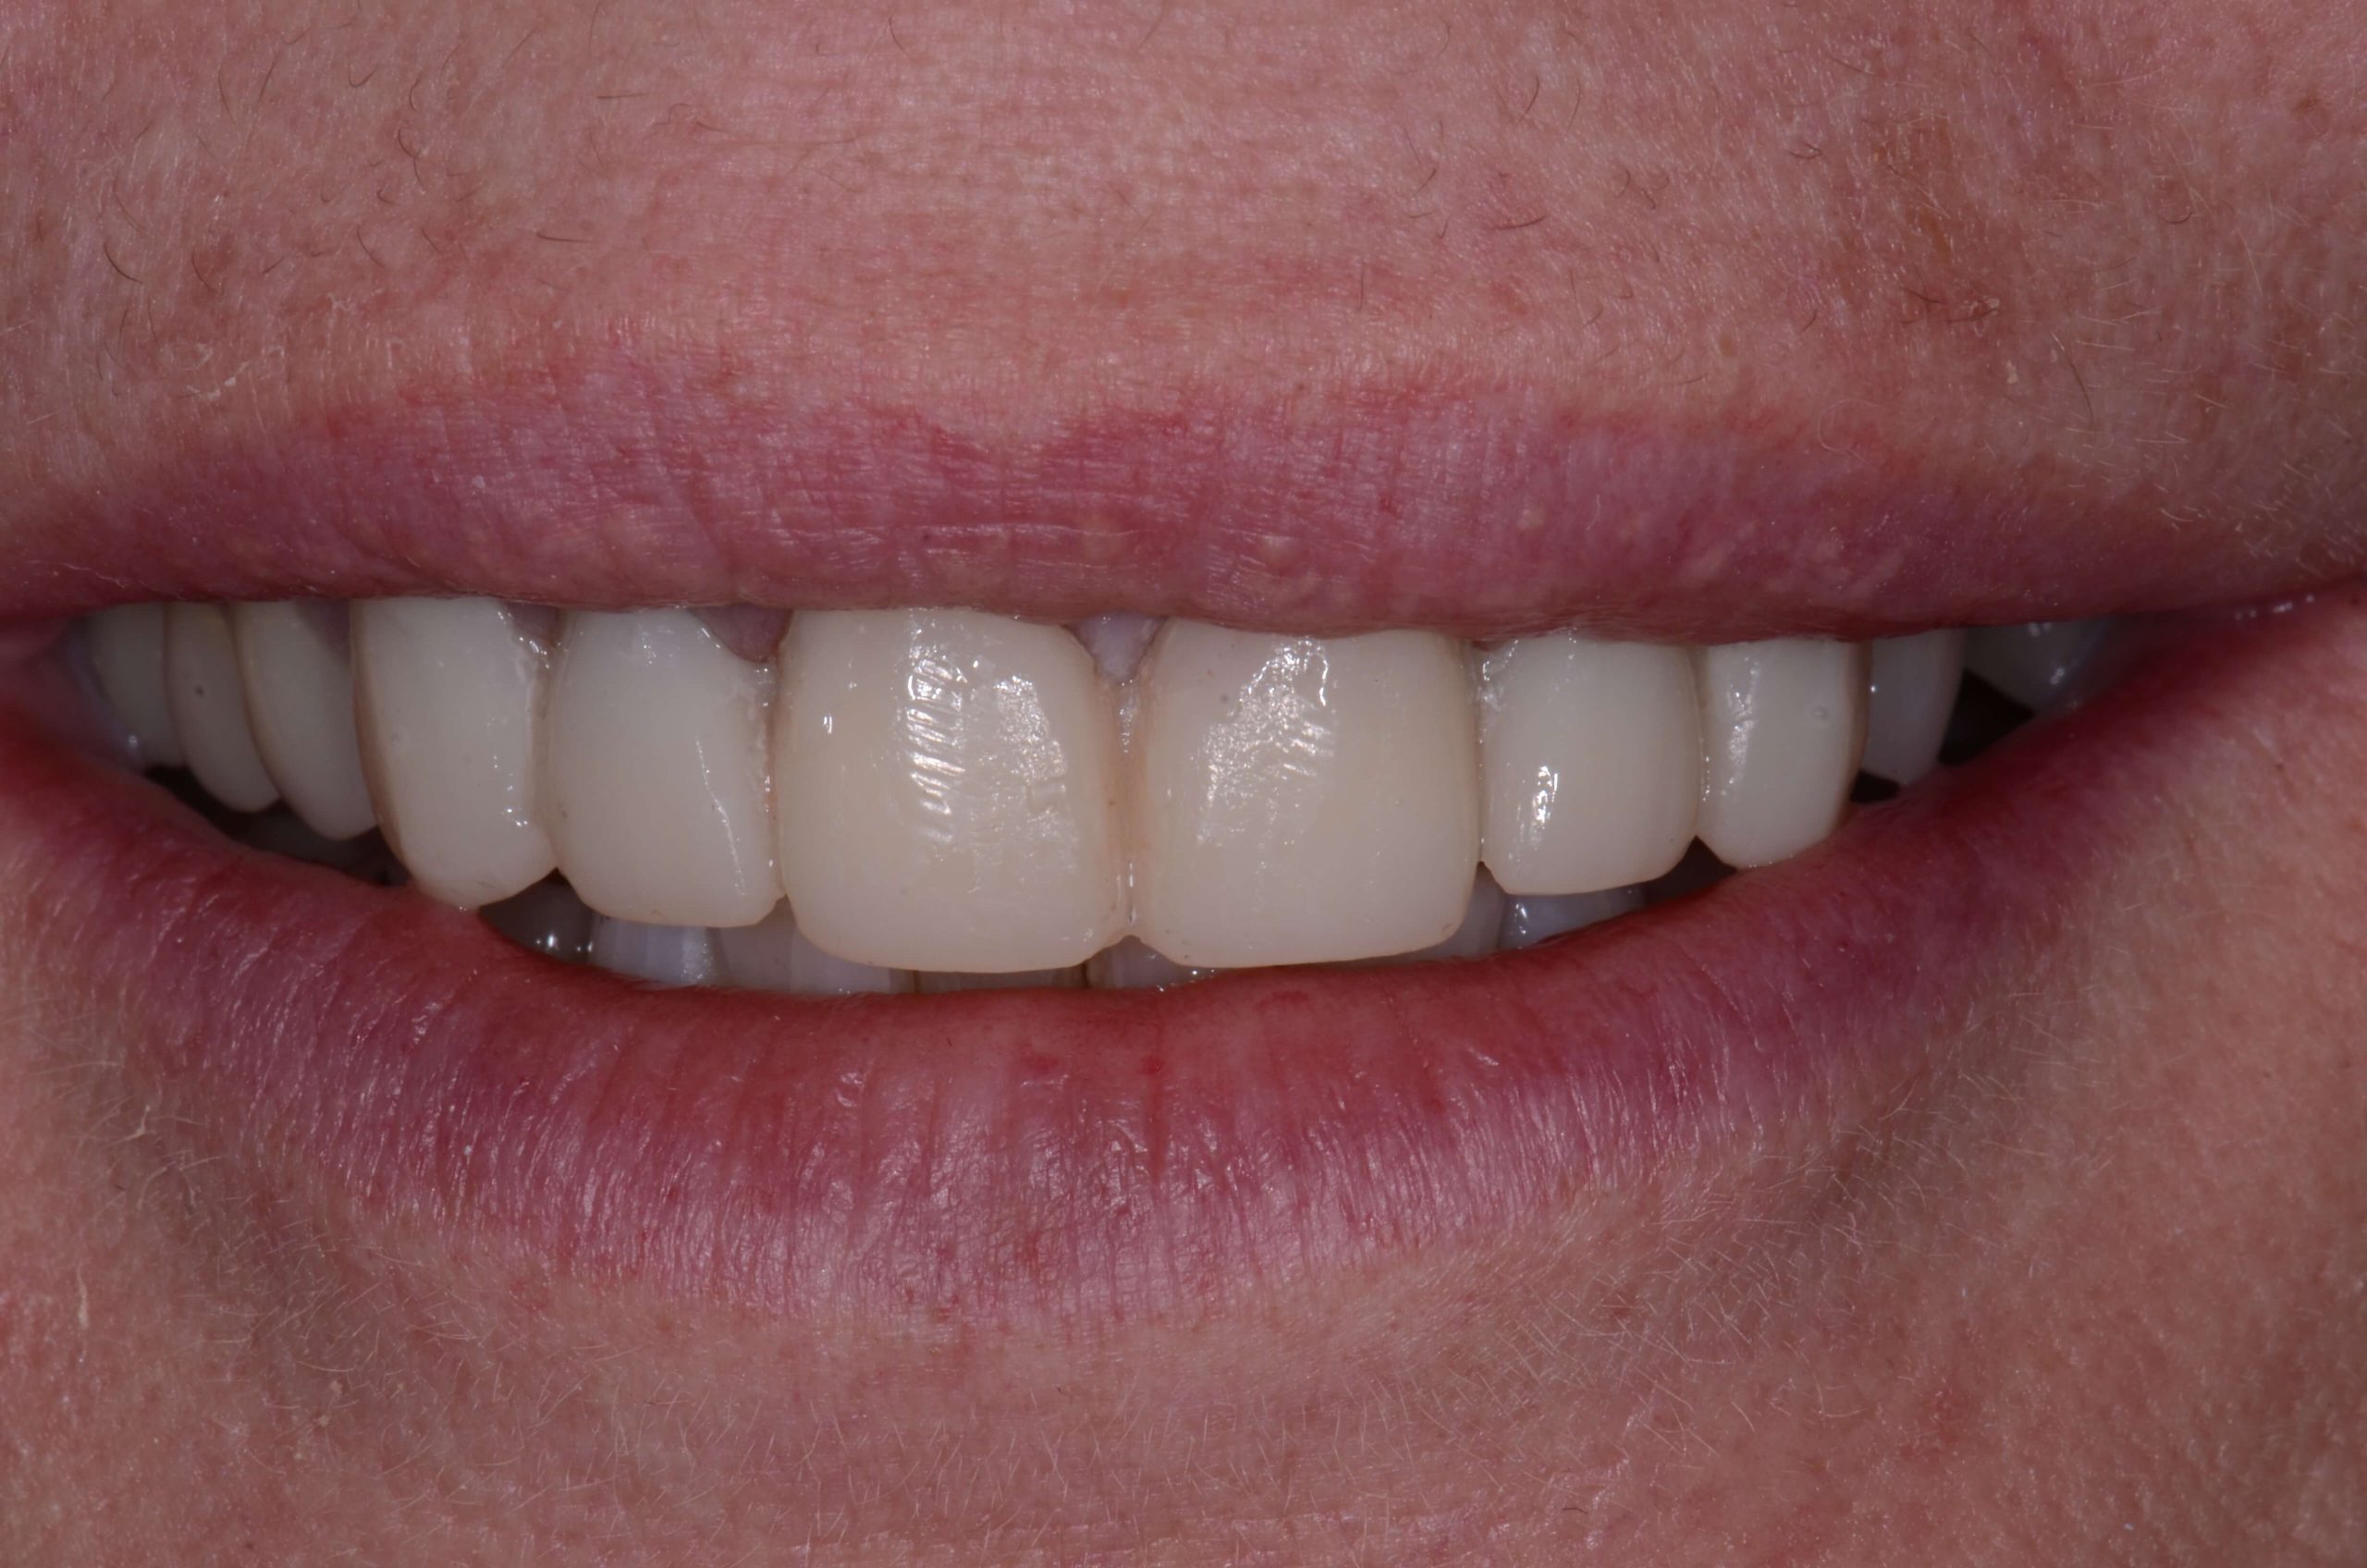
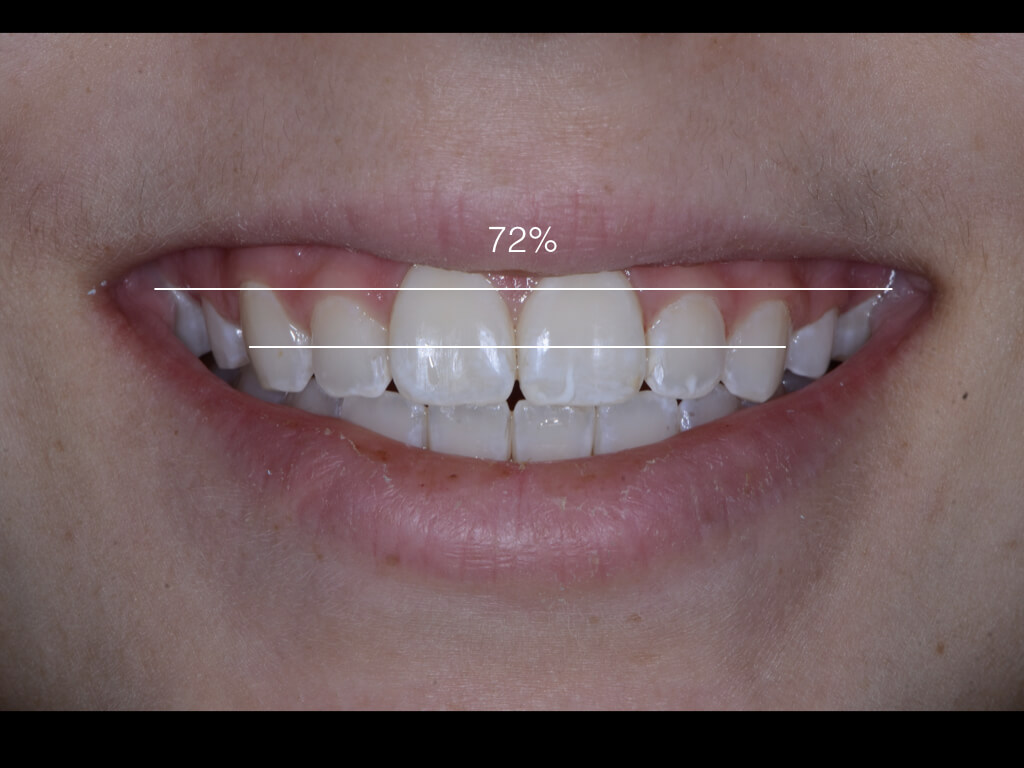
The next of the four ratios compares the width of the total esthetic zone, all of the teeth visible between the commissures at a full smile, and the width of just the anterior segment, between the distal of the canines. The first thing to do is measure the two distances. This can be done in pixels by inserting a line over a full smile photo, or measured with a mm ruler on a printed photograph. Make sure your line is placed at the inside of the soft tissue near the commissures. The relationship to real width is irrelevant as we are going to use a ratio. We then divide the width of the anterior segment by the width of the esthetic zone and multiply by 100.

Arch Width Ratio= (Anterior Segment Width/ Esthetic Zone width) x 100

Smiles that are rated as attractive have an anterior segment width ratio between 59-75%, and the average ratio is 66%. The percentages do not have a gender or age bias which makes relying on these numbers easy. If the ration is too small or too large I start to wonder about arch space issues. Often with patients with a large midline diastema you will see this ratio be larger than 75%. In these cases or cases with inadequate space I want to make sure we use wax-ups and mock-ups to ascertain that we can meet the patients aesthetic demands without the addition of ortho to the treatment plan.

Related Course

E4: Posterior Reconstruction and Completing the Comprehensive Treatment Sequence

DATE: May 15 2025 @ 8:00 am - May 19 2025 @ 2:30 pm

Location: The Pankey Institute

CE HOURS: 44

Dentist Tuition: $ 7400

Single Occupancy with Ensuite Private Bath (per night): $ 345

The purpose of this course is to help you develop mastery with complex cases involving advanced restorative procedures, precise sequencing and interdisciplinary coordination. Building on the learning in Essentials Three…

Learn More>
About Author

User Image
Lee Ann Brady DMD

Dr. Lee Ann Brady is passionate about dentistry, her family and making a difference. She is a general dentist and owns a practice in Glendale, AZ limited to restorative dentistry. Lee’s passion for dental education began as a CE junkie herself, pursuing lots of advanced continuing education focused on Restorative and Occlusion. In 2005, she became a full time resident faculty member for The Pankey Institute, and was promoted to Clinical Director in 2006. Lee joined Spear Education as Executive VP of Education in the fall of 2008 to teach and coordinate the educational curriculum. In June of 2011, she left Spear Education, founded leeannbrady.com and joined the dental practice she now owns as an associate. Today, she teaches at dental meetings and study clubs both nationally and internationally, continues to write for dental journals and her website, sits on the editorial board of the Journal of Cosmetic Dentistry, Inside Dentistry and DentalTown Magazines and is the Director of Education for The Pankey Institute.

FIND A PANKEY DENTIST OR TECHNICIAN

I AM A
I AM INTERESTED IN

VIEW COURSE CALENDAR

Anterior Aesthetic Zone Ratio

January 15, 2019 Lee Ann Brady DMD

There are many different ways to assess and diagnose the aesthetics of a smile. I love learning a different approach, not so I can change to it, but so I can incorporate it into what I am already doing.

I had the pleasure of attending a full day lecture by Dr. Corky Willhite on transitional Bonding. Corky is one of the dentists I respect the most when it comes to composite education, and I had not heard him teach for many years so I was really looking forward to it. With all of the great new tricks I learned about composite, what I came away with that has me most excited is the four Esthetic Zone Ratios, to analyze and improve the attractiveness of a smile.

What Are Aesthetic Zone Ratios?

Esthetic Zone Ratios is an approach to smile design, and can be used in conjunction with or as a replacement for other smile design systems. There are four aesthetic zone ratios:

  • Anterior Aesthetic Zone Ratio
  • Tooth Proportion Ratio
  • Anterior Segment Ratio
  • Central Dominance Ratio

Aesthetic Zone Ratio

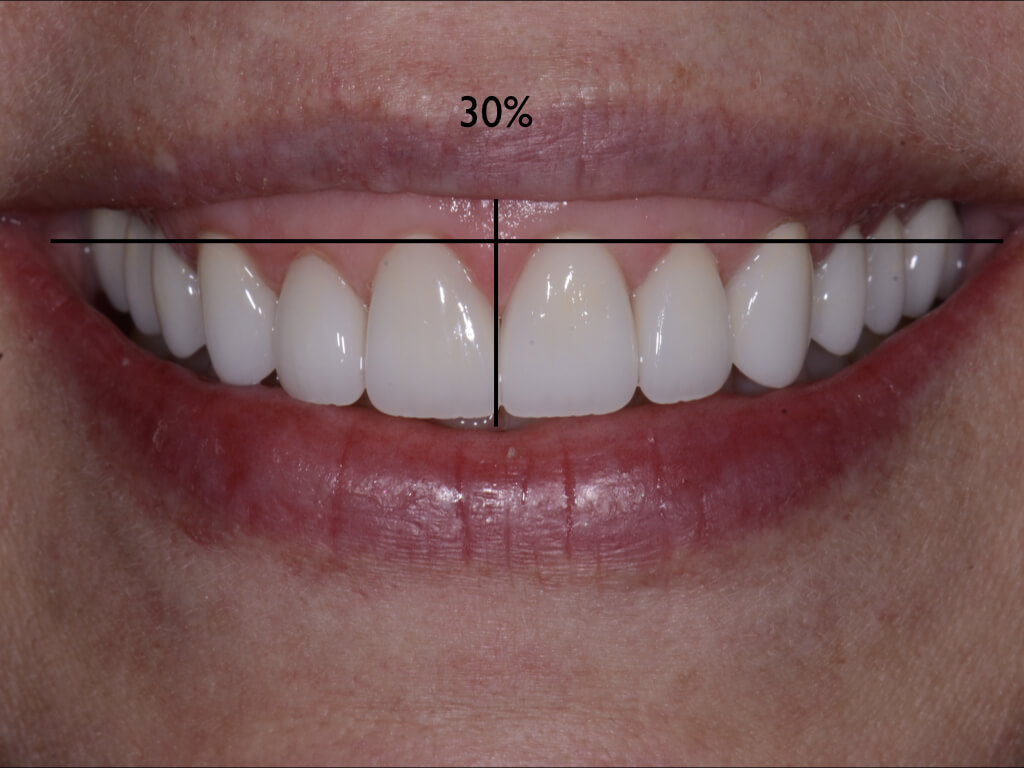
The first of the four ratios compares the width and height of the esthetic zone at a full smile. The first thing you will need is a full smile photograph of the patient. I typically ask the patient to say “E” to capture this photo so I do not get their posed smile with less display. I utilize presentation software to do the analysis since the program will do the math for me. I insert the full smile photograph into a slide. I then insert two lines one from for the width from inside the upper to inside the lower lip. I then do the same thing for width taking my line from the commissures, just inside the tissue of the cheek or face. You can then get the pixels length of the two lines by placing your cursor over the end of the line and holding.

Now you are going to divide the two numbers into each other, height divided by width, then take that result times 100 and you now have a percentage. The ideal ratio is between 15-30%. If this ratio is great then 30% we can then focus on a diagnostic cause of the smile being too tall or high. This might be things like Vertical Maxillary Excess or a short upper lip. The ratio triggers me to go back and look through other photos and evaluate the face and sift tissue for diagnostic challenges. If the number is smaller then 15% we may have a long upper lip, reduced lip mobility or a short lower face.

Facial and Soft Tissue anomalies are rarely treated when we fix the teeth, but can have a significant impact on the aesthetic outcomes, and when undiagnosed can often negatively impact our dental treatment plan.

Are you routinely taking diagnostic photos with patients?

Related Course

E3: Restorative Integration of Form & Function

DATE: January 12 2025 @ 8:00 am - January 16 2025 @ 2:30 pm

Location: The Pankey Institute

CE HOURS: 41

Dentist Tuition: $ 7400

Single Occupancy with Ensuite Private Bath (per night): $ 345

THIS COURSE IS SOLD OUT Understanding that “form follows function” is critical for knowing how to blend what looks good with what predictably functions well. E3 is the phase of…

Learn More>

About Author

User Image
Lee Ann Brady DMD

Dr. Lee Ann Brady is passionate about dentistry, her family and making a difference. She is a general dentist and owns a practice in Glendale, AZ limited to restorative dentistry. Lee’s passion for dental education began as a CE junkie herself, pursuing lots of advanced continuing education focused on Restorative and Occlusion. In 2005, she became a full time resident faculty member for The Pankey Institute, and was promoted to Clinical Director in 2006. Lee joined Spear Education as Executive VP of Education in the fall of 2008 to teach and coordinate the educational curriculum. In June of 2011, she left Spear Education, founded leeannbrady.com and joined the dental practice she now owns as an associate. Today, she teaches at dental meetings and study clubs both nationally and internationally, continues to write for dental journals and her website, sits on the editorial board of the Journal of Cosmetic Dentistry, Inside Dentistry and DentalTown Magazines and is the Director of Education for The Pankey Institute.

FIND A PANKEY DENTIST OR TECHNICIAN

I AM A
I AM INTERESTED IN

VIEW COURSE CALENDAR

Utilizing Chair-side Air Abrasion

January 13, 2019 Lee Ann Brady DMD

Chair-side air abrasion has numerous advantages, especially today when we use adhesive retention so much of the time.

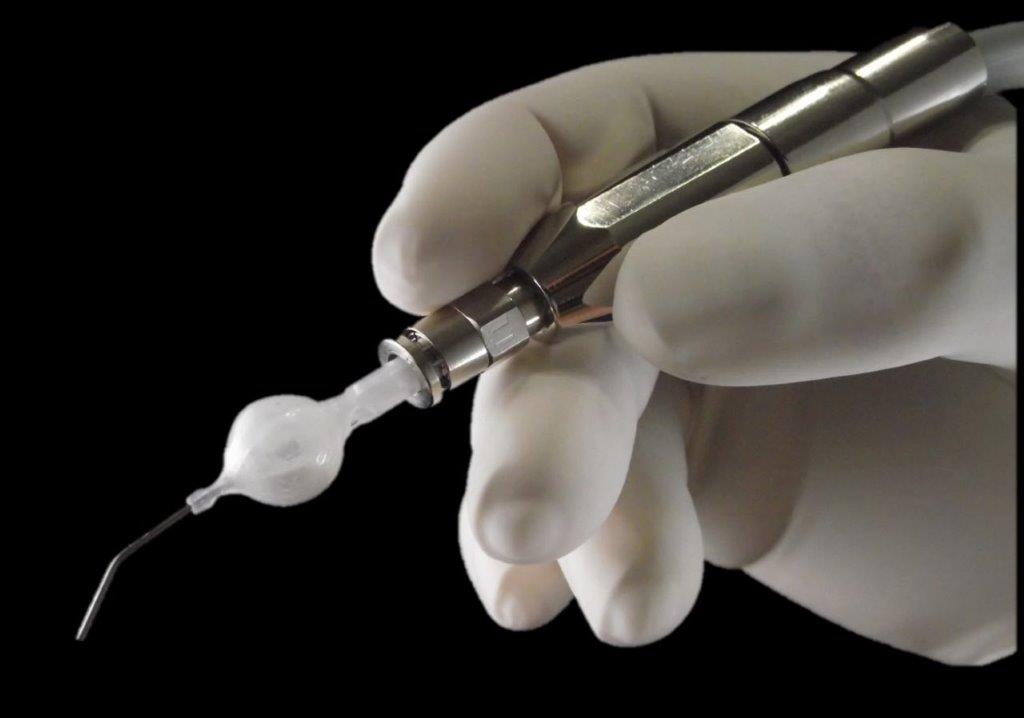
The advantages for many years have been outweighed by the logistic challenges. With the advent of small, lightweight, easy to use air abrasion handpieces this is no longer true. When I became aware of the etchmaster I was skeptical, but I am now a believer and use air abrasion int he operatory all day long.

The Clinical Applications

One of the first things that many of us will utilize air abrasion for is to “etch” zirconia restorations for bonding during final seating. The only way to prepare the inside of a zirconia restoration is with 30-50 micron aluminum oxide. The particle size and type is critical. The ideal pressure is 1 bar (15psi). Next on my list is to clean tooth preparations prior to bonding and cementation. To me there is no better way to assure the removal of temporary cement and prepare a tooth for maximal adhesive retention than with 30 micron aluminum oxide.

My list goes on as I have started to prepare small class one cavity preparations using small glass beads in my chair-side unit. Cleaning out the occlusal grooves prior to a sealant and etching un-prepped enamel for anterior esthetic composite margins are other uses. In addition sodium bicarbonate can be used to remove stain. Now that I have a convenient, easy to use unit, I find more and more reasons everyday.

Air Abrasion Made Easy

When I first began to experiment with air abrasion the biggest challenge was the equipment and managing the logistics.  The Etchmaster is a small 3 to 4 inch attachment that connects to either a 3 or 4 hole line on your unit. The pressure is precisely controlled, for great clinical outcomes, and it means the patients mouth is not full of powder when you are done. The powders come in pre-filled tips that slide into the top of the hand-piece. You can choose from a variety of sizes and particle types and sizes. This means no more filling a reservoir with powder, wondering if you have too little or too much. It also means not wondering what particle type and size is in the reservoir the next time you go to use the unit.

Have you explored the clinical advantages of air abrasion? How has this been beneficial in your practice?

Related Course

E3: Restorative Integration of Form & Function

DATE: October 5 2025 @ 8:00 am - October 9 2025 @ 2:30 pm

Location: The Pankey Institute

CE HOURS: 41

Dentist Tuition: $ 7400

Single Occupancy with Ensuite Private Bath (per night): $ 345

THIS COURSE IS SOLD OUT Understanding that “form follows function” is critical for knowing how to blend what looks good with what predictably functions well. E3 is the phase of…

Learn More>

About Author

User Image
Lee Ann Brady DMD

Dr. Lee Ann Brady is passionate about dentistry, her family and making a difference. She is a general dentist and owns a practice in Glendale, AZ limited to restorative dentistry. Lee’s passion for dental education began as a CE junkie herself, pursuing lots of advanced continuing education focused on Restorative and Occlusion. In 2005, she became a full time resident faculty member for The Pankey Institute, and was promoted to Clinical Director in 2006. Lee joined Spear Education as Executive VP of Education in the fall of 2008 to teach and coordinate the educational curriculum. In June of 2011, she left Spear Education, founded leeannbrady.com and joined the dental practice she now owns as an associate. Today, she teaches at dental meetings and study clubs both nationally and internationally, continues to write for dental journals and her website, sits on the editorial board of the Journal of Cosmetic Dentistry, Inside Dentistry and DentalTown Magazines and is the Director of Education for The Pankey Institute.

FIND A PANKEY DENTIST OR TECHNICIAN

I AM A
I AM INTERESTED IN

VIEW COURSE CALENDAR

Panadent Dento-Facial Analyzer Technique: Level Planes

October 7, 2018 Lee Ann Brady DMD

Function and esthetics are the two primary goals of excellent treatment. Achieving them both simultaneously requires the right tools used with the best skill possible. The  Dento-Facial Analyzer is my go-to for gathering information I can use to improve the outcome of mounting a maxillary model.

In parts 1 and 2 of this series, I introduced the Dento-Facial Analyzer and began the discussion of how to capture records with it. Here, I’ll complete my overview of a solid technique:

Completing the Dento-Facial Analyzer Technique

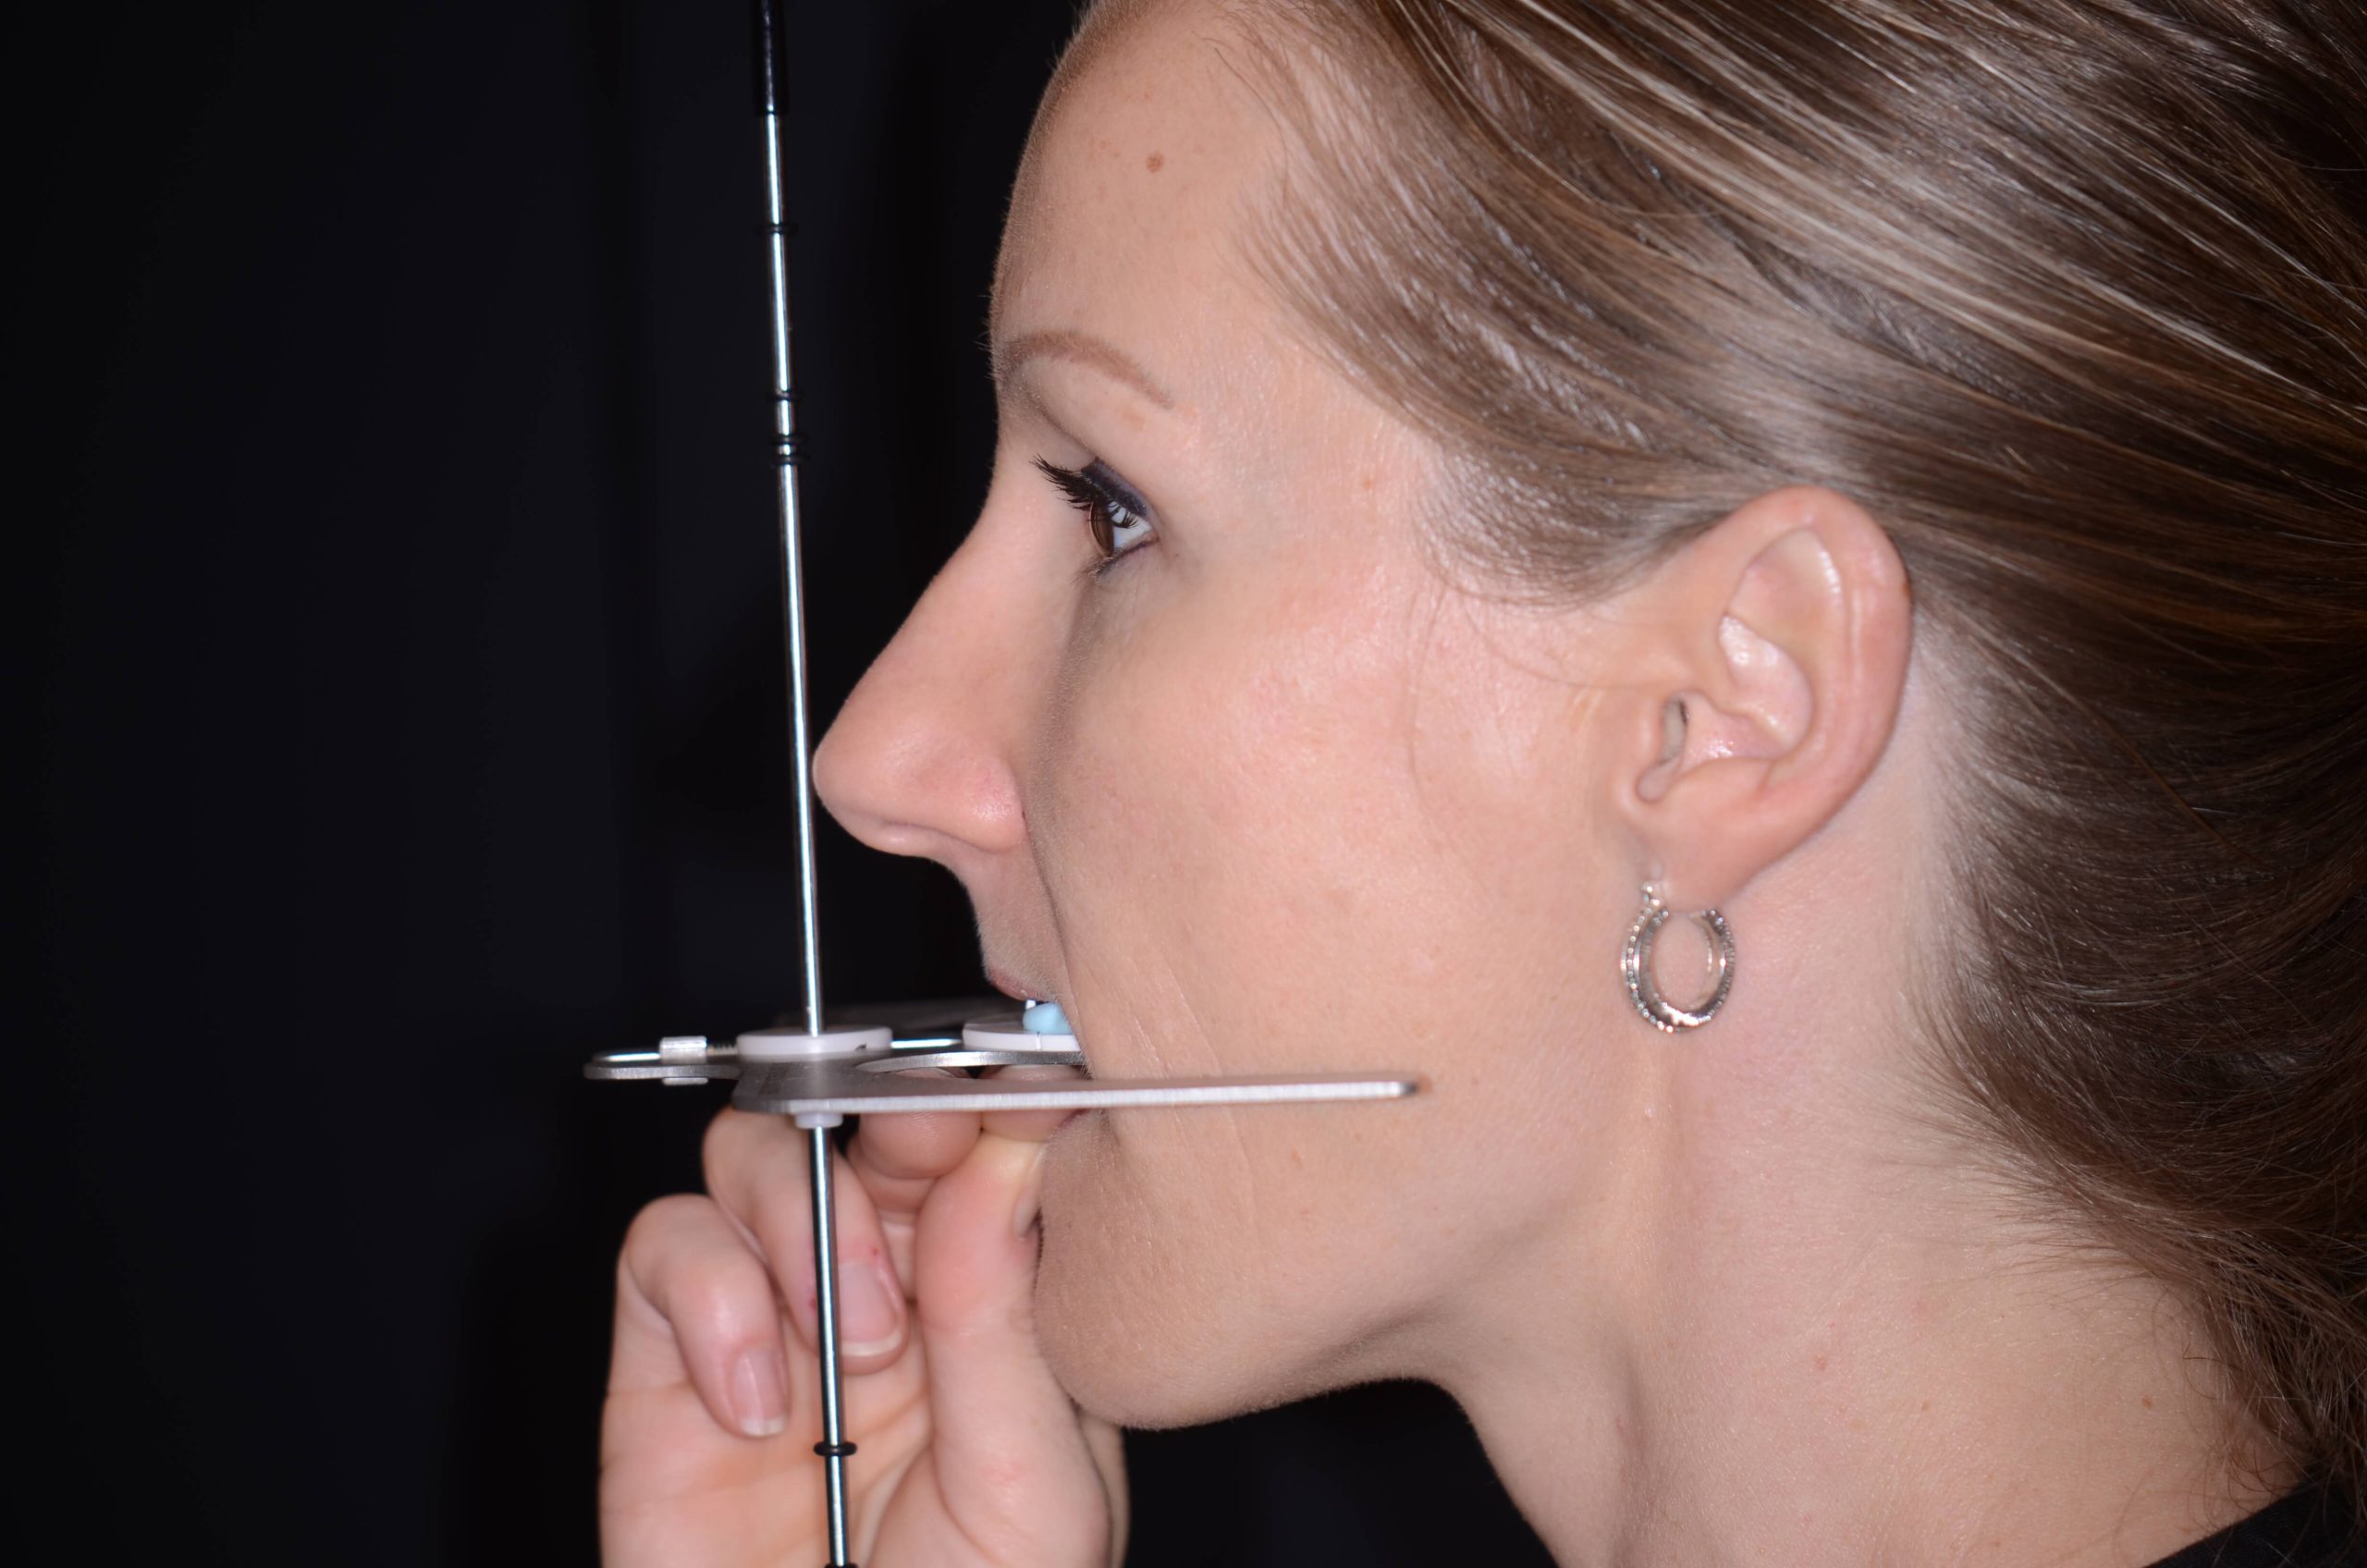
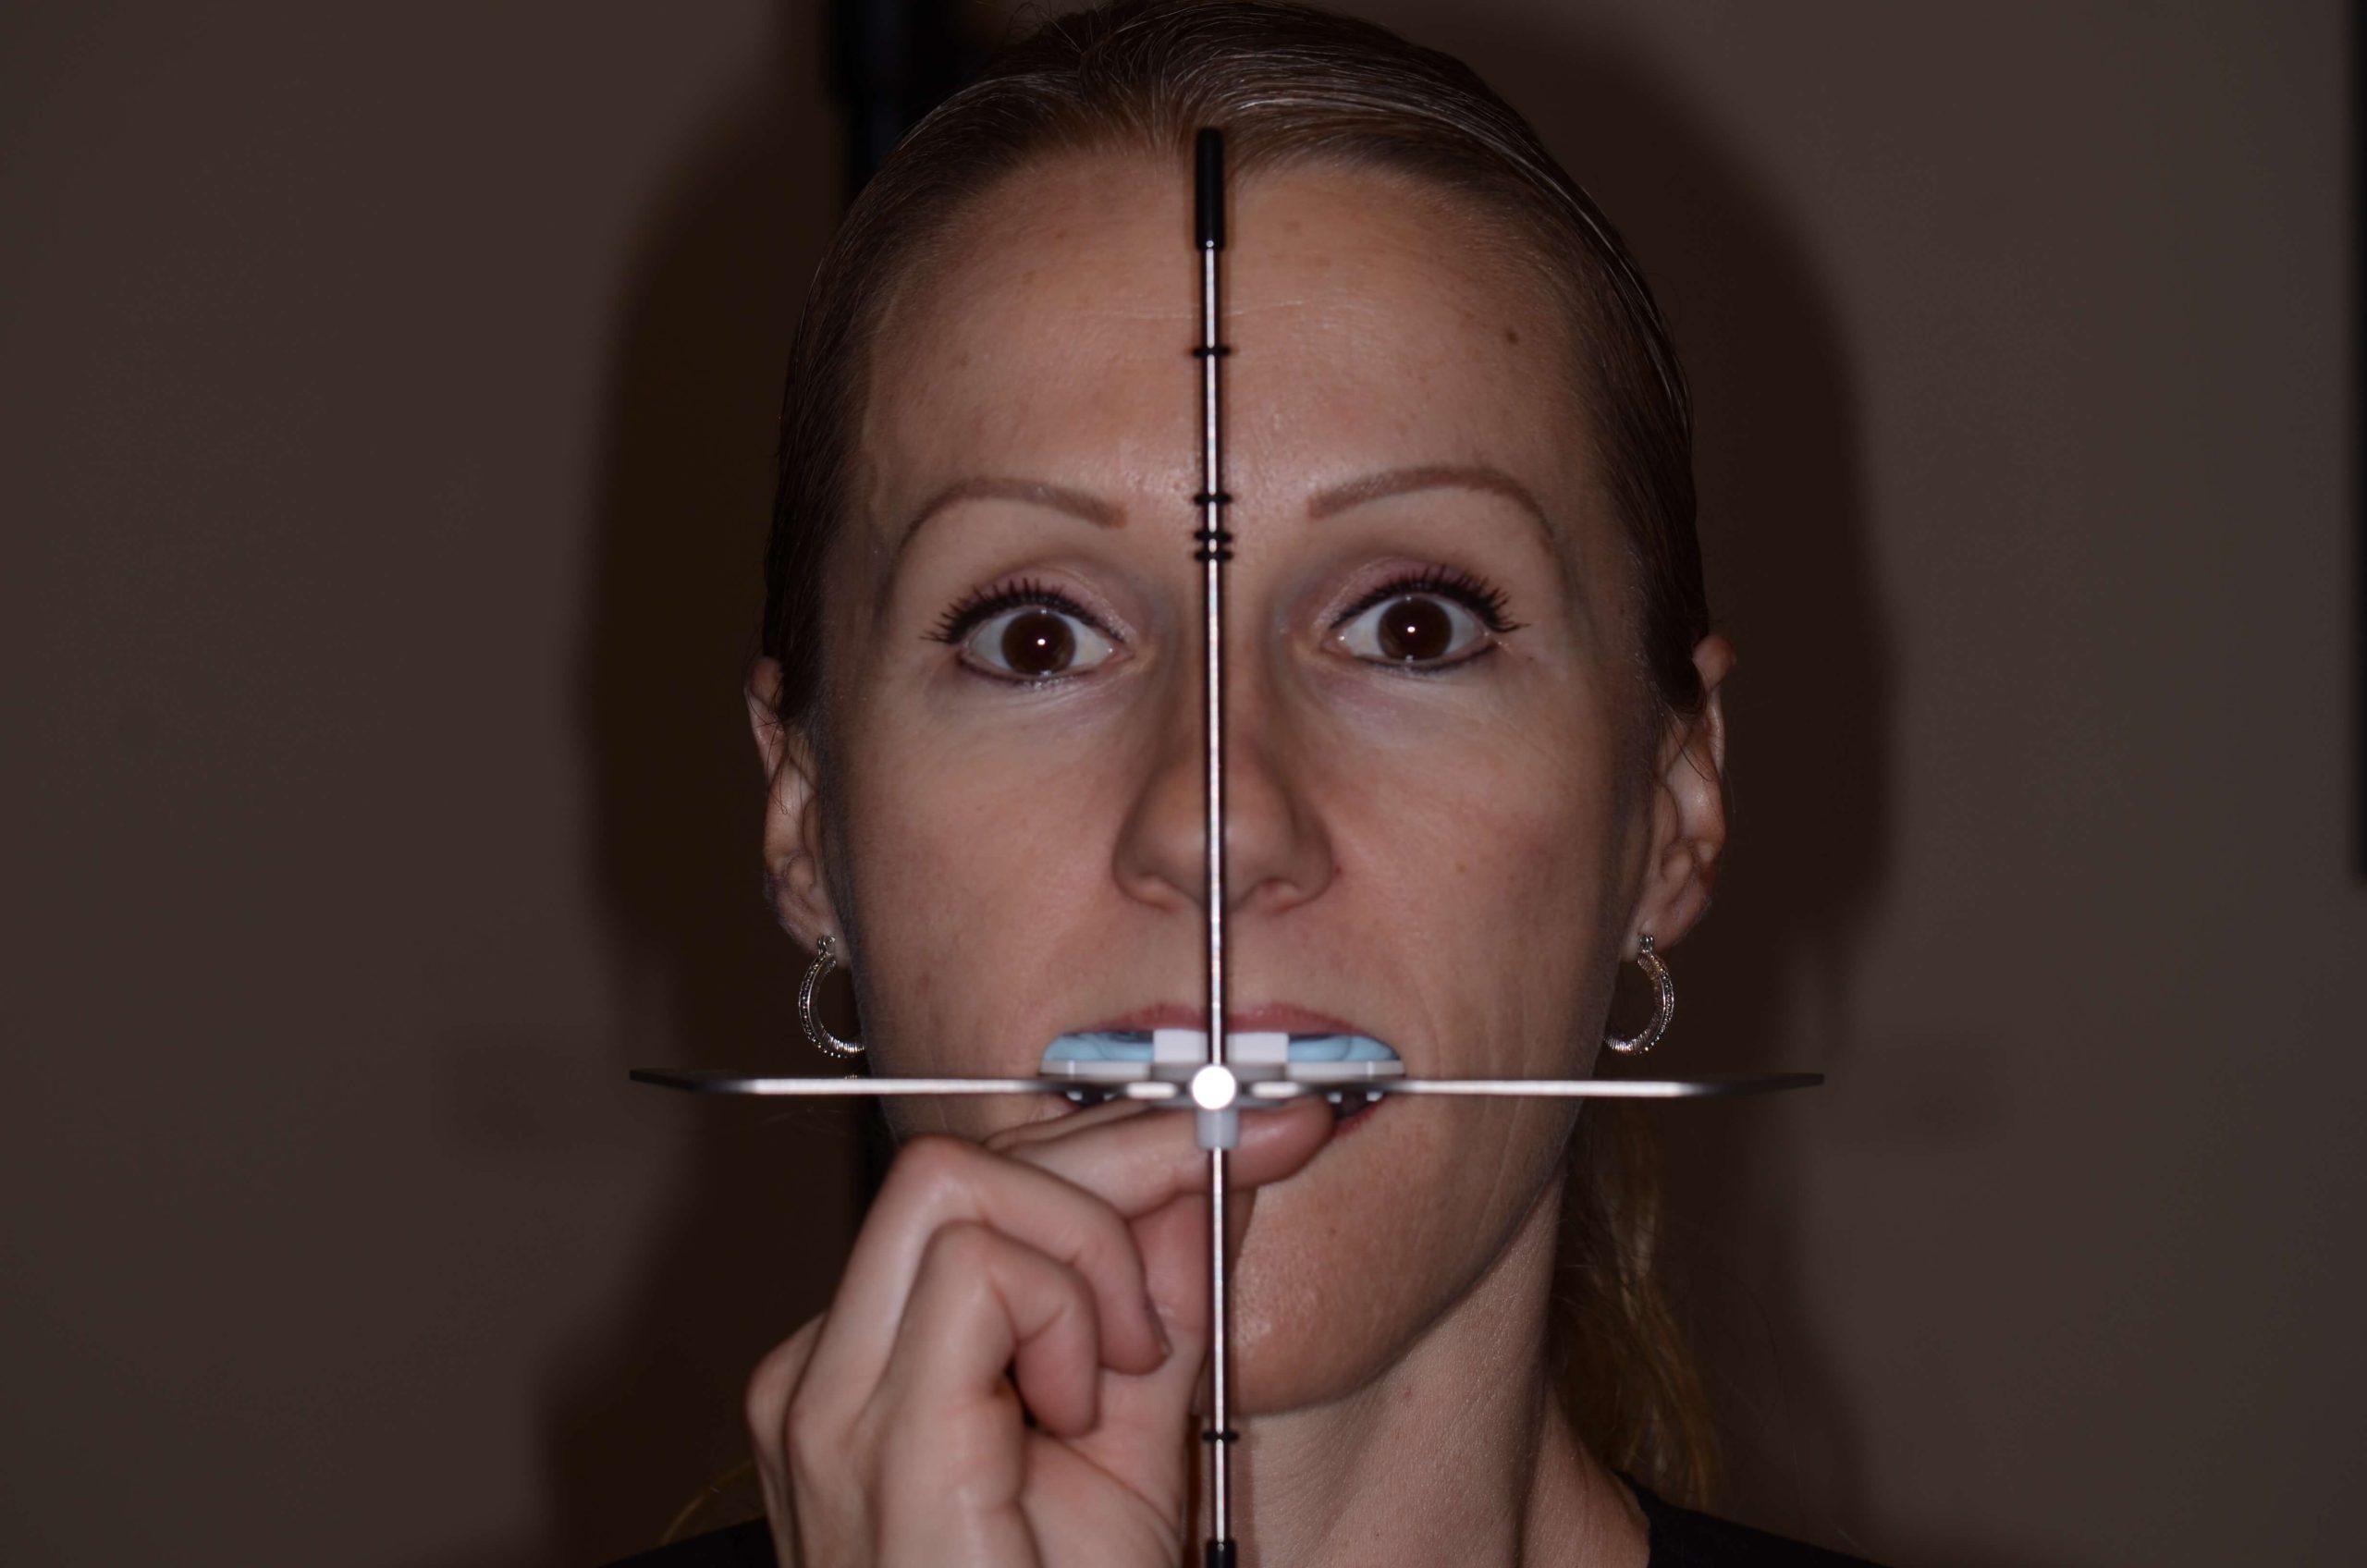
… Ensure the Dento-Facial Analyzer is positioned level to the horizon both when looking straight on at the patient’s face from the anterior section and looking at them from the side. It should be level in both planes of space. Then, allow the bite silicone to set and have the patient hold to verify.

Remember that the main use of the Dento-Facial Analyzer is transferring three significant pieces of information. This is either intended for the laboratory or for when we mount our own models.

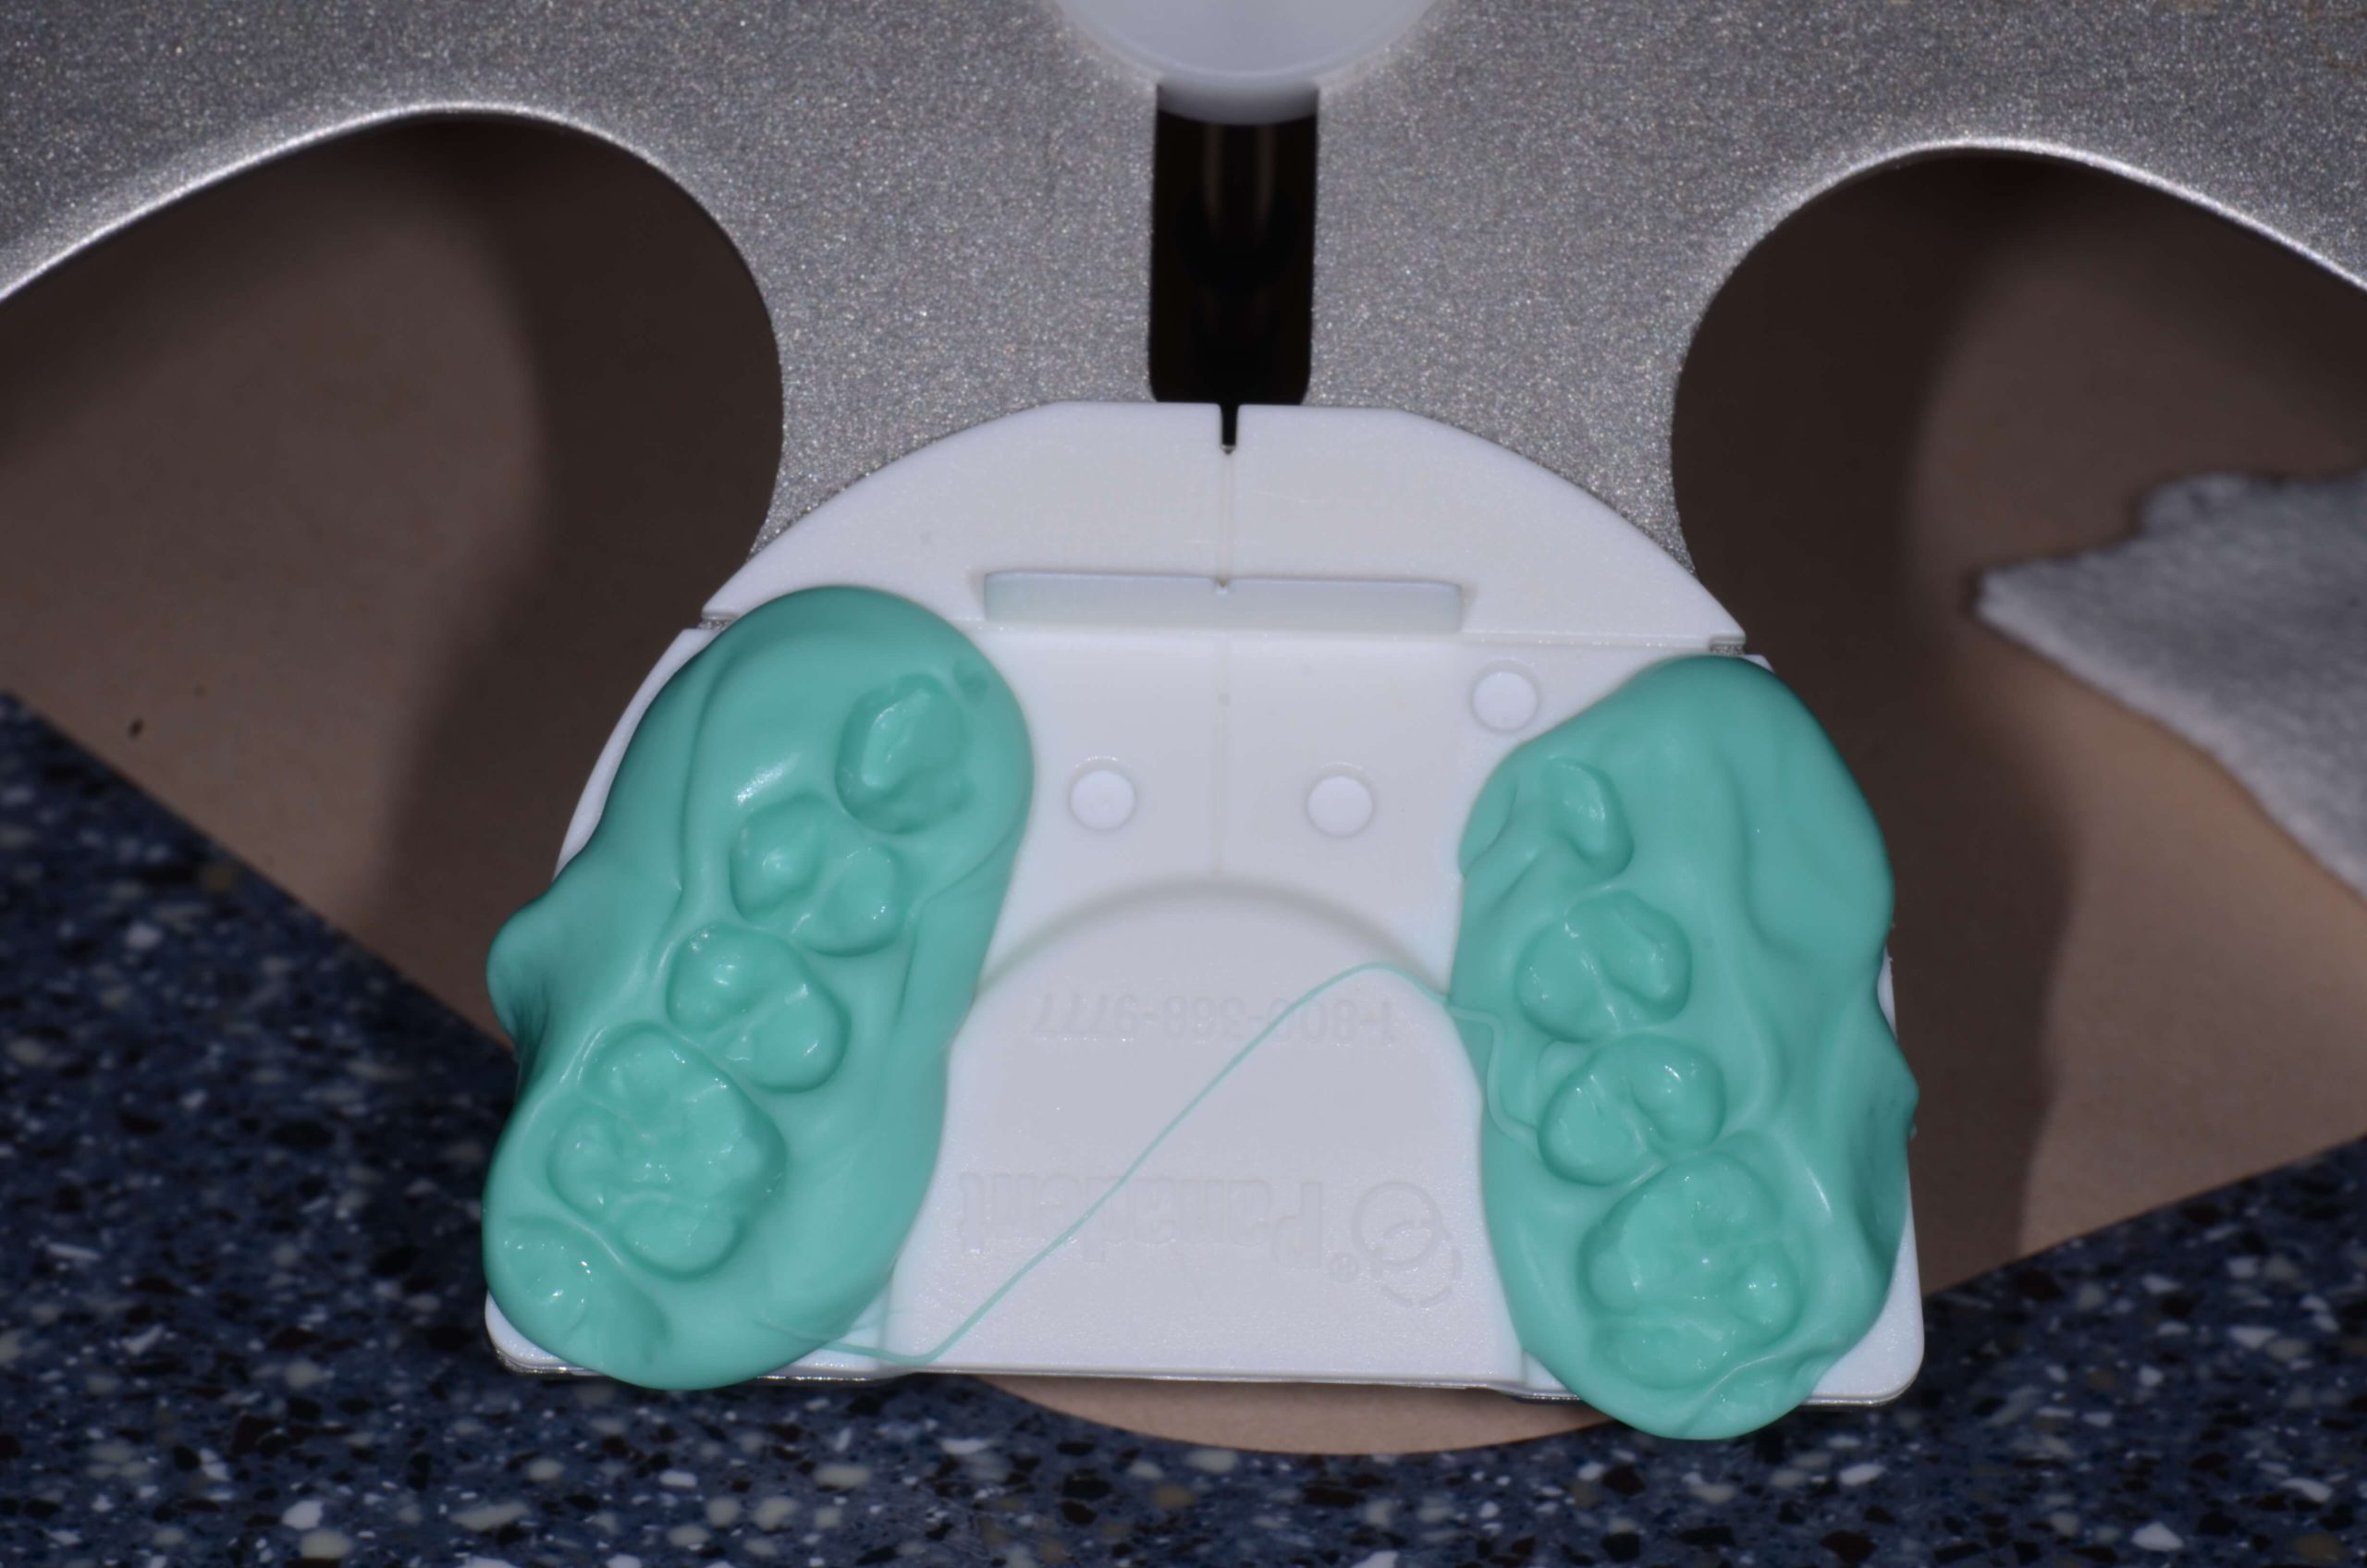
The first piece of information is the maxillary relationship – the distance to hinge access – which means it’s very important that the central incisors on the maxilla are seated against the plastic bite plate.

Second, we are transferring information about the occlusal plane and the incisal plane. From an incisal plane perspective, it’s crucial that the plate is level to the horizon as we look straight on at the patient once we have the analyzer in. The vertical rod on the analyzer indicates the center of the face – the facial midline – which can be given by the central philtrum of the upper lip or the center of glabella.

You should also look at how you’ve captured the record from a lateral view. This ensures the occlusal plane – the relationship of the cant from anterior to posterior teeth that exists in the patient’s face – is transferred accurately to the lab or onto the articulator. The side bar of the Dento-Facial Analyzer should be level to the horizon.

Do you use this simple and accurate tool?

For a hands-on demonstration of the Dento-Facial Analyzer from Pankey educators, learn more about our Essentials 1 course.

Related Course

Mastering Treatment Planning

DATE: October 2 2025 @ 8:00 am - October 4 2025 @ 1:30 pm

Location: The Pankey Institute

CE HOURS: 25.5

Tuition: $ 4795

Single Occupancy with Ensuite Private Bath (per night): $ 345

 MASTERING TREATMENT PLANNING Course Description In our discussions with participants in both the Essentials and Mastery level courses, we continue to hear the desire to help establish better systems for…

Learn More>

About Author

User Image
Lee Ann Brady DMD

Dr. Lee Ann Brady is passionate about dentistry, her family and making a difference. She is a general dentist and owns a practice in Glendale, AZ limited to restorative dentistry. Lee’s passion for dental education began as a CE junkie herself, pursuing lots of advanced continuing education focused on Restorative and Occlusion. In 2005, she became a full time resident faculty member for The Pankey Institute, and was promoted to Clinical Director in 2006. Lee joined Spear Education as Executive VP of Education in the fall of 2008 to teach and coordinate the educational curriculum. In June of 2011, she left Spear Education, founded leeannbrady.com and joined the dental practice she now owns as an associate. Today, she teaches at dental meetings and study clubs both nationally and internationally, continues to write for dental journals and her website, sits on the editorial board of the Journal of Cosmetic Dentistry, Inside Dentistry and DentalTown Magazines and is the Director of Education for The Pankey Institute.

FIND A PANKEY DENTIST OR TECHNICIAN

I AM A
I AM INTERESTED IN

VIEW COURSE CALENDAR

Dento-Facial Analyzer Technique: Capturing Records

October 1, 2018 Lee Ann Brady DMD

You can gather accurate functional and esthetic information using the Panadent Dento-Facial Analyzer for restorative cases. I’ve found this tool particularly effective compared to alternatives such as the Facebow or stick bite.

If you haven’t done so yet, make sure to check out the introduction to this series on the Dento-Facial Analyzer. It includes background information, armamentarium, and key reasons why the device can elevate patient care.

Without further ado, the Dento-Facial Analyzer technique:

Essentials of Dento-Facial Analyzer Technique

Once you have the white disposable plate – which is actually the piece you will send to the lab once the record is captured – snapped onto the Dento-Facial Analyzer, use VPS tray adhesive to lightly coat the plastic tray. You are only going to do this from about the canine position posteriorly because you aren’t going to put silicone on the anterior portion of that bite plate.

Next, attach the vertical reference bar to the Dento-Facial Analyzer. Without bite registration on it, take it to the patient’s mouth and seat the central incisors exactly against the white plastic in the front labially.

Verify that you can hold this level to the horizon in two planes of space and that you can touch the patient’s teeth. If not, you might need to build up the posterior.

If you’ve verified this, put bite silicone on the plate from the canine position back, then seat it again, making sure the central incisors are seated labially against the white plastic …

I’ll round up this fun technique with Part 3 in the series coming soon.

For a hands-on lesson in the Dento-Facial Analyzer from our talented educators, check out our Essentials 1 Pankey course. Also, watch this video for a quick refresher or pre-course overview.  

Related Course

E2: Occlusal Appliances & Equilibration

DATE: October 11 2026 @ 8:00 am - October 15 2026 @ 2:30 pm

Location: The Pankey Institute

CE HOURS: 44

Dentist Tuition: $ 7500

Single Occupancy with Ensuite Private Bath (per night): $ 355

What if you had one tool that increased comprehensive case acceptance, managed patients with moderate to high functional risk, verified centric relation and treated signs and symptoms of TMD? Appliance…

Learn More>

About Author

User Image
Lee Ann Brady DMD

Dr. Lee Ann Brady is passionate about dentistry, her family and making a difference. She is a general dentist and owns a practice in Glendale, AZ limited to restorative dentistry. Lee’s passion for dental education began as a CE junkie herself, pursuing lots of advanced continuing education focused on Restorative and Occlusion. In 2005, she became a full time resident faculty member for The Pankey Institute, and was promoted to Clinical Director in 2006. Lee joined Spear Education as Executive VP of Education in the fall of 2008 to teach and coordinate the educational curriculum. In June of 2011, she left Spear Education, founded leeannbrady.com and joined the dental practice she now owns as an associate. Today, she teaches at dental meetings and study clubs both nationally and internationally, continues to write for dental journals and her website, sits on the editorial board of the Journal of Cosmetic Dentistry, Inside Dentistry and DentalTown Magazines and is the Director of Education for The Pankey Institute.

FIND A PANKEY DENTIST OR TECHNICIAN

I AM A
I AM INTERESTED IN

VIEW COURSE CALENDAR

Panadent Dento-Facial Analyzer Technique: Introduction

September 21, 2018 Lee Ann Brady DMD

The Dento-Facial Analyzer is a marvelous tool I use in the practice to mount maxillary models. It has made a huge difference in my practice of dentistry and is one of my favorite tools to teach.

Introduction to the Dento-Facial Analyzer

For the critical aspects of diagnostics and sending info to the lab for the completion of a restorative case, mounting models appropriately is so important. They must be mounted in three planes of space referenced to hinge access to capture esthetic information including incisal plane and occlusal plane relative to the horizon.

Traditionally, this has been accomplished by utilizing a Facebow, Earbow, or by actually capturing hinge access position. Now, we have the option of using the Kois Dento-Facial Analyzer to capture both functional information and esthetic information that we would normally get with a Fox’s bite plane or stick bite. All of this functionality is managed with one simple device.

The Kois Dento-Facial Analyzer was designed based on scientific information gathered by Dr. John Kois, which shows that the distance from the incisal edge position of the maxillary central incisors to hinge access on average is 100 mm. Most people fall within a range of 5 mm to the average, therefore this is the assumption made when the device takes a record.

The armamentarium for record capturing with the Panadent instrument includes the analyzer, bite registration silicone in a gun with a tip, VPS adhesive used in an impression tray, and disposable bite plates that snap onto the analyzer (from the device manufacturer Panadent).

You can use bite registration silicone, Panadent bite tabs, wax, or VPS heavy body impression material to capture the record …

I’ll continue this review of the Dento-Facial Analyzer technique in Part 2, coming soon! And don’t miss one of my recent Pankey Gram favorites from Dr. Bill Gregg on an occlusion-focused hygiene exam. Read it here for his insightful tips.

For an in-person, hands-on lesson in the Dento-Facial Analyzer, check out our Essentials 1 Pankey course. You can also watch this video for a quick refresher.  

Related Course

E1: Aesthetic & Functional Treatment Planning

DATE: January 15 2026 @ 8:00 am - January 30 2026 @ 2:30 pm

Location: The Pankey Institute

CE HOURS: 39

Dentist Tuition: $ 6900

Single Occupancy with Ensuite Private Bath (Per Night): $ 355

Transform your experience of practicing dentistry, increase predictability, profitability and fulfillment. The Essentials Series is the Key, and Aesthetic and Functional Treatment Planning is where your journey begins.  Following a system of…

Learn More>

About Author

User Image
Lee Ann Brady DMD

Dr. Lee Ann Brady is passionate about dentistry, her family and making a difference. She is a general dentist and owns a practice in Glendale, AZ limited to restorative dentistry. Lee’s passion for dental education began as a CE junkie herself, pursuing lots of advanced continuing education focused on Restorative and Occlusion. In 2005, she became a full time resident faculty member for The Pankey Institute, and was promoted to Clinical Director in 2006. Lee joined Spear Education as Executive VP of Education in the fall of 2008 to teach and coordinate the educational curriculum. In June of 2011, she left Spear Education, founded leeannbrady.com and joined the dental practice she now owns as an associate. Today, she teaches at dental meetings and study clubs both nationally and internationally, continues to write for dental journals and her website, sits on the editorial board of the Journal of Cosmetic Dentistry, Inside Dentistry and DentalTown Magazines and is the Director of Education for The Pankey Institute.

FIND A PANKEY DENTIST OR TECHNICIAN

I AM A
I AM INTERESTED IN

VIEW COURSE CALENDAR

Shrink Wrap Provisional Technique for Predictable Veneers: Part 4

August 24, 2018 Lee Ann Brady DMD

Creating amazing provisionals primes the patient for a positive treatment experience and ensures they’ll be content even before the final veneers. Read on for the last post in our four-part shrink wrap provisionals fabrication series:

Checking Occlusion and Polishing Shrink Wrap Provisionals

After cleaning off most of the excess from the provisional with a universal scaler, extra fine mosquito diamond, and a brownie, use the same diamond to open the linguo-gingival embrasures with the intent that the patient should be able to pass floss through them. This also keeps the tissue as healthy as possible for the seat later on.

Now that you’ve done all your flash trim, you should check the protrusive and right and left excursive occlusion, making sure you have even marks and no fremitus. Check intercuspal position to ensure you have no fremitus there as well, either lying back or with the patient in the alert feeding position.

With everything trimmed and ready to go, the last step is simply to polish. You can use the Brasseler Featherlite porcelain polishing system running in a latch handpiece. Utilize the first of three polishers at about 15,000 RMP, then move to the second polisher at about 10,000 RPM. They can be run at a higher speed, but you’ll get way fewer uses out of the polishers. Finally, run the last of the three polishers at about 7,000 RPM.

If you notice a porosity after cleaning out the residue from the polishing, you can use a Venus Diamond flowable that matches the esthetics of the bisacryl exactly. Fill the void by manipulating the side of the explorer to drag away excess and feather it out. Then simply light cure so that food doesn’t pack into the void.

The final step of this shrink wrap technique is to use Dialite polishing paste from Brasseler in an impregnated bristle brush to create a perfectly smooth finish. The entire process of provisionalization should take no more than about fifteen minutes.


The Shrink Wrap Technique is taught in our hands on course Excellence in Bonded Porcelain.

Related Course

E1: Aesthetic & Functional Treatment Planning

DATE: January 23 2025 @ 8:00 am - January 26 2025 @ 2:30 pm

Location: The Pankey Institute

CE HOURS: 39

Dentist Tuition: $ 6800

Single Occupancy with Ensuite Private Bath (Per Night): $ 345

Transform your experience of practicing dentistry, increase predictability, profitability and fulfillment. The Essentials Series is the Key, and Aesthetic and Functional Treatment Planning is where your journey begins.  Following a system of…

Learn More>

About Author

User Image
Lee Ann Brady DMD

Dr. Lee Ann Brady is passionate about dentistry, her family and making a difference. She is a general dentist and owns a practice in Glendale, AZ limited to restorative dentistry. Lee’s passion for dental education began as a CE junkie herself, pursuing lots of advanced continuing education focused on Restorative and Occlusion. In 2005, she became a full time resident faculty member for The Pankey Institute, and was promoted to Clinical Director in 2006. Lee joined Spear Education as Executive VP of Education in the fall of 2008 to teach and coordinate the educational curriculum. In June of 2011, she left Spear Education, founded leeannbrady.com and joined the dental practice she now owns as an associate. Today, she teaches at dental meetings and study clubs both nationally and internationally, continues to write for dental journals and her website, sits on the editorial board of the Journal of Cosmetic Dentistry, Inside Dentistry and DentalTown Magazines and is the Director of Education for The Pankey Institute.

FIND A PANKEY DENTIST OR TECHNICIAN

I AM A
I AM INTERESTED IN

VIEW COURSE CALENDAR

Shrink Wrap Provisional Technique for Predictable Veneers: Part 3

August 22, 2018 Lee Ann Brady DMD

Utilizing the shrink wrap technique for predictable veneers necessitates careful attention to materials selection and silicone matrix creation. Once you have created the matrix, cleaned the preps, and fully seated the matrix, you can use a 2 x 2 soaked thoroughly in rubbing alcohol to wipe across and remove the air-inhibited layer.

Cleaning Up the Veneers Preparation

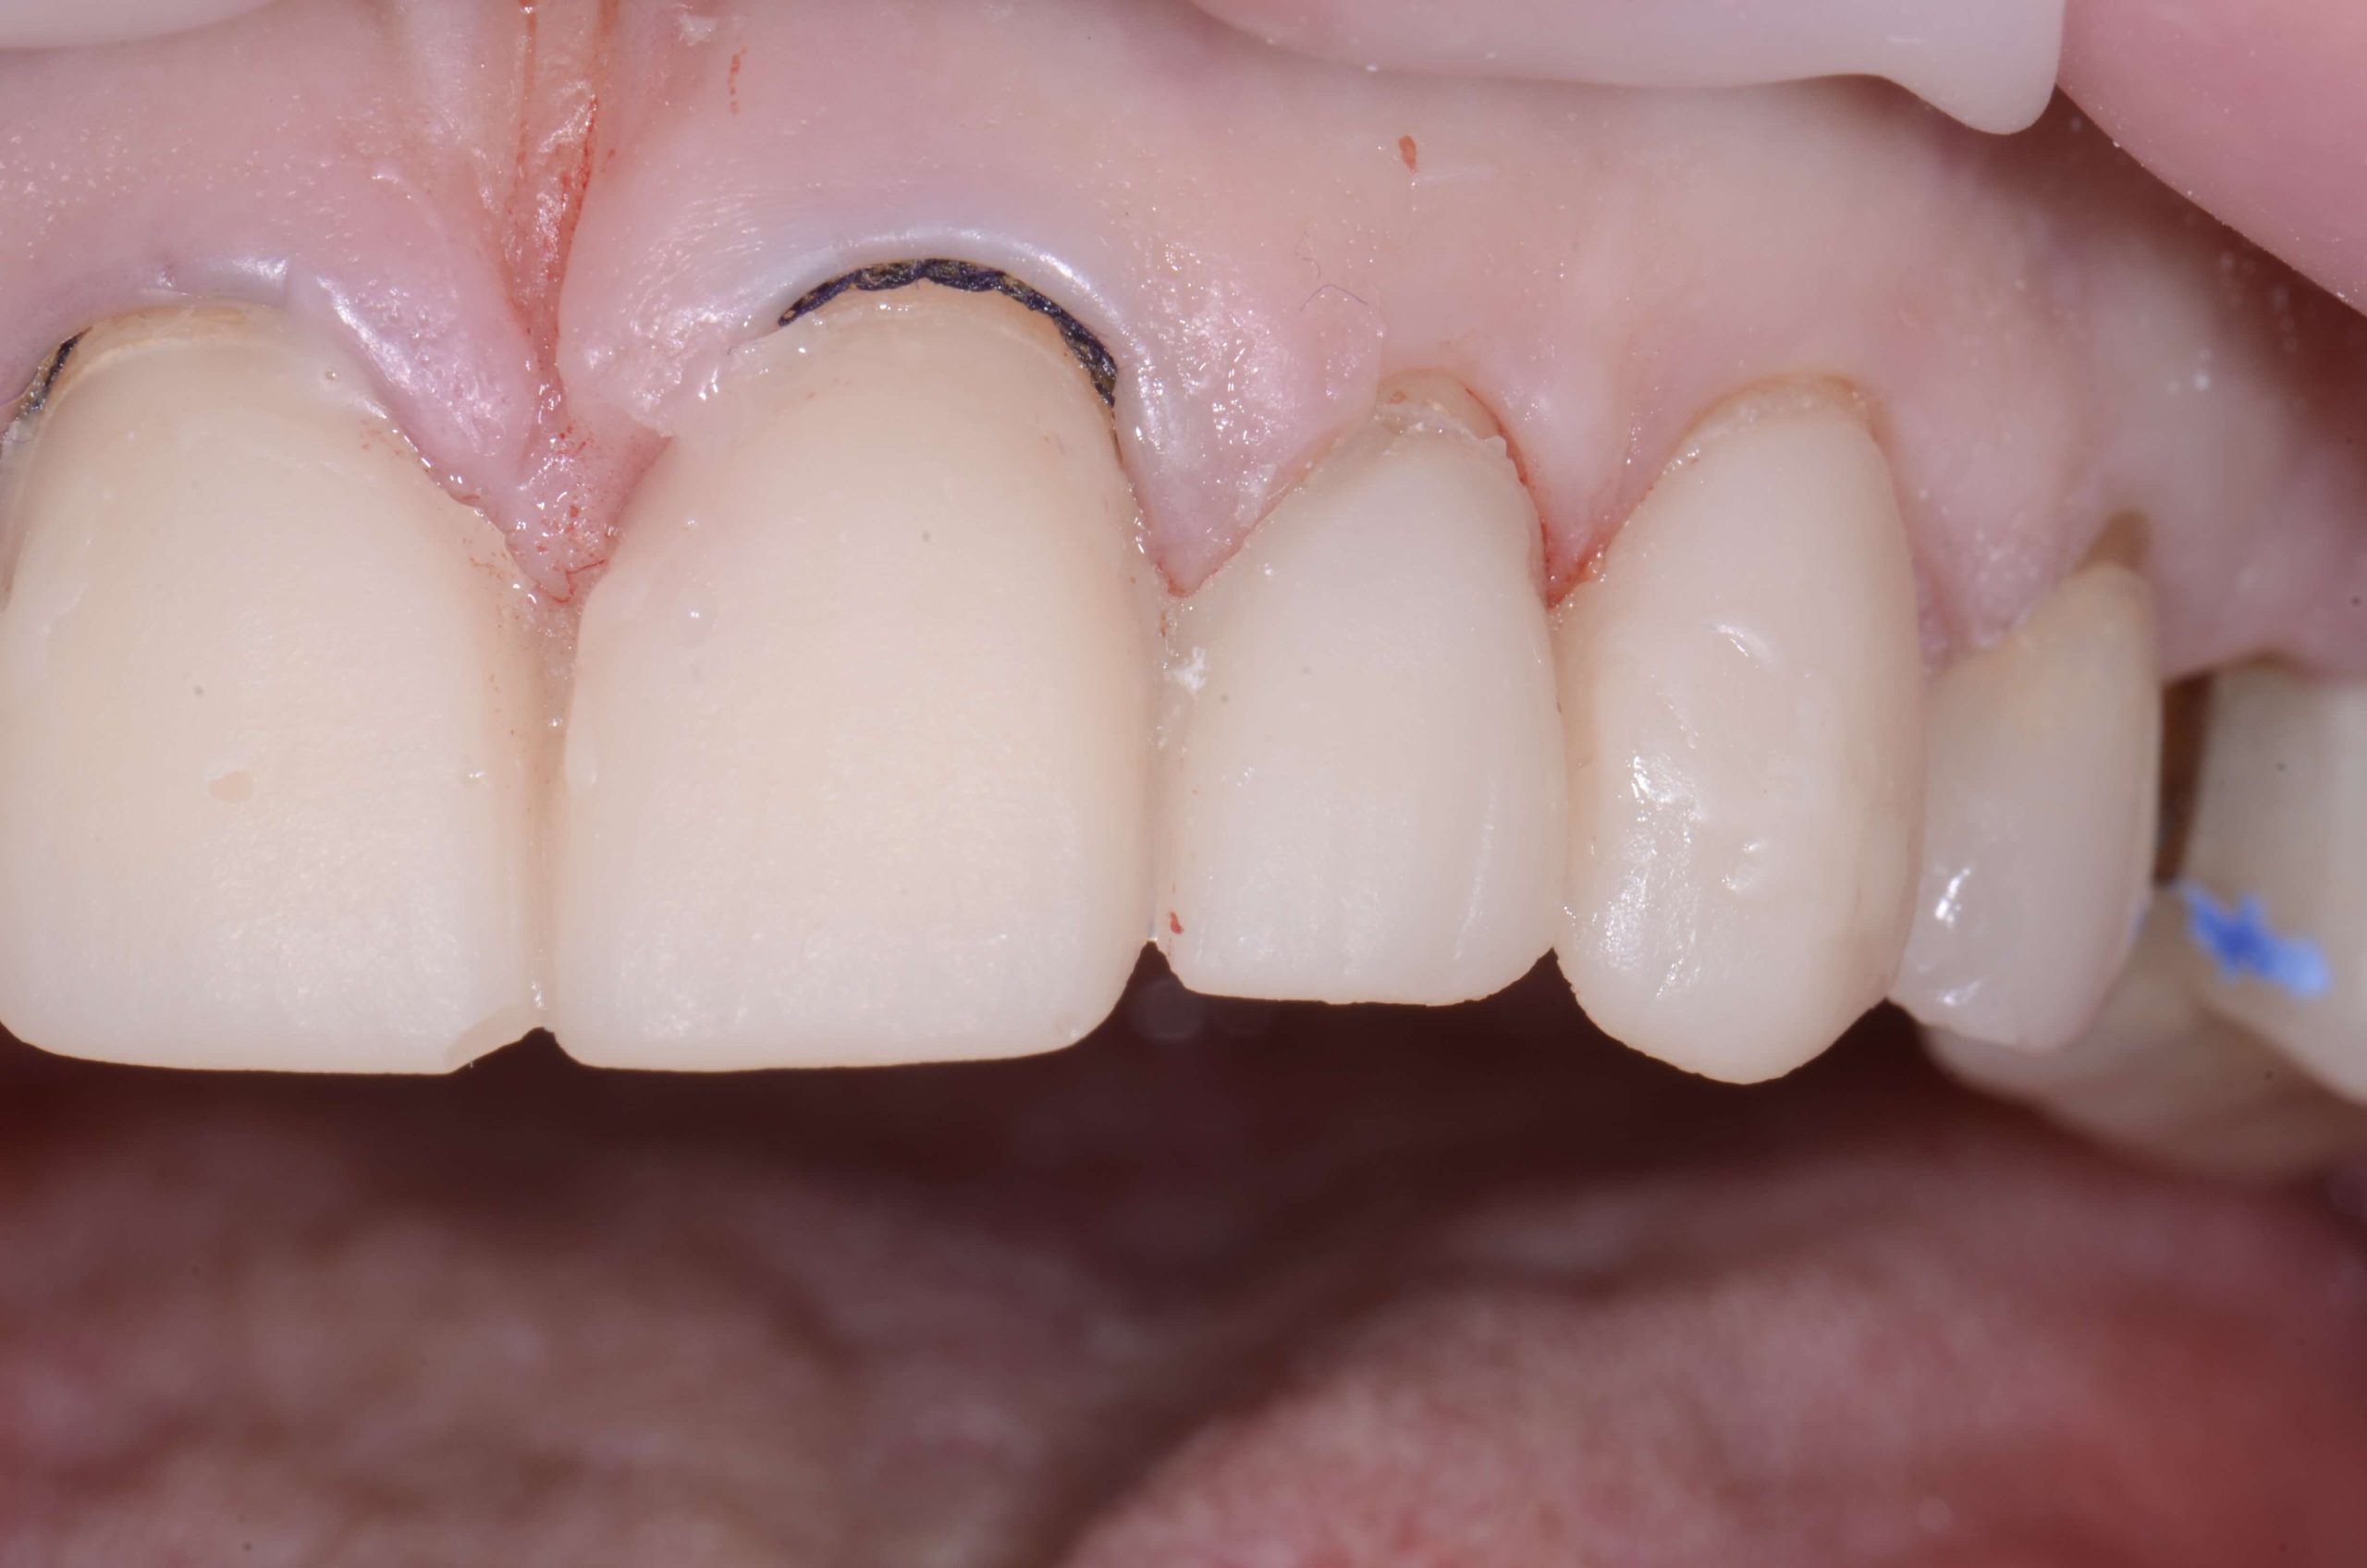
Because of the matrix with the silicone gasket, almost all of the excess matrix material should flake off with a universal scaler. That’s why this technique works perfectly for preps with equigingival or supragingival margins. It works less well if you have a subgingival margin because the gasket separates the silicone right at the level of the existing free gingival margin.

On the lingual, you will have a very thin film of excess material sitting over the unprepared portion of the tooth. You can peel it off using the scaler. These provisionals are not easy to pull off or dislodge from the teeth. That means you don’t have to be cautious. The material will separate as if it has been perforated right where the margin was.

After the use of a universal scaler, you can check all the margins. You’ll realize you have virtually no excess. You can then utilize an extra fine mosquito diamond at 20,000 rpm dry in the speed reduction Brasseler NSK high speed attachment. You should open the facial gingival embrasures so the patient can get floss through them. This will lead to healthy gingival tissues that aren’t inflamed on the day of the seat.

Now switch to a brownie silicone point running dry at 10,000 to 20,000 rpm. A brownie at this speed will cut any kind of resin to create a perfect infinity margin right where the lingual reduction is on the preparations and remove any excess.

What common provisionals technique do you prefer for veneers? To be continued … 


The Shrink Wrap Technique is taught in our hands on course Excellence in Bonded Porcelain.

Related Course

E1: Aesthetic & Functional Treatment Planning

DATE: October 22 2026 @ 8:00 am - October 25 2026 @ 2:30 pm

Location: The Pankey Institute

CE HOURS: 39

Dentist Tuition: $ 6900

Single Occupancy with Ensuite Private Bath (Per Night): $ 355

Transform your experience of practicing dentistry, increase predictability, profitability and fulfillment. The Essentials Series is the Key, and Aesthetic and Functional Treatment Planning is where your journey begins.  Following a system of…

Learn More>

About Author

User Image
Lee Ann Brady DMD

Dr. Lee Ann Brady is passionate about dentistry, her family and making a difference. She is a general dentist and owns a practice in Glendale, AZ limited to restorative dentistry. Lee’s passion for dental education began as a CE junkie herself, pursuing lots of advanced continuing education focused on Restorative and Occlusion. In 2005, she became a full time resident faculty member for The Pankey Institute, and was promoted to Clinical Director in 2006. Lee joined Spear Education as Executive VP of Education in the fall of 2008 to teach and coordinate the educational curriculum. In June of 2011, she left Spear Education, founded leeannbrady.com and joined the dental practice she now owns as an associate. Today, she teaches at dental meetings and study clubs both nationally and internationally, continues to write for dental journals and her website, sits on the editorial board of the Journal of Cosmetic Dentistry, Inside Dentistry and DentalTown Magazines and is the Director of Education for The Pankey Institute.

FIND A PANKEY DENTIST OR TECHNICIAN

I AM A
I AM INTERESTED IN

VIEW COURSE CALENDAR

Shrink Wrap Provisional Technique for Predictable Veneers: Part 2

August 20, 2018 Lee Ann Brady DMD

Provisionals are an important part of veneers fabrication that requires just as much care and diligence as the final restoration. After acquiring diagnostic and lab records and fabricating a silicone matrix, the next step is to clean the preps with a dilute solution of 2% chlorhexidine prep scrub. Use a syringe tip with a fuzzy end for optimal brushing.

Cleaning the Veneer Preps and Loading the Matrix

The latter process ensures you start off with clean, bacteria-free preps. Rinse off the chlorhexidine and thoroughly dry the preps. With this technique you should spot-etch utilizing 35% phosphoric acid for a 3mm diameter spot on the facial or labial of the teeth.

Keep the etch far away from the margins and interproximals. Leave it for 30 seconds, rinse off, and vigorously dry the preparations. You can use an air/water syringe because a little contamination is fine.

You should then apply GLUMA from Kulzer to every prep, which is a combination of antimicrobial glutaraldehyde and HEMA that prevents tooth sensitivity. The GLUMA excess is dried with cotton to prevent it from getting in saliva or mucous membranes.

Now that teeth are ready, you can load the silicone matrix with a bisacryl material. Load the matrix by moving back and forth along the incisal edge and adding layers to minimize the incorporation of air bubbles. Fully seat it. One of the tricks with this matrix is the very flat occlusal table so you can apply even pressure. Additionally, adequate thickness of the silicone provides rigidity and accuracy with less trim needed.

Let the material stay in the mouth for the full set time, which is a little over four minutes. At that point, remove the matrix for completely hard bisacryl on the teeth.

To be continued …


The Shrink Wrap Technique is taught in our hands on course Excellence in Bonded Porcelain.

Related Course

The Pankey Hygienist: Where Clinical & Behavioral Science Unite

DATE: January 9 2025 @ 1:00 pm - January 11 2025 @ 8:00 pm

Location: The Pankey Institute

CE HOURS: 23

Regular Tuition: $ 3195

Single Occupancy Room with Ensuite Bath (Per Night): $ 345

The Power of Development Hygienists and Dentists: Are you ready for your hygiene appointments to be more effective both clinically and relationally? Can you imagine having a totally fresh perspective…

Learn More>

About Author

User Image
Lee Ann Brady DMD

Dr. Lee Ann Brady is passionate about dentistry, her family and making a difference. She is a general dentist and owns a practice in Glendale, AZ limited to restorative dentistry. Lee’s passion for dental education began as a CE junkie herself, pursuing lots of advanced continuing education focused on Restorative and Occlusion. In 2005, she became a full time resident faculty member for The Pankey Institute, and was promoted to Clinical Director in 2006. Lee joined Spear Education as Executive VP of Education in the fall of 2008 to teach and coordinate the educational curriculum. In June of 2011, she left Spear Education, founded leeannbrady.com and joined the dental practice she now owns as an associate. Today, she teaches at dental meetings and study clubs both nationally and internationally, continues to write for dental journals and her website, sits on the editorial board of the Journal of Cosmetic Dentistry, Inside Dentistry and DentalTown Magazines and is the Director of Education for The Pankey Institute.

FIND A PANKEY DENTIST OR TECHNICIAN

I AM A
I AM INTERESTED IN

VIEW COURSE CALENDAR

Shrink Wrap Provisional Technique for Predictable Veneers: Part 1

August 17, 2018 Lee Ann Brady DMD

Of all the methods commonly used for veneer provisionalization, my favorite has to be the shrink wrap technique. I love it and use it all the time because in my opinion it is the easiest and most predictable method.

The term ‘shrink wrap’ comes from allowing polymerization shrinkage of the material to lock bisacryl onto the preparation. The main advantage of this approach is that it keeps veneer provisionals firmly secured until the final restoration can be placed.

Here’s my take on utilizing this technique in the dental practice:

Predictable Veneers with Shrink Wrap Provisionals

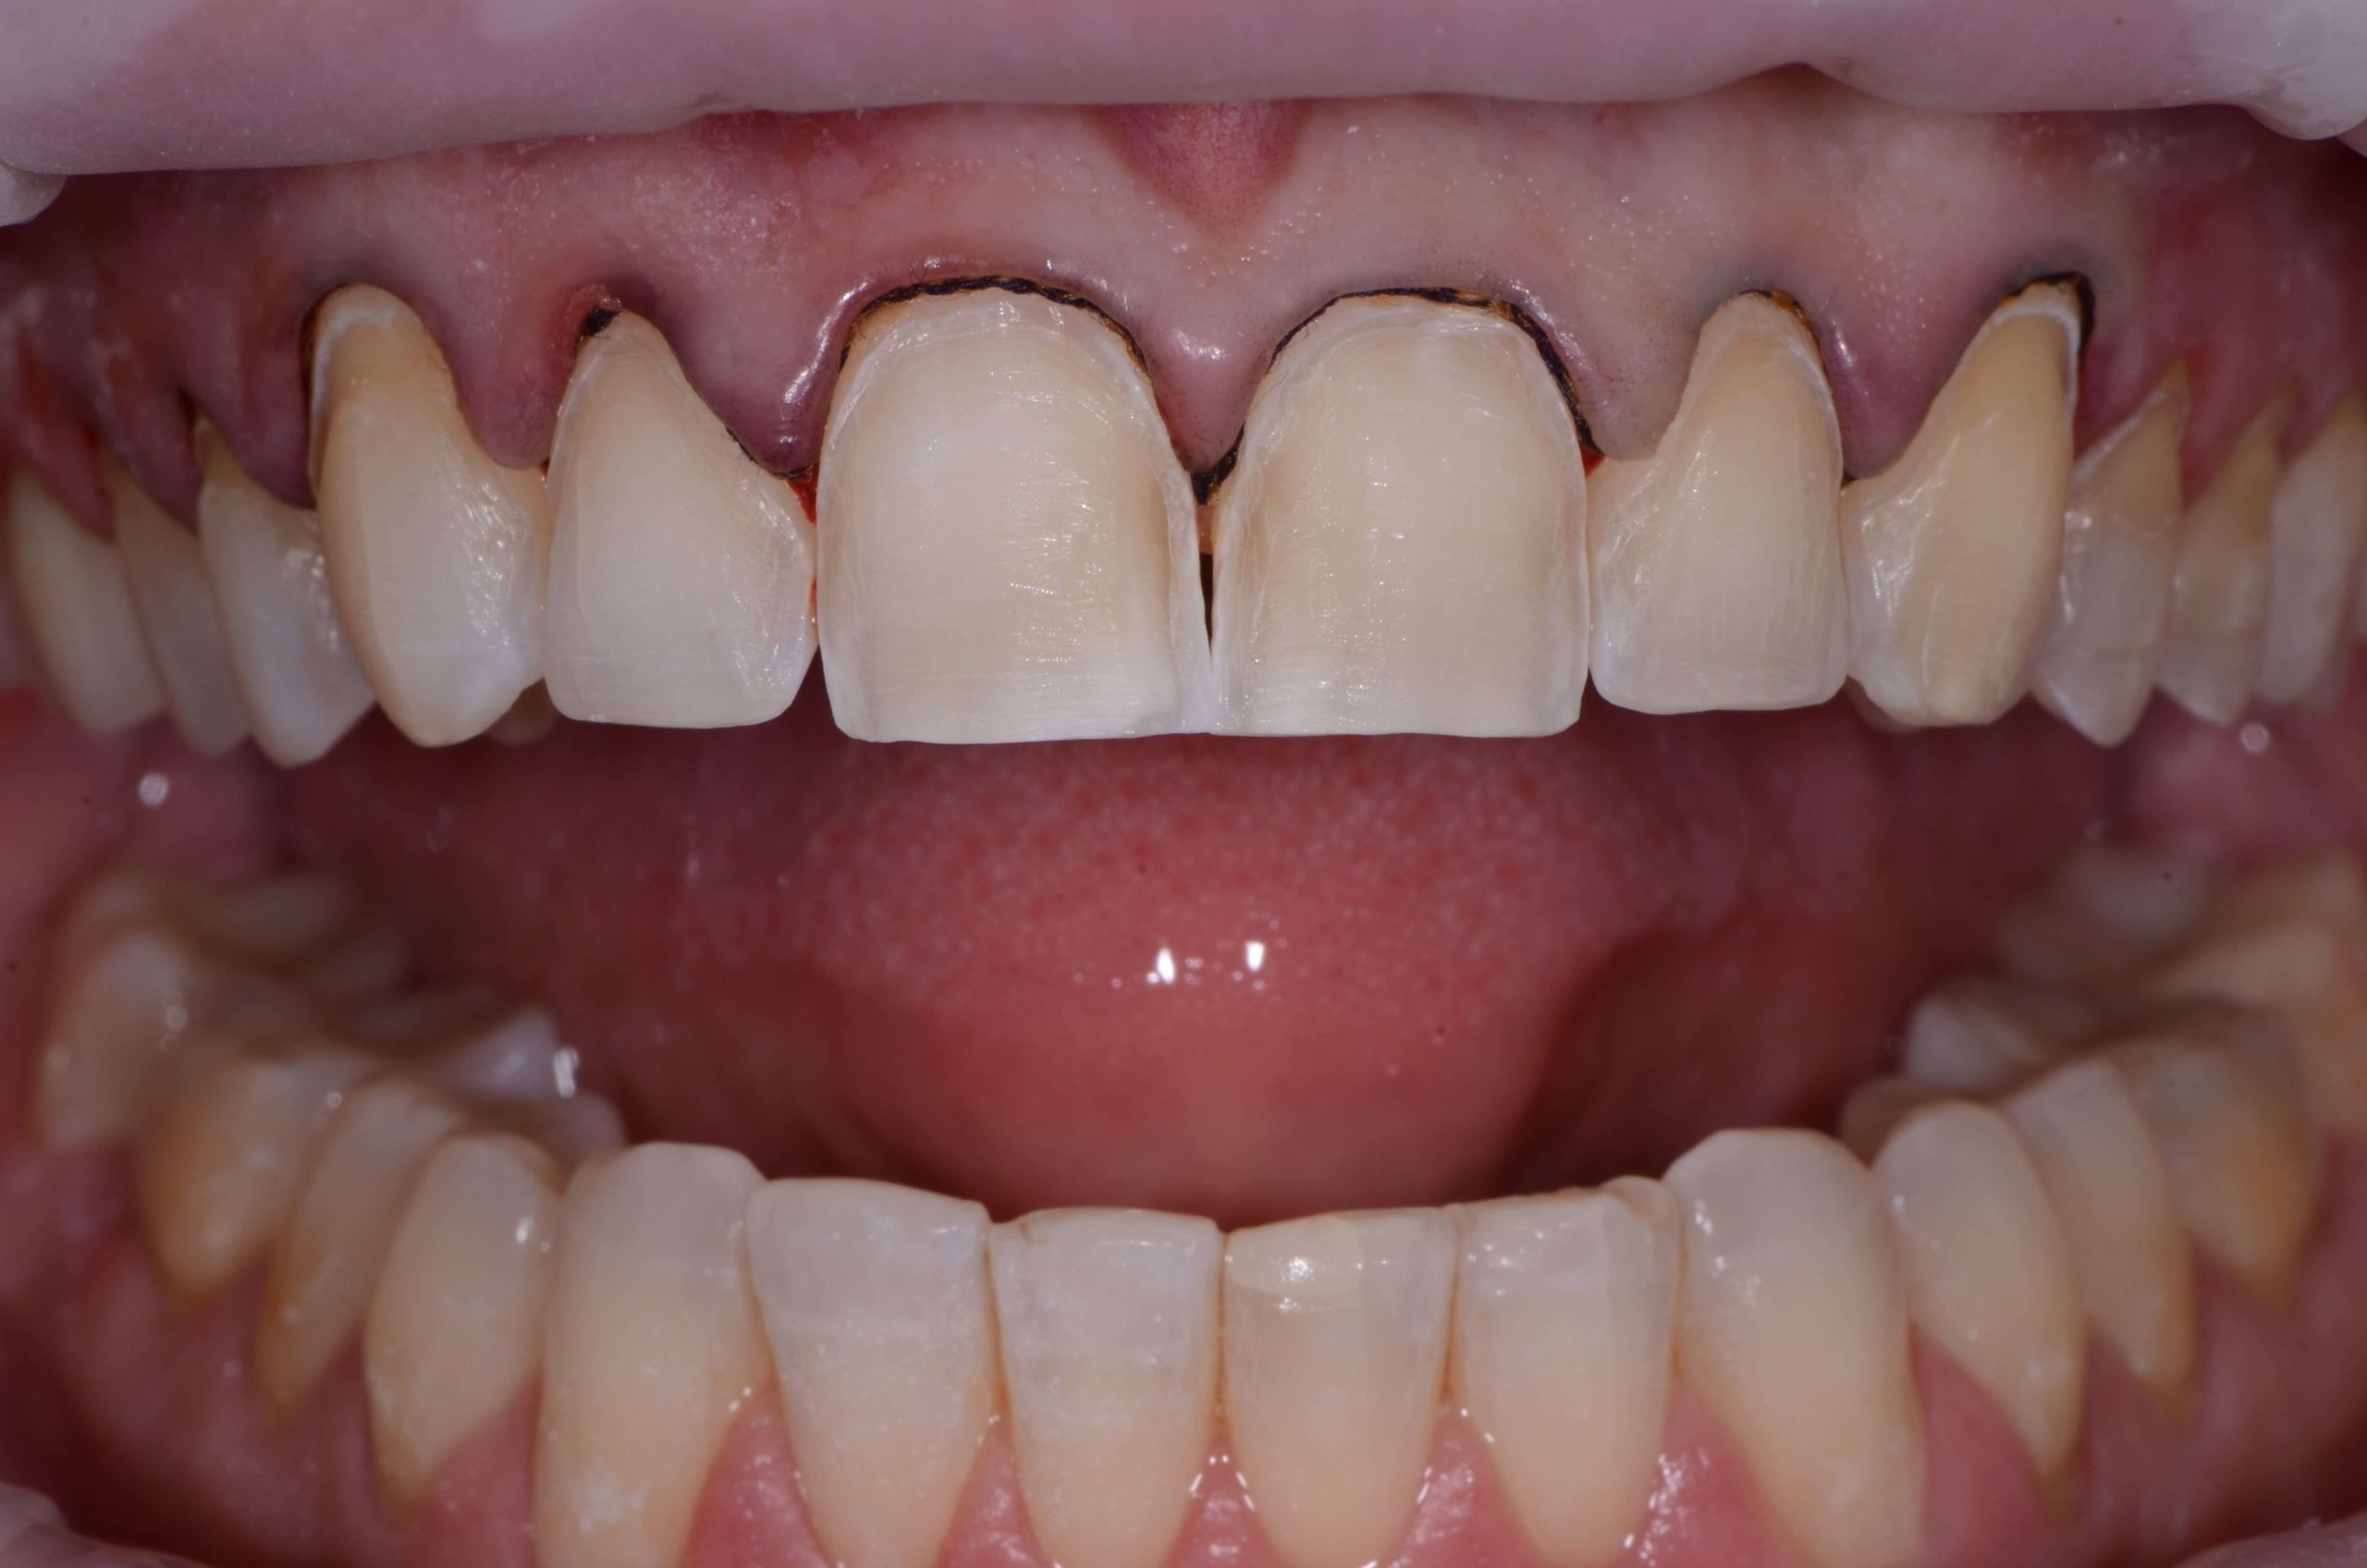
The first step of shrink wrap provisionals is to prepare the teeth. Let’s imagine you are dealing with a patient who experienced trauma such as breaking their teeth in a bicycle accident.

Before beginning the technique, make sure you have all the diagnostic records you need, including all prep records for the lab: facebow, opposing model, final impressions (maybe more than one) with good flash, etc. Once you provisionalize the teeth, it won’t be easy to get access to the preps again.

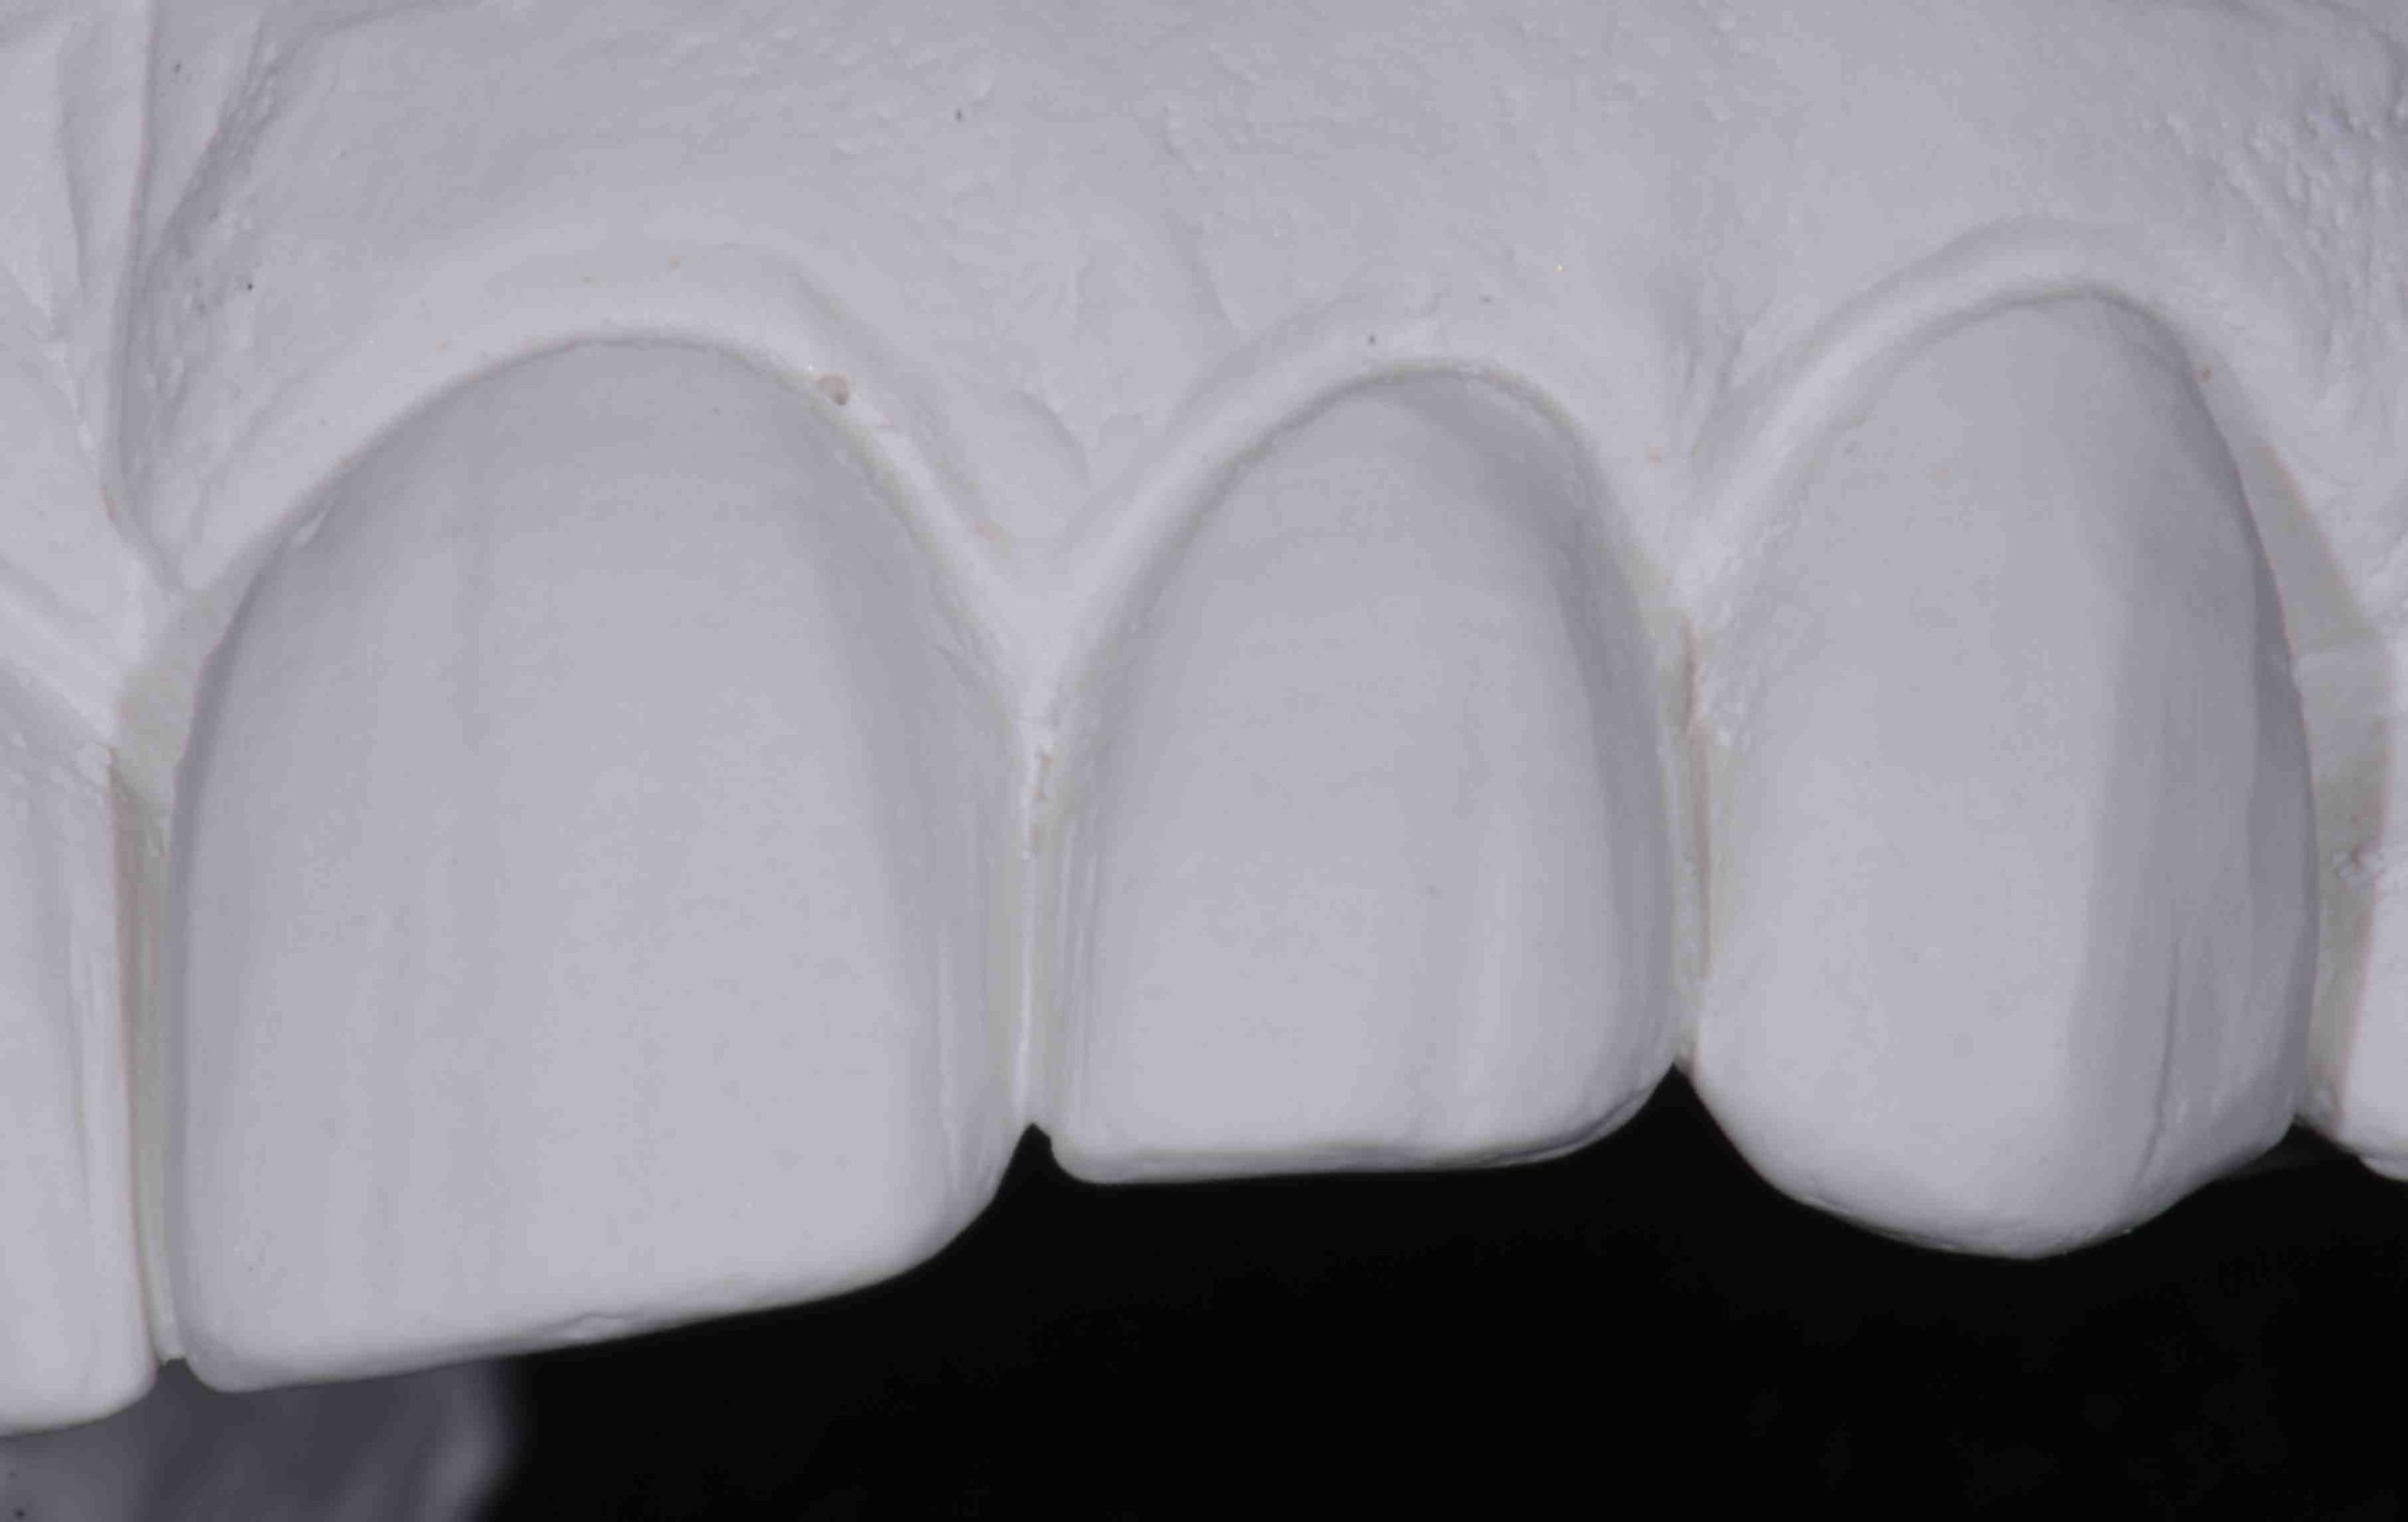
One of the essential parts of a shrink wrap provisional technique is fabrication of a silicone matrix with a silicone gasket to separate the excess. You should begin with a solid model either of the teeth before they are prepared or of the wax-up. You can carve a 1 mm deep trench into the wax-up by using the cleoid end of a cleoid/discoid.

Put the sharp pointy end right on the free gingival margin of the gingival of the tooth on the model to carve. You can even go a little deeper in the interproximals. Now take that model and fabricate a two stage silicone matrix.

First, create a putty matrix and trim it. Then, load the putty with the light body of the same impression system, reseat on the model, allow it to achieve a full set, and trim. Now you are ready to go to the patient and use lip retractors. Remember to add a little vaseline or lubricant to the lips for comfort.

At this point, I like to use the OptraGate from Ivoclar Vivadent for a latex free retraction device that can handle anything in the anterior. I will have it in during preparation and for impressions so I don’t have to hold the lip out of the way.

To be continued …


The Shrink Wrap Technique is taught in our hands on course Excellence in Bonded Porcelain.

Related Course

E2: Occlusal Appliances & Equilibration

DATE: August 10 2025 @ 8:00 am - August 14 2025 @ 2:30 pm

Location: The Pankey Institute

CE HOURS: 44

Dentist Tuition: $ 7400

Single Occupancy with Ensuite Private Bath (per night): $ 345

What if you had one tool that increased comprehensive case acceptance, managed patients with moderate to high functional risk, verified centric relation and treated signs and symptoms of TMD? Appliance…

Learn More>

About Author

User Image
Lee Ann Brady DMD

Dr. Lee Ann Brady is passionate about dentistry, her family and making a difference. She is a general dentist and owns a practice in Glendale, AZ limited to restorative dentistry. Lee’s passion for dental education began as a CE junkie herself, pursuing lots of advanced continuing education focused on Restorative and Occlusion. In 2005, she became a full time resident faculty member for The Pankey Institute, and was promoted to Clinical Director in 2006. Lee joined Spear Education as Executive VP of Education in the fall of 2008 to teach and coordinate the educational curriculum. In June of 2011, she left Spear Education, founded leeannbrady.com and joined the dental practice she now owns as an associate. Today, she teaches at dental meetings and study clubs both nationally and internationally, continues to write for dental journals and her website, sits on the editorial board of the Journal of Cosmetic Dentistry, Inside Dentistry and DentalTown Magazines and is the Director of Education for The Pankey Institute.

FIND A PANKEY DENTIST OR TECHNICIAN

I AM A
I AM INTERESTED IN

VIEW COURSE CALENDAR