The Surprising Impact of Flavored Topical Anesthetic

July 8, 2020 Lee Ann Brady DMD

When I bought my dental practice in Glendale, Arizona, eight years ago, they were offering patients a choice of flavors for topical anesthetic. I truthfully thought it was silly and that we would stop doing it. With experience, however, I came to realize that giving a choice was valuable for both patients and team members. Today we are still offering a choice of flavors.

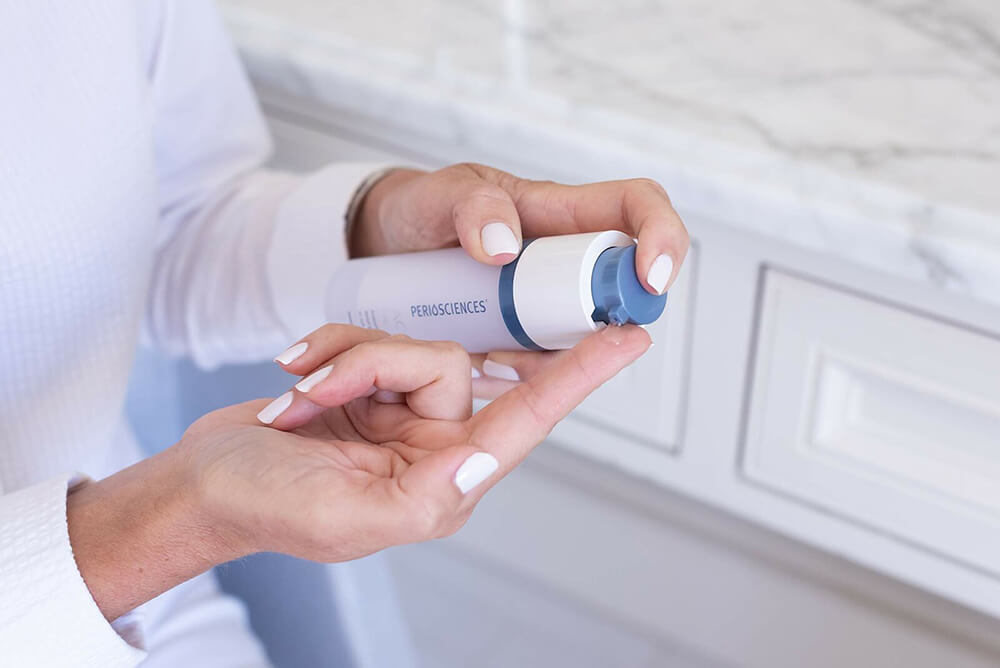
When a patient is seated, the dental assistant will say, “As you know, as part of the process for getting you numb, we will be using a topical anesthetic. We have five flavors and you get to tell me which flavor you would like to use today.”

It is really interesting to listen to the dialog, but also to realize what is happening for the patient. The choice gives the patient an opportunity to settle into a conversation and something to focus on other than that they will be getting an injection and the logistics of that.

The process almost creates a fun, quirky conversation, as the patient thinks about the choices. Sometimes patients say, “You choose, and I’ll guess which one it is. Let’s see if it really tastes like that.” When patients pose themselves this challenge, the whole time I am giving the injection, they are trying to figure out which flavor of topical we have used.

Sometimes patients ask, “Which flavor is your favorite?” or “What do other patients like most?” In this case, we talk about it.

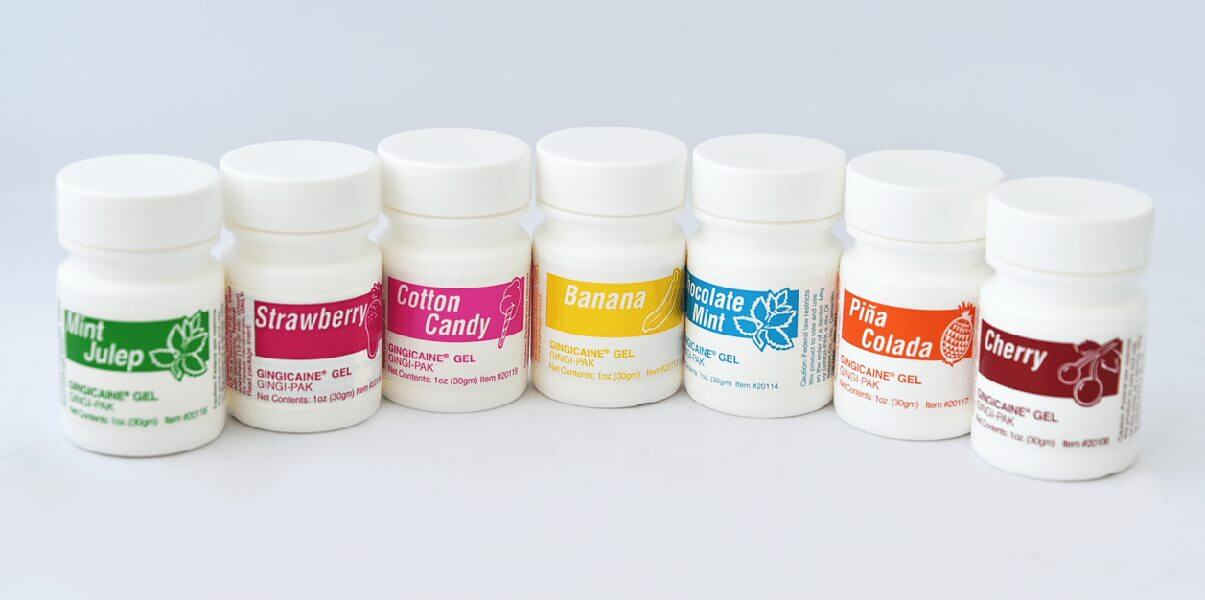
We have the mint flavors everyone else has but we also rotate in cherry, strawberry, bubble gum and pina colada. In summer, we offer watermelon. At any one time, we typically have five flavors and they vary throughout the year. A patient who has come in a few times, may even start the conversation with, “Do you have any new flavors for me to try today?”

One of my favorite conversations is whether the pina colada actually has rum in it and how funny it would be if we could just use the rum. An ice-breaker conversation such as this is a great way for us to ease the tension at the front end of an appointment that will require anesthetic. It truly adds an element of fun that has become for us a practice distinguisher.

Related Course

Mastering Treatment Planning

DATE: October 2 2025 @ 8:00 am - October 4 2025 @ 1:30 pm

Location: The Pankey Institute

CE HOURS:

Tuition: $ 4795

Single Occupancy with Ensuite Private Bath (per night): $ 345

 MASTERING TREATMENT PLANNING Course Description In our discussions with participants in both the Essentials and Mastery level courses, we continue to hear the desire to help establish better systems for…

Learn More>

About Author

User Image
Lee Ann Brady DMD

Dr. Lee Ann Brady is passionate about dentistry, her family and making a difference. She is a general dentist and owns a practice in Glendale, AZ limited to restorative dentistry. Lee’s passion for dental education began as a CE junkie herself, pursuing lots of advanced continuing education focused on Restorative and Occlusion. In 2005, she became a full time resident faculty member for The Pankey Institute, and was promoted to Clinical Director in 2006. Lee joined Spear Education as Executive VP of Education in the fall of 2008 to teach and coordinate the educational curriculum. In June of 2011, she left Spear Education, founded leeannbrady.com and joined the dental practice she now owns as an associate. Today, she teaches at dental meetings and study clubs both nationally and internationally, continues to write for dental journals and her website, sits on the editorial board of the Journal of Cosmetic Dentistry, Inside Dentistry and DentalTown Magazines and is the Director of Education for The Pankey Institute.

FIND A PANKEY DENTIST OR TECHNICIAN

I AM A
I AM INTERESTED IN

VIEW COURSE CALENDAR

Cleaning Dental Photography Mirrors

June 24, 2020 Lee Ann Brady DMD

It can be very frustrating to take a series of dental photos only to realize there were scratches or watermarks on the mirrors when you review the images later on a computer. Cleaning mirrors without damaging them can be a challenge.

I happen to like the [chromium or titanium] coated buccal, lingual, occlusal and anterior contact Intraoral Handle Mirrors from PhotoMed®. These feature a stainless steel handle that keeps fingertips out of the photograph. And, if your patient is cooperative, they can hold the mirror to free up your assistant. All of the handle mirrors from PhotoMed are single-sided, autoclavable, and can be cold sterilized.

In my practice, we try to protect our mirrors as much as possible from scratches, because once they happen, there is nothing you can do about it. Watermarks, on the other hand, can be eliminated and also cleaned away.

To avoid watermarks, we always wrap our mirrors in a paper towel before putting them in the autoclave bag. To clean away fingerprints and water spots, we use premoistened lens cleaning wipes that are designed for cleaning eyeglasses. They can be purchased in bulk, and we find them economical, efficient, and effective in cleaning our intraoral mirrors for crisp intraoral photo images. We keep a box in every operatory, where they do double duty in cleaning our eyeglasses and loupes.

Related Course

E2: Occlusal Appliances & Equilibration

DATE: June 22 2025 @ 8:00 am - June 26 2025 @ 2:30 pm

Location: The Pankey Institute

CE HOURS: 44

Dentist Tuition: $ 7400

Single Occupancy with Ensuite Private Bath (per night): $ 345

What if you had one tool that increased comprehensive case acceptance, managed patients with moderate to high functional risk, verified centric relation and treated signs and symptoms of TMD? Appliance…

Learn More>

About Author

User Image
Lee Ann Brady DMD

Dr. Lee Ann Brady is passionate about dentistry, her family and making a difference. She is a general dentist and owns a practice in Glendale, AZ limited to restorative dentistry. Lee’s passion for dental education began as a CE junkie herself, pursuing lots of advanced continuing education focused on Restorative and Occlusion. In 2005, she became a full time resident faculty member for The Pankey Institute, and was promoted to Clinical Director in 2006. Lee joined Spear Education as Executive VP of Education in the fall of 2008 to teach and coordinate the educational curriculum. In June of 2011, she left Spear Education, founded leeannbrady.com and joined the dental practice she now owns as an associate. Today, she teaches at dental meetings and study clubs both nationally and internationally, continues to write for dental journals and her website, sits on the editorial board of the Journal of Cosmetic Dentistry, Inside Dentistry and DentalTown Magazines and is the Director of Education for The Pankey Institute.

FIND A PANKEY DENTIST OR TECHNICIAN

I AM A
I AM INTERESTED IN

VIEW COURSE CALENDAR

I’ve Learned a Lot About Face Shields

June 17, 2020 Lee Ann Brady DMD

Most dentists have some stories about buying and trying different types of face shields as we have started to practice again. The challenges of fit, being comfortable and working with loupes are common conversations. I have tried six types to date with more on the way.

I started with “What can we get?” Then I moved on to “What will be the most comfortable and best on our loupes?”

I and my two hygienists wear loupes. I wear a 4.0x power, flip-up loupe. The hygienists wear 1.5x power loupes. In addition to the loupes, we wear a light.

We’ve tried face shields that hang from a visor. This is the kind my assistants love and wear all the time. However, this type of shield does not fit over my loupe. It fits over my hygienists’ loupes but by the end of the day, they have a headache from the pressure of the temple pieces on the visor.

We tried the disposable face shields that hang from a headband with foam padding. They did not fit over loupes.

A third type from Bio-Mask® turned out to be my hygienists’ favorite and the one I wear when I am doing a consult and not wearing my loupe. This type of visor frame has replaceable face shields. It is lightweight and comfortable (due to its weight, adjustable head strap, and foam padding), and it is designed to be worn with loupes. The replaceable shields can be washed with hot soapy water. The shields are designed to protect from splatter and spray that might come over the top of the visor, so you have full-face protection. I can wear it over my loupe by enlarging the headband and resting the front of the visor frame on my light.

Just recently I came across a different face shield designed to wear over dental loupes that I really like. It’s the PRO-TEX® extra-wide 13″x 7″ shield (model FSX). It clips directly onto the frame of my loupe. I wear eyeglasses, a face mask, my loupe with a light, and then clip the face shield to my loupe frame. This is the least pressure on my ears and temples that I have discovered. The shield can be washed between patients with warm soapy water.

I know a lot of people are praising loupe face shields from Ultra Light Optics®. I am looking forward to trying these when they come in because they are designed so you can mount your light outside the shield and not have to reach under the mask to flip down your light.

Related Course

Smile Design: The 7 Deadly Sins

DATE: August 9 2024 @ 8:00 am - August 10 2024 @ 3:00 pm

Location: The Pankey Institute

CE HOURS: 16

Regular Tuition: $ 2195

Single Occupancy with Ensuite Private Bath (per night): $ 290

Designing Smiles is What We Do! From direct to indirect restorative – to clear aligners – to interdisciplinary care – designing smiles is what we do. Those who understand and…

Learn More>

About Author

User Image
Lee Ann Brady DMD

Dr. Lee Ann Brady is passionate about dentistry, her family and making a difference. She is a general dentist and owns a practice in Glendale, AZ limited to restorative dentistry. Lee’s passion for dental education began as a CE junkie herself, pursuing lots of advanced continuing education focused on Restorative and Occlusion. In 2005, she became a full time resident faculty member for The Pankey Institute, and was promoted to Clinical Director in 2006. Lee joined Spear Education as Executive VP of Education in the fall of 2008 to teach and coordinate the educational curriculum. In June of 2011, she left Spear Education, founded leeannbrady.com and joined the dental practice she now owns as an associate. Today, she teaches at dental meetings and study clubs both nationally and internationally, continues to write for dental journals and her website, sits on the editorial board of the Journal of Cosmetic Dentistry, Inside Dentistry and DentalTown Magazines and is the Director of Education for The Pankey Institute.

FIND A PANKEY DENTIST OR TECHNICIAN

I AM A
I AM INTERESTED IN

VIEW COURSE CALENDAR

Dental Anesthetic Needles

May 28, 2020 Kelley Brummett DMD

In dental school most of us learned to use the same two sizes and lengths of dental anesthetic needles. Once I got out into practice and started to experiment with different sizes and lengths, I changed my protocol.

I discovered through my years of practice that I like to use an extra short 30 gauge needle that is 12 mm long for maxillary anesthetic injections and for mandibular injections that are premolars and forward. What I like about the extra short needle is that it does not bend. For these two types of anesthetic injections, the extra short needle is long enough and easier to control than the “short” one we learned to use in dental school. As a bonus, if a patient asks to see the needle, I usually hear them say, “Oh, that’s not so bad.”

On a mandibular block, I prefer to use a 27 gauge needle that is 25 mm long. What I like about this size is that it gets me to the depth I need and is easy to manipulate. Rarely do I need a longer needle that is more difficult to control.

Related Course

Pankey Scholar 15B

DATE: September 4 2025 @ 6:00 pm - September 6 2025 @ 3:00 pm

Location: The Pankey Institute

CE HOURS: 0

Dentist Tuition: $ 3495

Single Occupancy with Ensuite Private Bath (per night): $ 345

“A Pankey Scholar is one who has demonstrated a commitment to apply the principles, practices and philosophy they learned through their journey at The Pankey Institute.”   At its core,…

Learn More>

About Author

User Image
Kelley Brummett DMD

Dr. Kelley D. Brummett was born and raised in Missouri. She attended the University of Kansas on a full-ride scholarship in springboard diving and received honors for being the Big Eight Diving Champion on the 1 meter springboard in 1988 and in 1992. Dr. Kelley received her BA in communication at the University of Kansas and went on to receive her Bachelor of Science in Nursing. After practicing nursing, Dr Kelley Brummett went on to earn a degree in Dentistry at the Medical College of Georgia. She has continued her education at the Pankey Institute to further her love of learning and her pursuit to provide quality individual care. Dr. Brummett is a Clinical Instructor at Georgia Regents University and is a member of the American Academy of Cosmetic Dentistry. Dr. Brummett and her husband Darin have two children, Sarah and Sam. They have made Newnan their home for the past 9 years. In her free time, she enjoys traveling, reading and playing with her dogs. Dr. Brummett is an active member of the ADA, GDA, AGDA, and an alumni of the Pankey Institute.

FIND A PANKEY DENTIST OR TECHNICIAN

I AM A
I AM INTERESTED IN

VIEW COURSE CALENDAR

Reducing Aerosols Using OptraDam® Plus by Ivoclar

May 22, 2020 Lee Ann Brady DMD

In light of today’s heightened need to reduce aerosol viruses, weighing the benefit of using a rubber dam may outweigh the challenges of using one. But I have found a barrier solution that is easy to use, highly efficient for isolation and reduction of aerosols, and more patient-friendly. It is actually a rubber dam replacement called OptraDam® Plus from Ivoclar Vivadent.

For some time now it has been part of my restorative toolkit, because the isolation improves restorative outcomes and, once again…it is efficient, easy to use, and patient-friendly. I call it “the friendlier version of a rubber dam.”

OptraDam® Plus comes prepacked in two sizes, regular and small. It has a figure 8 OptraGate for holding the lips out of the way and has a solid rubber dam back that is pre-marked for where to punch the holes. It is easy to insert and more comfortable in place. Because it does not require a lot of retention, I can use it without a clamp. This means I do not have to deliver palatal anesthesia on the maxillary or long buccal anesthesia on the mandibular. This is much kinder and gentler for the patient. It does not come in a Latex-free version, but it is a barrier solution you may want to consider.

Related Course

E4: Posterior Reconstruction and Completing the Comprehensive Treatment Sequence

DATE: February 27 2025 @ 8:00 am - March 3 2025 @ 2:30 pm

Location: The Pankey Institute

CE HOURS: 44

Dentist Tuition: $ 7400

Single Occupancy with Ensuite Private Bath (per night): $ 345

THIS COURSE IS SOLD OUT The purpose of this course is to help you develop mastery with complex cases involving advanced restorative procedures, precise sequencing and interdisciplinary coordination. Building on…

Learn More>

About Author

User Image
Lee Ann Brady DMD

Dr. Lee Ann Brady is passionate about dentistry, her family and making a difference. She is a general dentist and owns a practice in Glendale, AZ limited to restorative dentistry. Lee’s passion for dental education began as a CE junkie herself, pursuing lots of advanced continuing education focused on Restorative and Occlusion. In 2005, she became a full time resident faculty member for The Pankey Institute, and was promoted to Clinical Director in 2006. Lee joined Spear Education as Executive VP of Education in the fall of 2008 to teach and coordinate the educational curriculum. In June of 2011, she left Spear Education, founded leeannbrady.com and joined the dental practice she now owns as an associate. Today, she teaches at dental meetings and study clubs both nationally and internationally, continues to write for dental journals and her website, sits on the editorial board of the Journal of Cosmetic Dentistry, Inside Dentistry and DentalTown Magazines and is the Director of Education for The Pankey Institute.

FIND A PANKEY DENTIST OR TECHNICIAN

I AM A
I AM INTERESTED IN

VIEW COURSE CALENDAR

SpeedCEM Plus: Techniques for Self-Adhesive Cementation

April 21, 2020 Lee Ann Brady DMD

SpeedCEM Plus is dual-cure self-adhesive resin cement from Ivoclar that has been designed to be used with restorations that have inherent mechanical retention. It can be used for most materials – all-metal restorations, zirconia oxide ceramics, or something in the lithium disilicate category. The material will fully pull MRIs on its own, but it can also be light-cured. It has great esthetics, low technique sensitivity from the standpoint of using the material, and great bond strength. It is easily cleaned up. 

Prepping the Internal Surface of the Restoration 

Oxide-based ceramic restorations are etched with air abrasion. Your laboratory can do this, or you can use between 30 and 50-micron aluminum oxide to air abrade the intaglio of the restoration. Confirm with your lab if they are going to be doing this. 

The internal surface of lithium disilicate based restorations is etched using chemistry. You can use hydrochloric acid at 5% for no more than 20 seconds, or you can use an Ivoclar Vivadent product called Monobond Etch & Prime for 60 seconds 

If you try in the restoration after it has been etched, as I like to do, then the restoration will need to be cleaned again before it is bonded. For this cleaning purpose, I use Ivoclar Vivadent’s IvocleanIt’s a phosphate-free restorative cleaning material that can be used on metal, oxide-based ceramic materials, and on lithium disilicate materials. I simply vigorously shake the bottle and apply Ivoclean for 20 to 30 seconds, rinse the restoration and dry it. I recommend using a clean air source for drying such as an Adec airline on your unit. 

If you are going to use metal ceramics or lithium disilicate, you now need to condition the inside of the restorative material. I use the product Monobond Plus, which is appropriate for all kinds of materials.  

If you are working with zirconia or an oxide-based ceramic, one of the advantages of SpeedCEM Plus is you do not have to do anything to the inside of the restoration other than the air abrasion and cleaning because the chemistry in the SpeedCEM Plus will prime or condition the inside of the zirconia restoration.  

Prepping the Prepared Tooth 

With SpeedCEM Plus, we do not need to do anything to the tooth prior to cementation other than cleaning the tooth. I like to clean the prepared tooth with light air abrasion and apply a 2% chlorhexidine solution to the prep and clean the tooth with a bristle brush in a slow-speed handpiece. 

SpeedCEM Plus Application & Cure 

After cleaning the prep, you can load the restoration with SpeedCEM Plus and seat the restorationSpeedCEM Plus comes with a mixing tip through which you express the adhesive.  

You now have two choices. You can hold the restoration in place with firm pressure and allow it to go to its self-cure mode which intraorally takes approximately 3 minutes. Alternatively, you can use your curing light to speed up the process.  

After I seat the restoration, I like to check the margins with an explore to make sure I have not had a mis-seat and then I pick up my curing light and, at a distance of 1 to 10 mm, I cure for one second at each line angle. We call this the quarter technique… mesial buccal one second, distal buccal one second, mesial lingual one second and distal lingual one second. I can now quickly go in and clean up all excess cement, making sure I get excess cement out of the interproximals. It’s important to cure on the line angles, not just buccal and lingual, or you will leave a lot of material that doesn’t reach the gel phase interproximally.     

Once all the excess material is cleaned off, I cover all of the margins with an oxygen barrierand I do a 20-second cure on each of the four line angles using the quarter technique. The patient is good to go once you check the occlusion. 

Notes 

  • SpeedCEM Plus comes in three shades 
  • It is designed to be capped in the refrigerator. Never remove the used mixing tip and put a new empty tip on as this would leave the base and catalyst at the ends of the barrel exposed to air. You can either replace the used mixing tip with the original manufacturer’s cap or leave the used mixing tip on and disinfect it just like you wipe your light-curing unit. I recommend you do the latter, as it decreases the risk of contaminating the resin and initiating the self-cure process in the barrel. 
  • Because the material is so versatile, you also can use it for placing your posts. 

Related Course

E1: Aesthetic & Functional Treatment Planning

DATE: August 22 2024 @ 8:00 am - August 25 2024 @ 2:30 pm

Location: The Pankey Institute

CE HOURS: 39

Dentist Tuition: $ 6500

Single Occupancy Room with Ensuite Bath (Per Night): $ 290

Transform your experience of practicing dentistry, increase predictability, profitability and fulfillment. The Essentials Series is the Key, and Aesthetic and Functional Treatment Planning is where your journey begins.  Following a system of…

Learn More>

About Author

User Image
Lee Ann Brady DMD

Dr. Lee Ann Brady is passionate about dentistry, her family and making a difference. She is a general dentist and owns a practice in Glendale, AZ limited to restorative dentistry. Lee’s passion for dental education began as a CE junkie herself, pursuing lots of advanced continuing education focused on Restorative and Occlusion. In 2005, she became a full time resident faculty member for The Pankey Institute, and was promoted to Clinical Director in 2006. Lee joined Spear Education as Executive VP of Education in the fall of 2008 to teach and coordinate the educational curriculum. In June of 2011, she left Spear Education, founded leeannbrady.com and joined the dental practice she now owns as an associate. Today, she teaches at dental meetings and study clubs both nationally and internationally, continues to write for dental journals and her website, sits on the editorial board of the Journal of Cosmetic Dentistry, Inside Dentistry and DentalTown Magazines and is the Director of Education for The Pankey Institute.

FIND A PANKEY DENTIST OR TECHNICIAN

I AM A
I AM INTERESTED IN

VIEW COURSE CALENDAR

Topical Antioxidants

March 17, 2020 Lee Ann Brady DMD

It used to be a challenge for me to help patients who came in with recurrent aphthous ulcers, lichen planus or erosive lichen planus, burning mouth, burning tongue, or geographic tongue that was uncomfortable. I’d worry about the pharmaceutical reactions of prescription options such as prednisone, steroid mouth rinses, and lidocaine rinses. Now, that challenge is greatly reduced due to the success we have had treating these problems with nonprescription topical antioxidants. 

There is a group of nonprescription topical antioxidant products that I rely on weekly from PerioSciences. These products not only promote healing but also provide significant relief from soft tissue pain, xerostomia, and burning sensations in the mouth. This is PerioSciences’ AO ProVantage line of mouthwashes, gel, and toothpasteThey are without a doubt the best products I have come across in my career for oral medicine applications. They were developed by dental scientists and other researchers and contain two antioxidants from the skin of apples. The products are marketed to help with a number of things in addition to oral wound healing, for example, to treat superficial gingivitis and to maintain patients who are at advanced risk of perio inflammation.  

In my practice, I have two patients who have chronic erosive lichen planus. We discovered that the application of the AO ProVantage gel to a lesion, four or more times a day, allows the body to heal the lesion. Within three to four weeks, the lesion is gone completely. After lesions are gone, my patients stop using the gel and start using AO ProRinse three to four times a day to prevent the outbreak of another erosive lesion. If they get another lesion, they go back to using the gel. The mouth rinse has reduced the number of outbreaks for these patients, and having these products on hand, has allowed my patients to successfully manage outbreaks on their own. 

I have lots of older patients who suffer with burning mouth or burning tongue. AO ProRinse mouth rinses have worked well for them. Some of my patients have severe dry mouth in association with the burning—some with Sjogren’s syndrome, some with Lupus disease. We start them on the hydrating formula of AO ProRinse, and they rinse their mouths four to six times a day with remarkable results. It’s also been of great value to my patients going through chemotherapy to keep their mouths hydrated and comfortable.  

The PerioSciences products are nonprescription and now readily available via AmazonOnce introduced to the products and given guidance, my patients have found it easy to determine when to start using the products and how often to use them. Topical antioxidants are just one more example of industry breakthroughs I am grateful to have in my clinical toolkit and widely available to patients.  

Related Course

Mastering Advanced Splint Therapy

DATE: June 26 2024 @ 8:00 am - June 29 2024 @ 1:00 pm

Location: The Pankey Institute

CE HOURS: 29

Regular Tuition: $ 5700

night with private bath: $ 290

This Course Is Sold Out! If you are ready to take what you know about appliance therapy to the next level, then this course is a must. The anatomic appliance…

Learn More>

About Author

User Image
Lee Ann Brady DMD

Dr. Lee Ann Brady is passionate about dentistry, her family and making a difference. She is a general dentist and owns a practice in Glendale, AZ limited to restorative dentistry. Lee’s passion for dental education began as a CE junkie herself, pursuing lots of advanced continuing education focused on Restorative and Occlusion. In 2005, she became a full time resident faculty member for The Pankey Institute, and was promoted to Clinical Director in 2006. Lee joined Spear Education as Executive VP of Education in the fall of 2008 to teach and coordinate the educational curriculum. In June of 2011, she left Spear Education, founded leeannbrady.com and joined the dental practice she now owns as an associate. Today, she teaches at dental meetings and study clubs both nationally and internationally, continues to write for dental journals and her website, sits on the editorial board of the Journal of Cosmetic Dentistry, Inside Dentistry and DentalTown Magazines and is the Director of Education for The Pankey Institute.

FIND A PANKEY DENTIST OR TECHNICIAN

I AM A
I AM INTERESTED IN

VIEW COURSE CALENDAR

LuxaCrown in Clinical Practice

March 9, 2020 Lee Ann Brady DMD

LuxaCrown is a new material that was released by DMG America last year. LuxaCrown is a dual cure composite material that comes in a convenient chair-side cartridge. Because it has the physical properties of composite, it is much stronger and longer lasting than bisacryl provisional material. The manufacturer says it can last in the oral environment up to five years, maybe longer. It is stainresistant and color stable, so you can leave it in the mouth for long periods without concern that the color will change. I though it would be helpful to share the situations in which I now use LuxaCrown instead of a bisacryl material for provisionals. 

Multi-Unit Restorations 

In my own practice, I don’t use LuxaCrown for single crown preps where the provisional will be in the mouth for a couple of weeks, perhaps a month, or a little more. But, the strength of LuxaCrown and the color stability of this new composite material make it what I consider to be an incredible new clinical tool in my practice to provisionalize multiple units where there is pontic space. With LuxaCrown, I no longer need to reinforce the pontic with Ribbond or orthodontic wire. I don’t have to do anything to make sure we don’t get fracture at the connectors, because the material is strong enough and durable enough it to hold up, even long term.  

Anterior Veneers 

The other situation in which I use LuxaCrown routinely is with my shrink wrapped provisionals for anterior veneers. The strength of the material makes it more durable in a partial coverage anterior setting. And the color stability is appealing because the veneer may be in provisional for two months or three months, depending on how long it takes us to get patient approved provisionals for shape and contour that the patient really loves. Not having to worry about the color changing over time has been a huge bonus.  

Anterior Onlays 

Another situation in which I am using LuxaCrown is for partial coverage onlays in the posterior. So often we experience bisacryl onlay provisionals popping off the teeth, but LuxaCrown provisionals stay where you put them.    

Phased Dentistry 

And, I use LuxaCrown whenever I am phasing dentistry…when I am doing what I call “interim restorations” and the provisional restorations will be in the mouth multiple months before the patient receives ceramic restorations. Perhaps, the patient will be in provisionals six to 24 months while they go through orthodontics and we do final restorations in quadrants or even sextants of the mouth. Patients don’t mind having LuxaCrown in their mouths for long periods, because in addition to its stability, it polishes pristinely smooth and is glossy.   

Related Course

Utilizing Clear Aligner Therapy in a Digital Workflow

DATE: September 26 2024 @ 6:00 pm - September 28 2024 @ 2:00 pm

Location: The Pankey Institute

CE HOURS: 0

Dentist Tuition: $ 1695

Single Occupancy with Ensuite Private Bath (per night): $ 290

Enhance Restorative Outcomes This one-and-a-half-day course is designed for Invisalign providers who want to improve restorative outcomes with clear aligner therapy. The course focuses on the digital workflow for comprehensive…

Learn More>

About Author

User Image
Lee Ann Brady DMD

Dr. Lee Ann Brady is passionate about dentistry, her family and making a difference. She is a general dentist and owns a practice in Glendale, AZ limited to restorative dentistry. Lee’s passion for dental education began as a CE junkie herself, pursuing lots of advanced continuing education focused on Restorative and Occlusion. In 2005, she became a full time resident faculty member for The Pankey Institute, and was promoted to Clinical Director in 2006. Lee joined Spear Education as Executive VP of Education in the fall of 2008 to teach and coordinate the educational curriculum. In June of 2011, she left Spear Education, founded leeannbrady.com and joined the dental practice she now owns as an associate. Today, she teaches at dental meetings and study clubs both nationally and internationally, continues to write for dental journals and her website, sits on the editorial board of the Journal of Cosmetic Dentistry, Inside Dentistry and DentalTown Magazines and is the Director of Education for The Pankey Institute.

FIND A PANKEY DENTIST OR TECHNICIAN

I AM A
I AM INTERESTED IN

VIEW COURSE CALENDAR

A Fantastic New Temporary Cement

October 4, 2019 Lee Ann Brady DMD

The search for temporary cements has been a long one over the last decade as my practice has moved away from porcelain fused to metal full coverage as the “go to” indirect restoration. The difference in mechanical retention, aesthetics and final placement protocols places different demands on our temporary cements. There are quite a number of criteria we want out of a temporary cement, and finding it all in one product was the challenge.

  • Great Retention
  • Easy to Remove
  • Easy to Clean the Prep
  • Eugenol Free
  • Easy to Clean Excess During Cementation
  • Esthetic/Translucent
  • No Sensitivity
  • Doesn’t grow black Scuz

Having played with many of the temporary cements on the market there are many that meet most of the criteria, but I hadn’t gotten everything I wanted until I started to use TempoCem ID from DMG America.

Why I am so pleased with TempoCem ID:
  • It is a resin-based temporary cement that actually changes from slightly opaque to translucent when you move through the curing process.
  • The initial opacity that remains — even at the gel phase, makes cleaning away the excess very easy.
  • Once all the excess has been cleaned off, a final cure takes you to fantastic retention and a beautifully esthetic cement.
  • The chemistry allows you to place the final restoration without worry of incompatibility with adhesive or traditional cement systems.

Whether for full or partial coverage TempoCem ID has become the temporary cement of preference in my office.


Related Course

E3: Restorative Integration of Form & Function

DATE: October 5 2025 @ 8:00 am - October 9 2025 @ 2:30 pm

Location: The Pankey Institute

CE HOURS: 41

Dentist Tuition: $ 7400

Single Occupancy with Ensuite Private Bath (per night): $ 345

Understanding that “form follows function” is critical for knowing how to blend what looks good with what predictably functions well. E3 is the phase of your Essentials journey in which…

Learn More>

About Author

User Image
Lee Ann Brady DMD

Dr. Lee Ann Brady is passionate about dentistry, her family and making a difference. She is a general dentist and owns a practice in Glendale, AZ limited to restorative dentistry. Lee’s passion for dental education began as a CE junkie herself, pursuing lots of advanced continuing education focused on Restorative and Occlusion. In 2005, she became a full time resident faculty member for The Pankey Institute, and was promoted to Clinical Director in 2006. Lee joined Spear Education as Executive VP of Education in the fall of 2008 to teach and coordinate the educational curriculum. In June of 2011, she left Spear Education, founded leeannbrady.com and joined the dental practice she now owns as an associate. Today, she teaches at dental meetings and study clubs both nationally and internationally, continues to write for dental journals and her website, sits on the editorial board of the Journal of Cosmetic Dentistry, Inside Dentistry and DentalTown Magazines and is the Director of Education for The Pankey Institute.

FIND A PANKEY DENTIST OR TECHNICIAN

I AM A
I AM INTERESTED IN

VIEW COURSE CALENDAR

Capturing an Exquisite Crown & Bridge Impression

August 28, 2019 Lee Ann Brady DMD

Capturing an exquisite final impression is our goal every time. Getting this result can be one of the most challenging things we do in dentistry. In addition to being masterful in taking an impression and handling the materials, we also must manage the oral environment properly.

Improving the Gingival Tissue Prior to the Impression Appointment

For crown and bridge impressions this process has to begin with optimal tissue management, and tissue management always begins before tooth preparation. Old restorations with poor margins often compromise hygiene with resultant irritated and inflamed gingival tissues. If the tissue is inflamed at the time, we recommend the tooth be crowned, we apply chlorhexidine varnish (Cervitec Plus – Ivoclar Vivadent). When the patient returns for impressions, tissue health is vastly improved.

Managing the Gingival Tissue for Tooth Preparation

Tooth preparation itself can result in difficulty managing the tissue. My preference is always to leave margins supragingival if that is clinically appropriate. My second choice is equigingival, where the margins are right at the crest of the tissue. If the margins are to be placed subgingival, I want to avoid cutting the tissue and then having to manage bleeding. If my initial margin placement is equigingival, I place a primary cord to move the tissue out of the way. This allows me to now drop the margin subgingival with minimal trauma to the tissue.

Retraction of the Gingival Tissue for the Impression

Once tooth preparation is complete, retraction creates a space for the impression material to go past the margin apically so that we can create the proper emergence profile of the restoration. There are many ways to retract prior to an impression. I personally use a second or top cord with a larger diameter than the primary cord I placed to move the tissue for subgingival preparation. If the tissue is bleeding after the placement of the top cord, I place 3M’s “Retraction paste” as a hemostatic agent. This allows for optimal control of bleeding without worry of negatively impacting the set of my impression materials or staining the prep or gingival tissues.

Taking the Final Impression

The final impression is taken with Flexitime impression material (Kulzer). I have my assistant load the tray with heavy body material. I first wet the top cord, so I do not cause bleeding upon removal. The area is now thoroughly dried to allow for proper contact of the impression material to the tooth and tissue surfaces. I inject Flexitime CorrectFlow (Kulzer) and then seat the impression tray. I hold the tray for the full intra-oral set time and do not allow patients to close or bite on the tray, as movement can negatively impact the accuracy of the impression.

Is the impression perfect?

Once removed I inspect the impression using magnification to assess that I have adequate flash beyond the margins of the light body, no pulls, voids, drags or evidence that the impression moved. There is no way to correct an impression for errors. If errors occur, we repeat the process from the beginning to take a new impression.

Check out some of my short videos about impressions on Restorative Nation at https://restorativenation.com/?s=impression.

Related Course

Compromise to Co-Discovery: A Treatment Planning Journey

DATE: December 5 2024 @ 8:00 am - December 7 2024 @ 1:00 pm

Location: The Pankey Institute

CE HOURS: 21

Regular Tuition: $ 2895

Single Occupancy with Ensuite Private Bath (per night): $ 290

The Balance of Communication, Case Planning & Occlusion Dr. Melkers always brings a unique perspective to his workshops and challenges us to the way we think. At Compromise to Co-Discovery,…

Learn More>

About Author

User Image
Lee Ann Brady DMD

Dr. Lee Ann Brady is passionate about dentistry, her family and making a difference. She is a general dentist and owns a practice in Glendale, AZ limited to restorative dentistry. Lee’s passion for dental education began as a CE junkie herself, pursuing lots of advanced continuing education focused on Restorative and Occlusion. In 2005, she became a full time resident faculty member for The Pankey Institute, and was promoted to Clinical Director in 2006. Lee joined Spear Education as Executive VP of Education in the fall of 2008 to teach and coordinate the educational curriculum. In June of 2011, she left Spear Education, founded leeannbrady.com and joined the dental practice she now owns as an associate. Today, she teaches at dental meetings and study clubs both nationally and internationally, continues to write for dental journals and her website, sits on the editorial board of the Journal of Cosmetic Dentistry, Inside Dentistry and DentalTown Magazines and is the Director of Education for The Pankey Institute.

FIND A PANKEY DENTIST OR TECHNICIAN

I AM A
I AM INTERESTED IN

VIEW COURSE CALENDAR