Planning Where The Pink Should Be
When we identify patients, whose dental esthetics has been negatively impacted by altered passive eruption, our treatment plans are apt to include altering the gingival esthetics. One of the things we are tasked with is determining where we want the tissue to be.
We start by determining if the incisal edge is correctly positioned in the face.
For example, by looking at a lips at rest photograph and a full face image for my patient with altered passive eruption, we can see that the patient’s incisal edges are correctly positioned. If they were not properly positioned, we would next plan the position for the incisal edges.
Tooth proportion becomes the next building block in the planning puzzle. We know that beautiful anterior teeth are usually between 70-80% width to length ratio. This variability allows us to accommodate other clinical considerations, as well as patient preference. As a starting point, I begin with 75% and then look at the other parameters.
If the patient has excessive gingival display, and one of the hoped for outcomes is to minimize the amount of gingiva, we can alter the drawing to increase the length and then evaluate the esthetic result. On the other hand, if there is excessive sulcus depth, we can place the proposed gingival margin within the confines of the sulcus and assess the esthetic result.

Patient Involvement
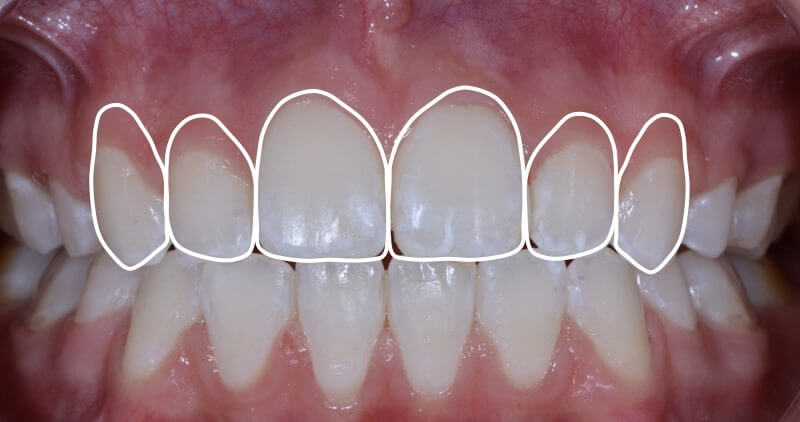
I create template drawings, like the one below, in Keynote on my Mac computer, but drawings also can be done in PowerPoint. I then sit down with my patient, insert a retracted teeth apart patient photo behind the drawing, and together we move the lines until the patient is happy with where the pink will be.

Once we have the final proposal, the next step is to determine the possible treatment options to gain the intended result. The information can easily be transferred to a wax-up or used to create a snap on trial smile.
How to Create and Use Templates
In Keynote or PowerPoint, take a retracted teeth apart photo of a beautiful, near perfect smile. Put it into the presentation software. Blow the image up to 200%. Using the free form drawing tool, trace the outline of the upper six anteriors. Take the photo out and save the presentation as a named template.key or template.ppt file.
When you want to do proposal drawings with your patient, open up the template, insert the patient’s photo and save the file with the patient’s name. You can copy and paste the tooth outlines onto any of the patient’s photos to propose gingival changes. If you pre-draw and save outline templates for various tooth sizes (ratios), you can quickly show options to your patient.
Related Course
E1: Aesthetic & Functional Treatment Planning
DATE: December 10 2025 @ 8:00 am - December 13 2025 @ 2:30 pmLocation: The Pankey Institute
CE HOURS: 39
Dentist Tuition: $ 6800
Single Occupancy with Ensuite Private Bath (Per Night): $ 345
Transform your experience of practicing dentistry, increase predictability, profitability and fulfillment. The Essentials Series is the Key, and Aesthetic and Functional Treatment Planning is where your journey begins. Following a system of…
Learn More>


