Capturing an Exquisite Crown & Bridge Impression
Capturing an exquisite final impression is our goal every time. Getting this result can be one of the most challenging things we do in dentistry. In addition to being masterful in taking an impression and handling the materials, we also must manage the oral environment properly.
Improving the Gingival Tissue Prior to the Impression Appointment
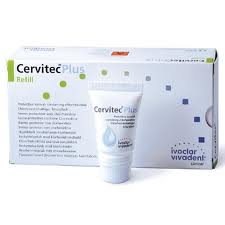
For crown and bridge impressions this process has to begin with optimal tissue management, and tissue management always begins before tooth preparation. Old restorations with poor margins often compromise hygiene with resultant irritated and inflamed gingival tissues. If the tissue is inflamed at the time, we recommend the tooth be crowned, we apply chlorhexidine varnish (Cervitec Plus – Ivoclar Vivadent). When the patient returns for impressions, tissue health is vastly improved.
Managing the Gingival Tissue for Tooth Preparation
Tooth preparation itself can result in difficulty managing the tissue. My preference is always to leave margins supragingival if that is clinically appropriate. My second choice is equigingival, where the margins are right at the crest of the tissue. If the margins are to be placed subgingival, I want to avoid cutting the tissue and then having to manage bleeding. If my initial margin placement is equigingival, I place a primary cord to move the tissue out of the way. This allows me to now drop the margin subgingival with minimal trauma to the tissue.
Retraction of the Gingival Tissue for the Impression
Once tooth preparation is complete, retraction creates a space for the impression material to go past the margin apically so that we can create the proper emergence profile of the restoration. There are many ways to retract prior to an impression. I personally use a second or top cord with a larger diameter than the primary cord I placed to move the tissue for subgingival preparation. If the tissue is bleeding after the placement of the top cord, I place 3M’s “Retraction paste” as a hemostatic agent. This allows for optimal control of bleeding without worry of negatively impacting the set of my impression materials or staining the prep or gingival tissues.
Taking the Final Impression
The final impression is taken with Flexitime impression material (Kulzer). I have my assistant load the tray with heavy body material. I first wet the top cord, so I do not cause bleeding upon removal. The area is now thoroughly dried to allow for proper contact of the impression material to the tooth and tissue surfaces. I inject Flexitime CorrectFlow (Kulzer) and then seat the impression tray. I hold the tray for the full intra-oral set time and do not allow patients to close or bite on the tray, as movement can negatively impact the accuracy of the impression.
Is the impression perfect?
Once removed I inspect the impression using magnification to assess that I have adequate flash beyond the margins of the light body, no pulls, voids, drags or evidence that the impression moved. There is no way to correct an impression for errors. If errors occur, we repeat the process from the beginning to take a new impression.
Check out some of my short videos about impressions on Restorative Nation at https://restorativenation.com/?s=impression.
Related Course
E1: Aesthetic & Functional Treatment Planning at the Washington Academy of General Dentistry
DATE: January 29 2026 @ 8:00 am - February 1 2026 @ 2:30 pmLocation: Washington Academy of General Dentistry
CE HOURS: 32
Transform your experience of practicing dentistry, increase predictability, profitability and fulfillment. The Essentials Series is the Key, and Aesthetic and Functional Treatment Planning is where your journey begins. Following a system of…
Learn More>


